Tag: Cape Town

  • Oatmeal and mushroom risotto

    Oatmeal and mushroom risotto

    This week, Woolworths had finally launched Steel cut oats in their stores, as you can imagine the excitement was palpable  with so many foodies patiently waiting for it to hit our shores! Steel cut oats are different from regular rolled oats, instant oats, and quick cook oats, in that it is processed in different ways. Steel cut oats are toasted groats that are coarsely chopped into small pieces, and have a chewy texture and nutty flavour. Of all the variation of oats, steel cut oats take the longest time to cook, approximately 20-30 minutes, you can of course reduce the cooking time by soaking the oats overnight. 
    This recipe is adapted from the Savoury oatmeal risotto recipe from Geoffrey Zakarian, spotted on an episode of The kitchen. I love the unusual idea of savoury oats, as opposed to the accepted norm of oats, I.e honey drizzled oats, topped with fresh fruit or poached fruit, or simply sprinkled with brown sugar and dusted with cinnamon. I’m crazy about mushrooms, and always love experimenting with different kinds and variations. I added dried porcini to the chicken stock to add the extra kick of umami and meatiness to the risotto, added chopped shiitake mushrooms for added texture and flavour. 

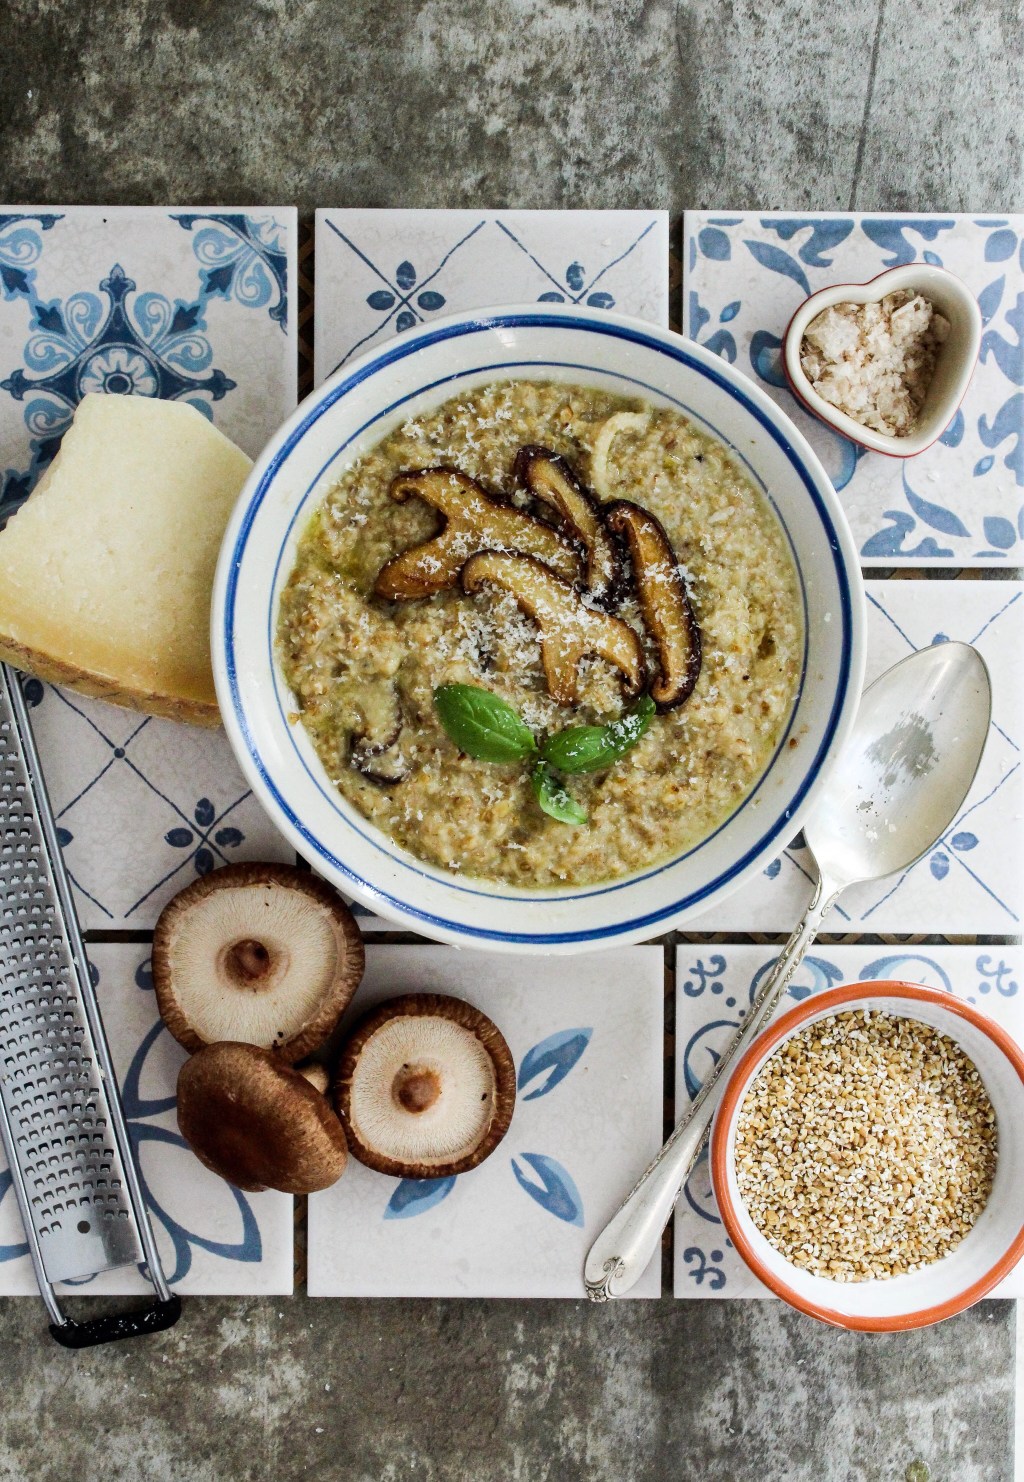
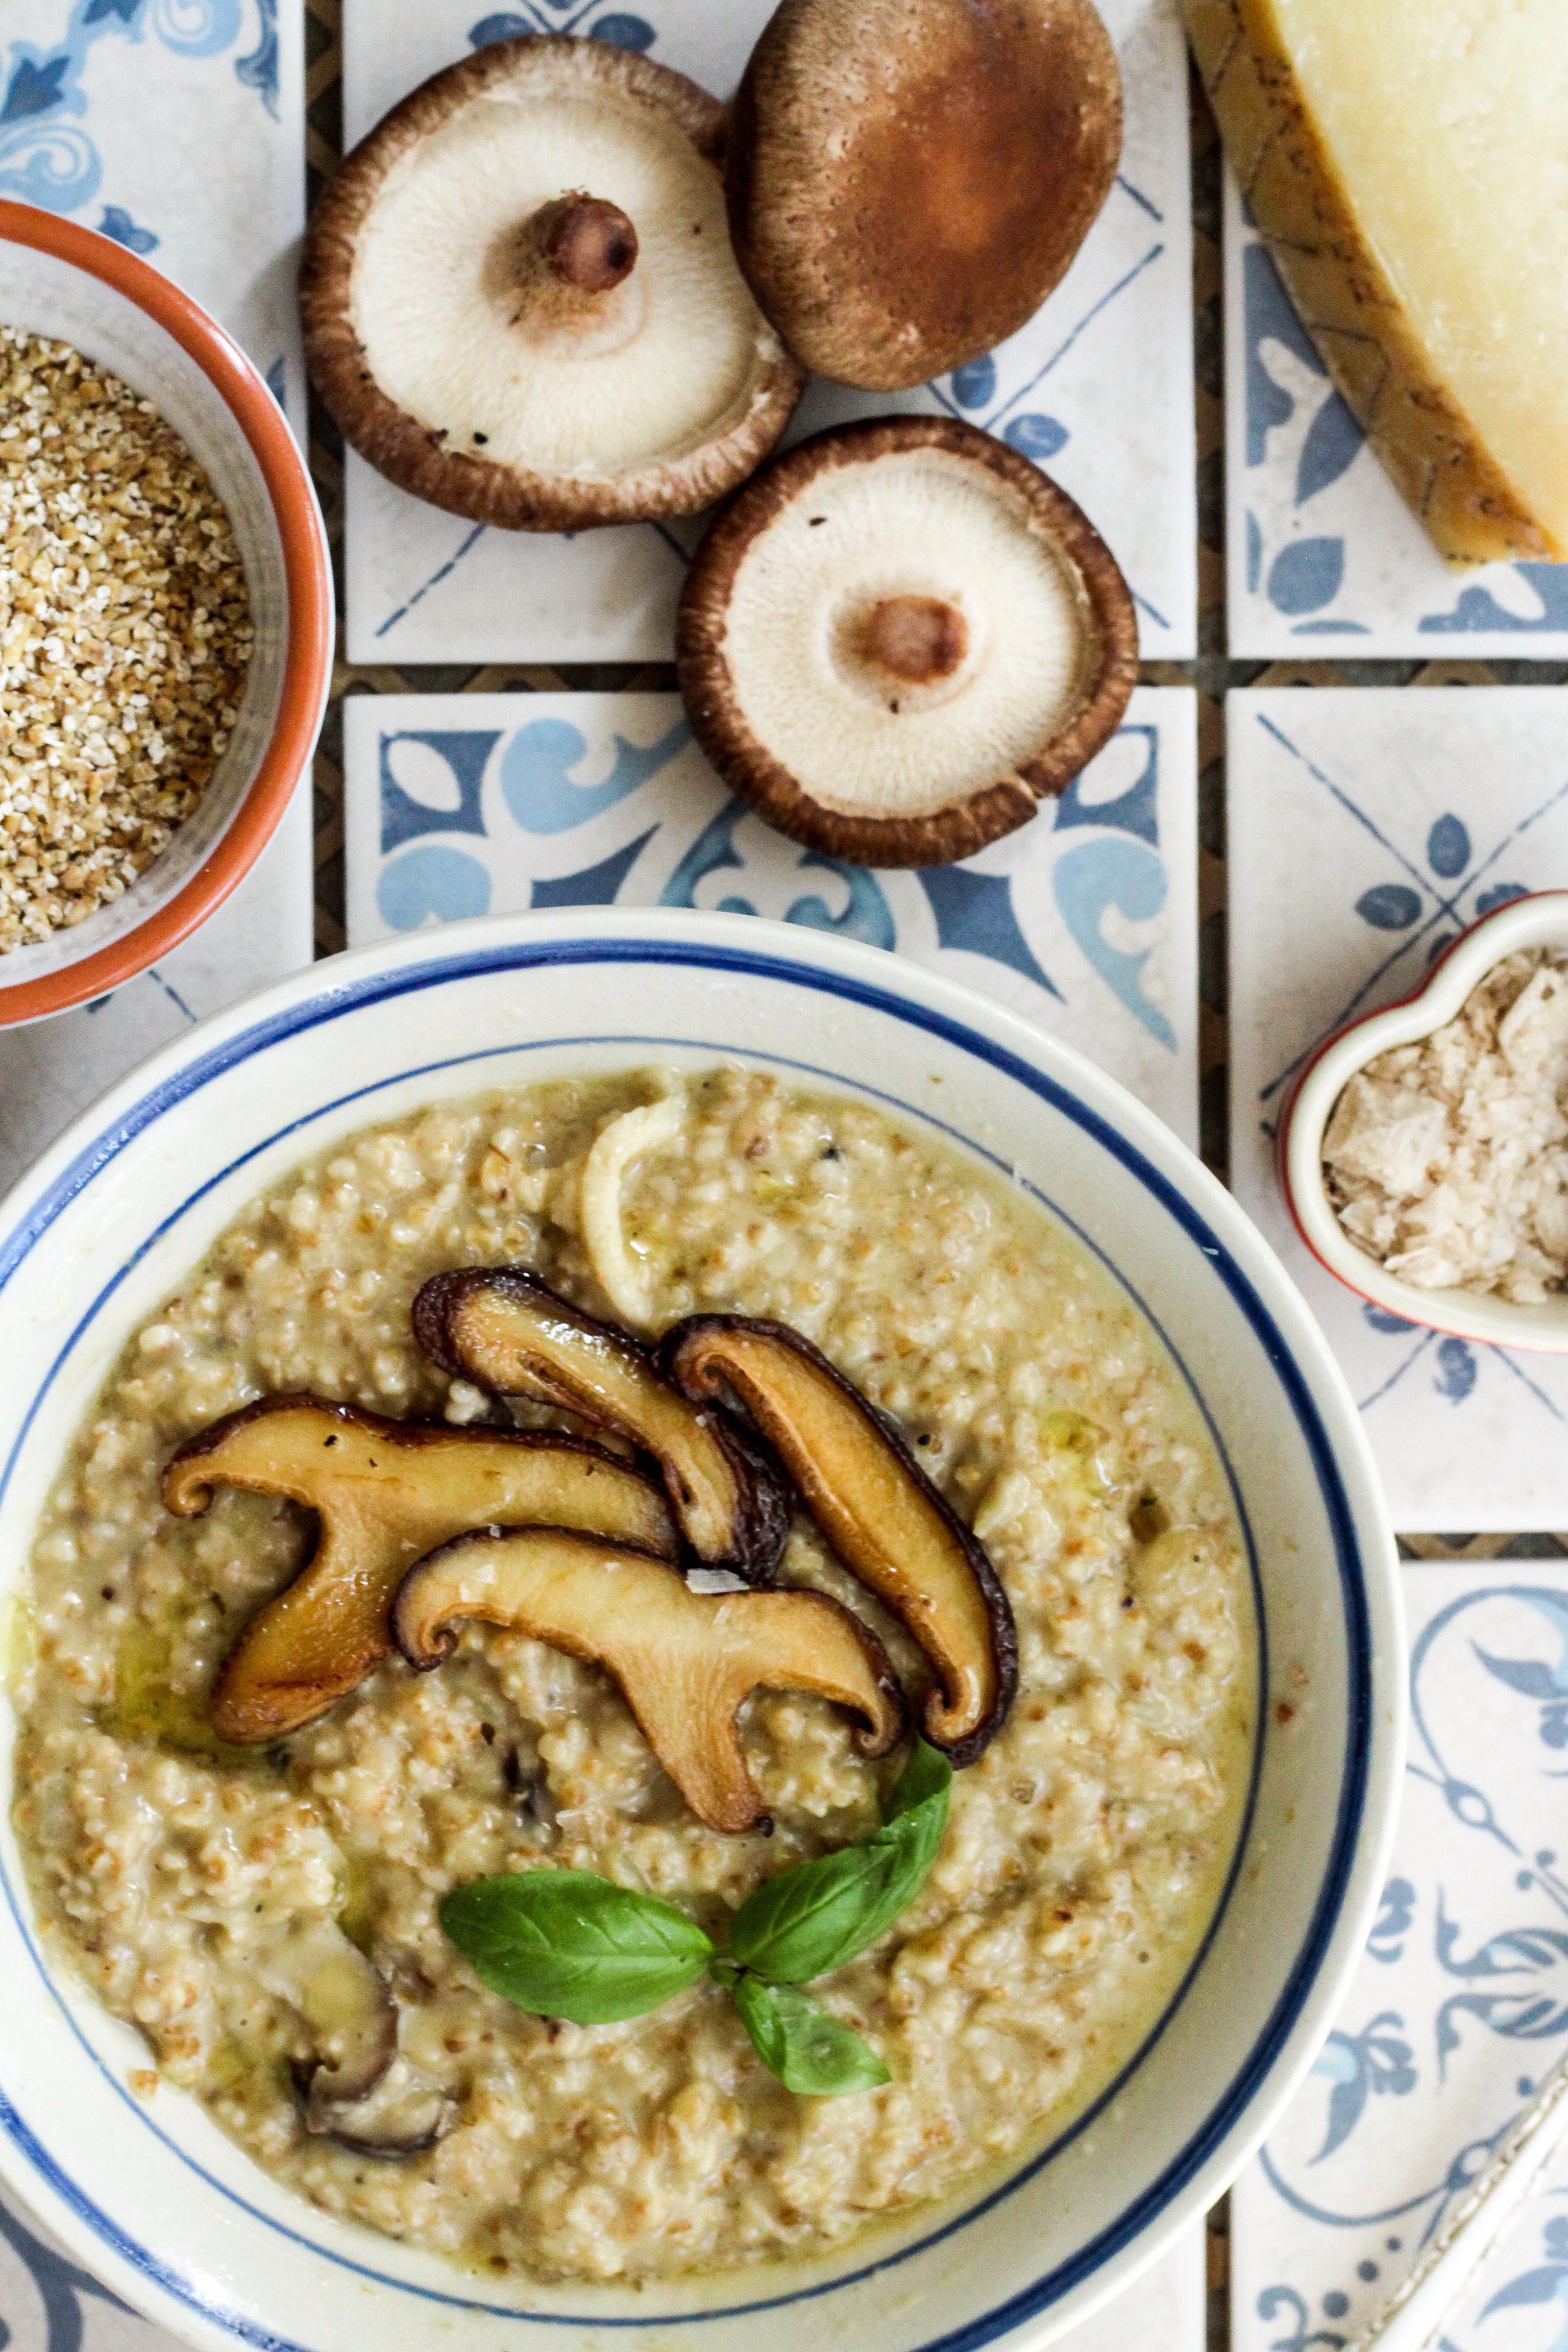
    Oatmeal and mushroom risotto. 
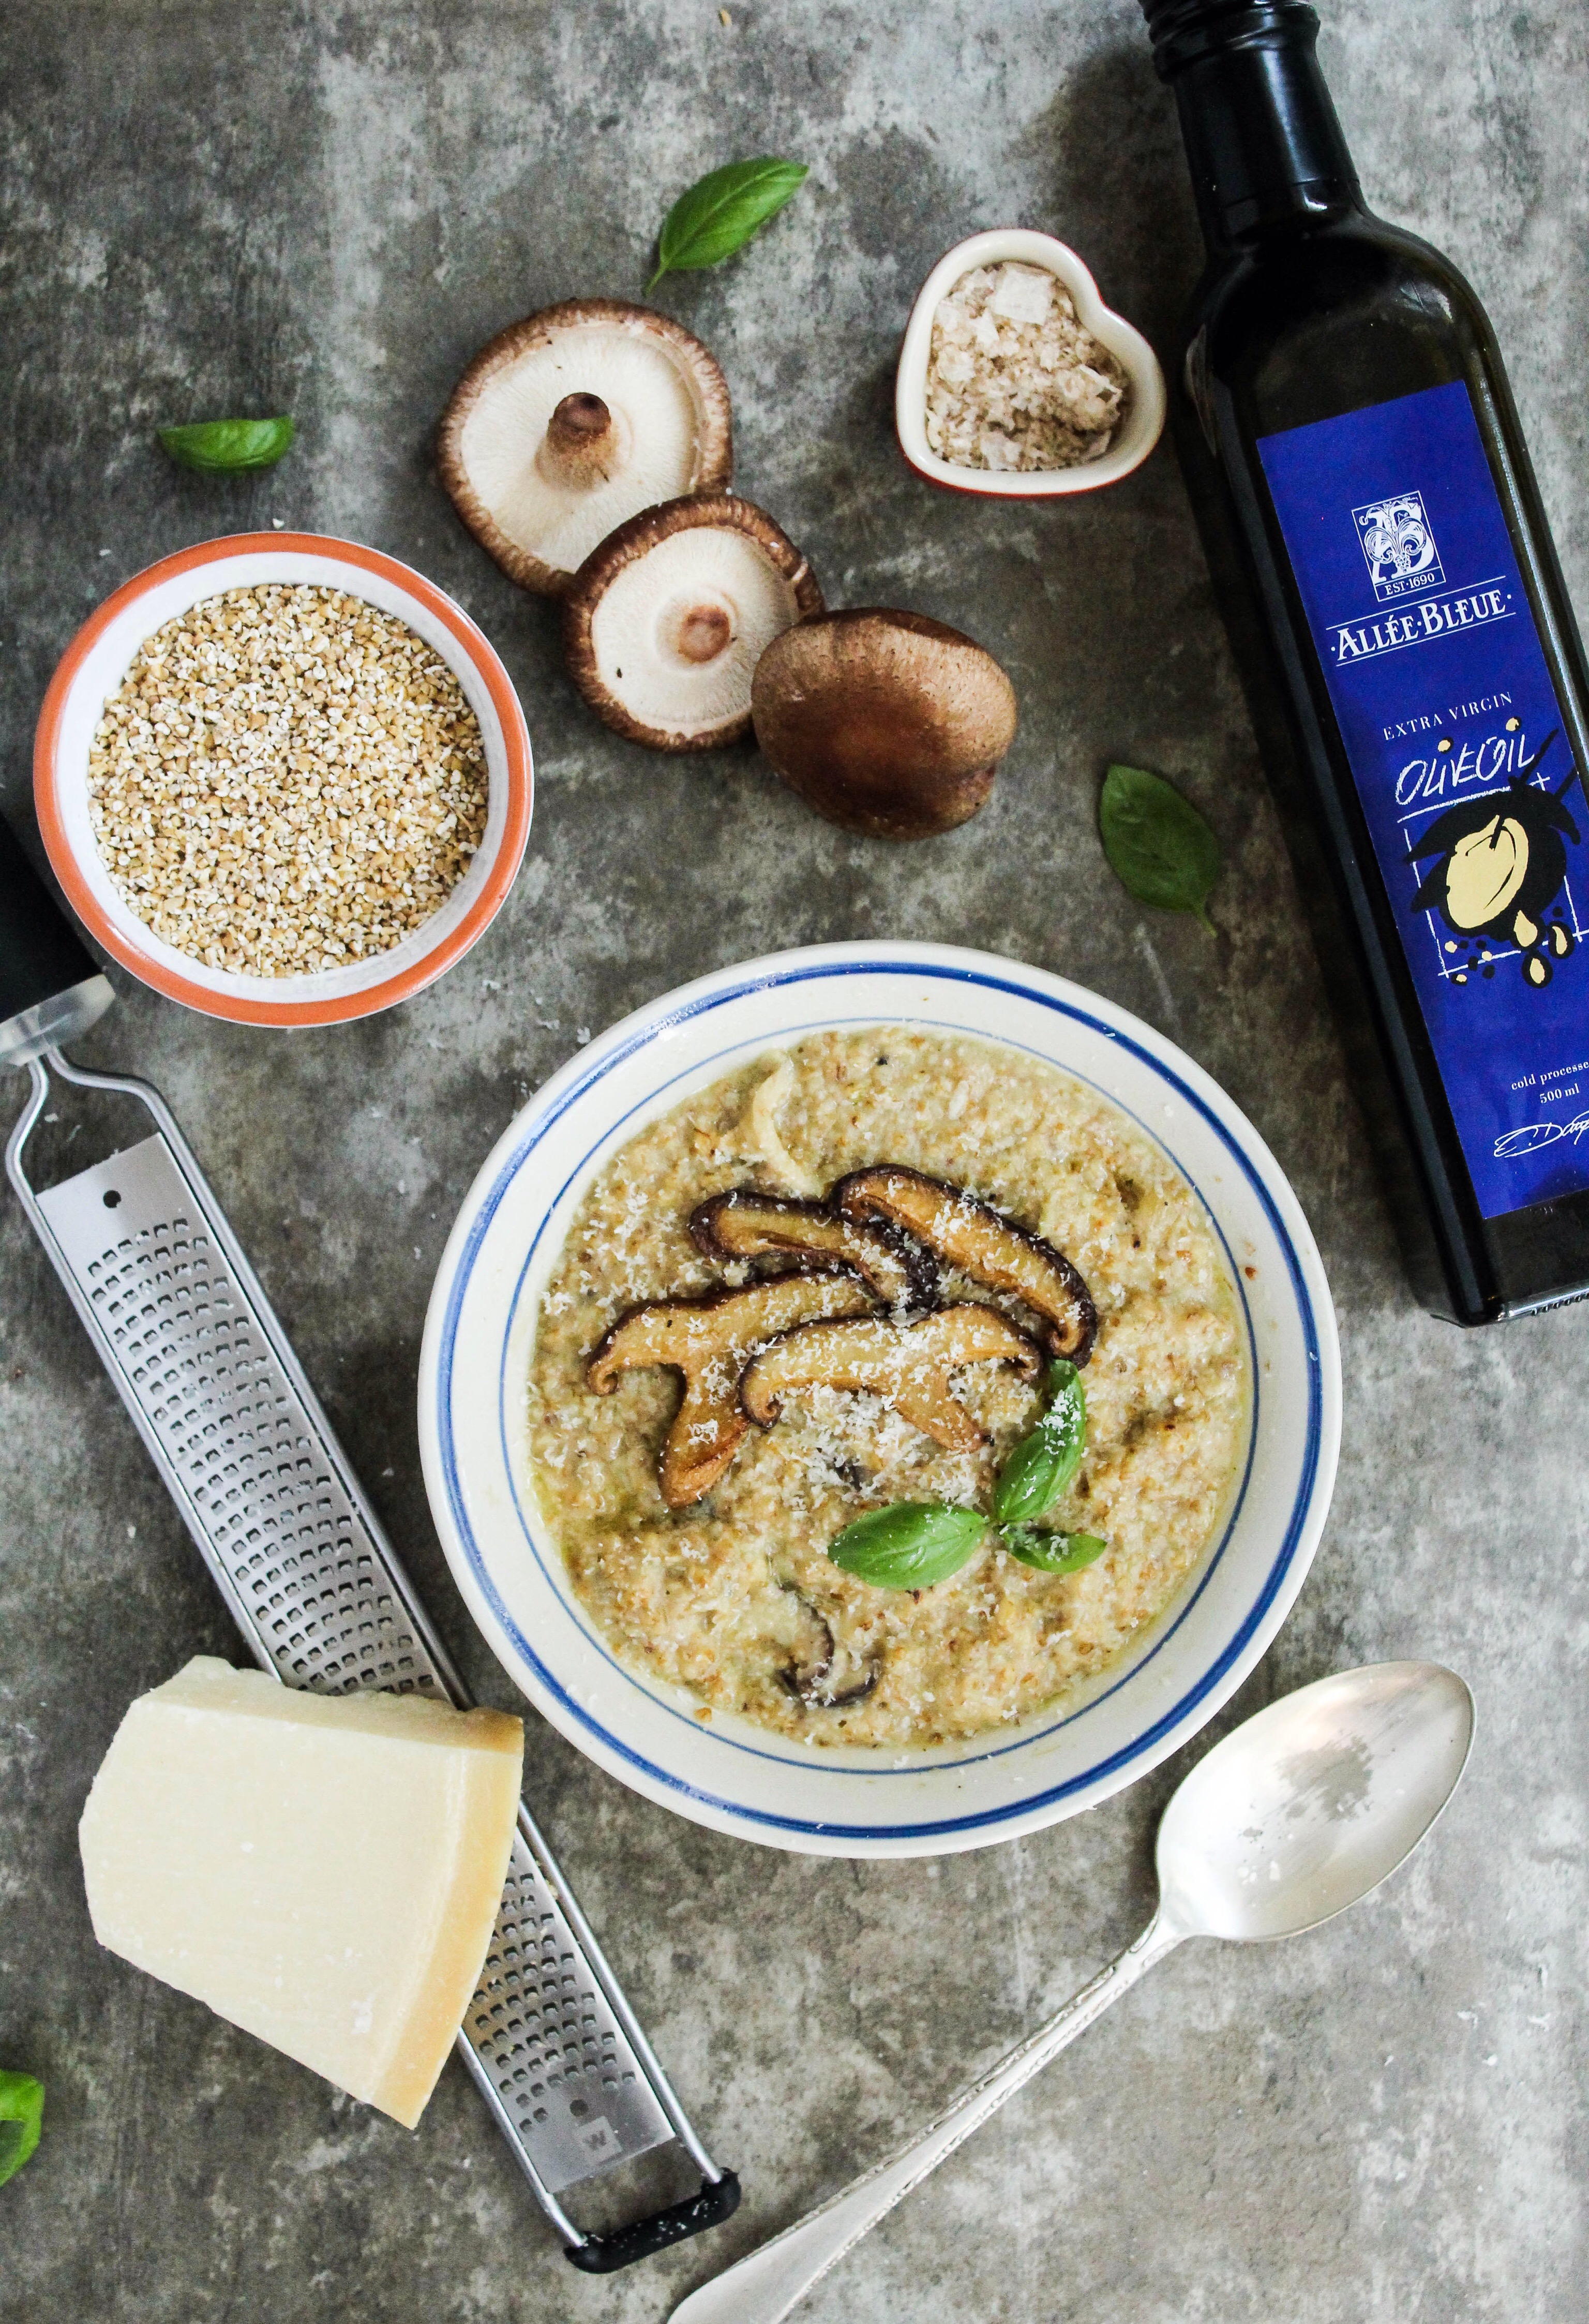
    Ingredients

    2 cups of steel cut oats

    750ml chicken or vegetable stock 

    1 red onion finely chopped

    dried pieces of porcini mushroom

    Four shiitake mushrooms sliced 

    50 ml Olive oil, and extra for drizzling. 

    Smoked sea salt flakes 

    Freshly cracked black pepper 

    1/2 cup Parmesan, I used Grana Padano 

    2 tablespoons of butter 

    A few basil leaves, torn 

    Method

    In a large pan, on a medium high heat, heat the olive oil then sauté the onion until translucent and soft, for 8 minutes. In a separate dry pan, toast the oats for 2 minutes until a nutty scent is emitted, then add to the sautéed onion, and stir to combine. Season with salt and pepper. Add the dehydrated porcini mushrooms to the warm stock and set aside for a few minutes. 
    Add two big ladles of chicken stock to the pan with two big ladles of water, and bring to a simmer whilst stirring frequently until most of the liquid is absorbed. Add the shiitake and hydrated porcini mushroom, then add more water and chicken stock accordingly as you go along, cook for 25 minutes. 
    Stir in the butter, Parmesan and add the torn basil to finish. Serve with a drizzle of extra virgin olive oil and a little more Parmesan grated over the dish. 

    I could never perfect the ‘death dish’ before but this dish has proven to be incredibly simple and dare I say incredibly delicious! With loads of patience and vision for the end product, making risotto doesn’t have to intimidating! 

    The hydrated porcini in the stock with the shiitake mushrooms finished with the Grana Padano, elevated the dish into an umami bomb that supersedes all else! The steel cut oats lends a nutty flavour to the dish and a creamy texture that would fool anyone to think this is a norm for risotto. I would happily indulge in this risotto any day!
    Yesterday was probably one of the best lunchtime meals I’ve had in a long time! Every morsel packed with umami goodness and texture, made me mindfully consume my meal and sit down to enjoy good food the way it truly should be enjoyed. 

    **This post has not been sponsored, and thus all ingredients were purchased by myself**

  • Olive oil, lime and coconut biscotti. 

    Olive oil, lime and coconut biscotti. 

    It’s been a while since I’ve baked anything, I find the process of baking quite calming and sort of a temporary escape from the real world in exchange for that a realm of whimsy and wonder. Now if only I could escape washing the dishes after the mess that ensues… With my olive oil purchase from Babylonstoren from the Olive workshop, thought I should do something a little out of the ordinary, instead to just use it primarily for cooking and drizzling over salads and luxurious homemade pastas. Whilst flipping through a stack of food magazines early this week, frantically searching for inspiration, I happily stumbled across a recipe for olive oil biscotti, and with zeal recreated the recipe with my own take and improvised here and there. This recipe is for an advertisement for the S.A Olive association, featured in the Fresh Living magazine. 

    The recipe is adapted from the recipe as mentioned above, and thus used as a guideline. I added dried cranberries, cashew nuts, coconut flakes, the zest and juice of two limes, this I find works complementary with the grassy peppery notes of the extra virgin olive oil. 

    Olive oil,lime and coconut biscotti. 


    Ingredients

    1/2 cup extra virgin olive oil 

    250g sugar 

    330g cake flour 

    2 free-range eggs 

    1 tsp bicarbonate of soda 

    1 tbsp vanilla paste 

    1/2 cup dried cranberries 

    100g cashew nuts roughly chopped 

    50g coconut flakes roughly chopped 

    Zest and juice of 2 limes 

    A pinch of sea salt flakes 

    Method

    Preheat oven to 180 degrees C. In a bowl or standmixer beat the oil, eggs, sugar and vanilla paste together. In a different bowl combine the flour and bicarbonate of soda and whisk till combined. Stir into the egg mixture to form a heavy dough. Divide the dough into two, form each piece into a log/roll, as long as your baking tray lengthways. Press down to a 13mm thickness. Bake for 25-30 minutes. Remove from the oven and set aside to cool. Once cooled, slice the logs into 13mm slices. Place the slices cut side up and bake for a further 5-10 minutes on either side. Serve with a freshly brewed espresso. 

  • Roast cauliflower and quinoa salad

    Roast cauliflower and quinoa salad

    This gorgeous warming salad is inspired and adapted by a recipe from the Gourmet Traveller Australia. As said in my previous post, I’m finding more ways to (excuse the pun) spice up my vegetables and make it into a main dish that is both filling and delicious. Thought I would share a little piece of news with you, I have recently started working for a recipe sharing site called Cookpad, I am expanding their reach to South Africa as their online community manager.They are very successful in Japan, Indonesia, the U.K and the U.S to name but a few. I am very excited to begin this journey to help grow their platform and reach in S.A and I can only hope that this is just the beginning of a fruitful and exciting journey with Cookpad! So if you are an avid home-cook based in South Africa, visit the site and sign up if you love sharing your recipes. Please follow this link if you are interested: https://cookpad.com/za

    A belated happy Mother’s Day to all the rockstar moms! I spent the day with my mom and family, and what a beautiful day it was! Seems that winter is unfortunately on hold for Cape Town at the moment with unusually warm weather in May and not a drop of rain in sight for the parched province.

    This recipe can be made ahead of time and as a great idea can be packed in for lunch to take to work. I usually boil quinoa for my partner and slow roast tomatoes with garlic, with a mix of baby spinach, toasted pumpkin seeds and some canned tuna or leftover chicken works just as well with a drizzle of extra virgin olive oil. It makes me so happy that I can make him something nourishing and uplifting for him to take to work.


    Roast cauliflower and quinoa salad with a yoghurt dressing: 


    Ingredients:
    300g sliced cauliflower florets

    1 tsp cumin seeds

    1 tsp fennel seeds

    1tsp ground cumin

    1tsp turmeric

    A pinch of sea salt

    1 tbsp olive oil

    1 cup of quinoa ( I used red and white)

    1 cup of vegetable stock

    100g baby spinach leaves

    50g almonds

    50g sunflower seeds
    For the dressing: 


    180ml plain double cream yoghurt

    Zest and juice of half a lemon

    1 garlic clove crushed

    Drizzle of olive oil.
    Method:
    Preheat oven to 180 degrees C. In a dry pan, toast the raw quinoa for 1-2 minutes on a medium to high heat. Remove and transfer to a small saucepan

    With the stock and bring to a simmer for 25 minutes until all liquid has been absorbed and the quinoa is light and fluffy. Set aside to cool.

    Toast the spices, sans the turmeric in a dry pan for 30-40 seconds. Add to a pestle and mortar, adding the turmeric then grind. In a roasting dish, add the cauliflower, toasted spices and drizzle of olive oil, roast for 15 minutes until golden and crisp. To make the dressing, in a small bowl, mix together the crushed garlic, lemon juice and zest along with the olive oil.

    To assemble, in a bowl or plate, add the baby spinach, the quinoa, the roasted spiced cauliflower, almonds, sunflower seeds and a drizzle of olive oil and a lashing of dressing over the salad.

    Enjoy! 🙂

  • Babylonstoren Olive Workshop

    Babylonstoren Olive Workshop

    Every visit, every single time, I always find something new at Babylonstoren. This to me is what keeps me coming back every time, the excitement of exploring something different in the same lush gardens. If you remember, I joined a group for the Bee workshop last October, which was amazing to experience first hand going into the apiary and interacting with the bees and more importantly being educated about bees and their critical importance to life and the food chain, this gave me a higher level of respect and love for bees. 
    To run you through what went down last week Wednesday, we started the day with a short scenic bus trip to the olive orchards where harvesting was well under way already(this time of the year is peak to harvesting times). Our hosts Klass Stoffberg, Linda Costa and Hannes introduced themselves and gave a brief lesson on the FS17 olive orchard which stood in front of us. We were encouraged to help pick the olives by individually picking them of the tree and not shaking off the tree. The former is the preferred method to harvest, as this creates less damage to the tree and olives.

    Another short bus trip down to the olive factory this time, a quick stop by the tasting room for a comforting coffee and biscotti on a overcast nippy day which proved perfect for a walk in the orchards! After refreshments, a walk down to the cellar and through to the other side, was a bustling olive factory, a quick tour followed by an olive oil tasting was enthralling and insightful to learn about the different varietals of olive oils and how they are grown in different soils and environments depending on their nutritional needs.

    Lunch was served at the Greenhouse at a long table, conducive for a talkative lunch hour. Lunch was a tasty lamb pot pie with a vibrant salad picked fresh from their lush gardens or course served along with a can of their award winning Extra Virgin Olive oil. Dessert, a very tart passion fruit cheesecake with chocolate soil.


    The lecture that took place after lunch, I have to be honest was my favourite part of the day! Yes I know, I am a nerd, a food nerd at heart, I do love learning and I believe that we never stop learning. A tasting of faulty olive oils and a worksheet of its positive and negative characteristics were present of which we had to complete to fully understand the difference between its faulty and positive characteristics. A faulty olive oil could have one of four characteristics, namely:

    ▪️Rancidity/oxidation

    ▪️Acidity/wineyness

    ▪️Musty/moldy

    ▪️Muddy sediment
    Did you know? in order for an extra virgin olive oil to be classified as such, it must have no defect or a defect of 2,5% or less out of 10 and fatty acids of 0,8% to be classified as EVOO. The CTC seal on all our local EVOO packaging is not only a stamp of approval of its quality and integrity but an assurance that the EVOO has gone through a local tasting panel.

    How to taste EVOO? Warm a small cup in your hands, take a small sip and allow it to coat your mouth. You should be experience fruitiness hitting your tastebuds and peppery notes coating the back of your throat. This is a good indication of the quality of the oil and its high antioxidants.

    The tasting of table olives was rather surprising to me, because I enjoy only one type of table olive which is the Kalamata. This all changed when I tasted the Beroni and Manzanilla table olives these specific ones were quite large in size and meaty in taste, with no bitter perfume or zesty flavours, which is what I hate from normal green table olives.

    The day ended with a brief exploration mission in the ‘healing garden’and a barefooted walkabout in the chamomile lawns with a likeminded new friend!


    The wealth of knowledge one acquires at these workshops are immeasurably worth it! By no means do I consider myself to be an ‘olive know-it-all’ at least now I can tell the difference between an EVOO and a refined olive oil. An added bonus about these workshops, are that you meet likeminded people and end up going home having made a friend or two!
    For more information on the workshops at Babylonstoren, follow the link and be sure to book way in advance to secure your spot. https://www.babylonstoren.com/experience/workshop

  • Roasted pumpkin infused yoghurt

    Roasted pumpkin infused yoghurt

    Pumpkin epitomizes Autumn in the comforting warm taste and colour lending it’s beautifully sweet flavour to just about anything I can think of to add it to. Which brings me to these gorgeous yoghurts that I am beyond obsessed with, pumpkin and cinnamon double cream yoghurts that I have recently considered an indulgent treat. The flavour of the pumpkin surprisingly enough shines through but not overpowering with a soft hint of cinnamon of course to complement the pumpkin. However, these store bought yoghurts are quite pricey, and find I prefer making my own when I have the time. I had some leftover pumpkin and decided to make a pumpkin pie recipe from renowned and local chef Bertus Basson’s new cookbook ‘Homegrown’ which is featured in this month’s Woolworths Taste issue. 


    Pumpkin infused yoghurt 
    Ingredients
    250g Pumpkin (cubed) 

    300g Plain yoghurt 

    2 T maple syrup 

    1 tsp cinnamon 
    Method

    Preheat oven to 180 degrees C. Place the cubed pumpkin in a roasting dish, drizzle with the maple syrup and add the cinnamon. Roast for 20-25 minutes until fully macerated. Set aside to cool. In a blender, or in my case my NutriBullet, add the pumpkin and blitz till smooth, then add the yoghurt with another dusting of cinnamon if you like, and blitz till smooth. Serve as a snack or with your morning granola. 


    If you want you could add some pears to the roasting tray along with the pumpkin, or what ever you like that is in season. Im in love with these gorgeous autumnal pears and couldn’t resist adding the pears to the photos. They’re super sweet and crunchy, usually I roast them with a little honey and serve with a few slices of Brie or Camembert as an indulgent snack. 

  • English muffins 

    English muffins 

    Sweet or savoury? A thin layer of strawberry jam or silky smooth lemon curd topped with a dollop of cream or simply served with lashings of melted butter on a toasted English muffin. Best served in bed with a piping hot cup of tea. This is the epitome of weekend ‘breakfast in bed’ kind of spoils! While there’s absolutely nothing wrong with buying store bought, which I love doing, but when I stumbled across the recipe on Delicious UK,  I knew I couldn’t pass up the opportunity to try it out for myself! Remember to make the starter a day before the time. For the savoury filled muffin, I made creamy mashed potatoes with roasted pork bangers and made a honey mustard glaze to drizzle over the bangers, roasted for 20 minutes on 200 degrees C until golden brown. Toast the muffins and serve. For the sweet inspired muffins, I poached a few figs in earl grey tea until the flavour has taken to the figs, or simply roast the figs in a balsamic glaze until macerated, them serve with store bought ricotta cheese with some of the liquid from the roasted figs. 
    English muffins: 
    Ingredients

    For the starter

    -50g strong white bread flour 

    -2g dried active yeast

    -50ml milk 
    For the dough

    250-300ml milk 

    8g dried active yeast 

    400g strong white bread flour, plus extra to dust

    1 tsp fine salt

    1 tsp caster sugar

    30g unsalted butter, melted, plus extra to grease

    Vegetable oil for greasing
    Method
    * Make the starter at least 12 hours, or up to 24 hours, in advance. Mix 
the 50g flour and 2g yeast in a large bowl, then stir in the 50ml milk to form a thick paste. Cover with cling film and leave somewhere fairly cool (but not cold) and dark (the mixture will expand a little and bubble up).  

    * For the dough, heat the 250-300ml milk in a pan to just steaming. Leave to cool till lukewarm, then stir in the 8g yeast and set aside. Put the 400g flour in a large mixing bowl with the salt and sugar, then stir in the starter. By the time that’s done, the warm milk should be frothy. Add it to the bowl with the melted butter, then stir to bring it together into a dough. Tip out onto a lightly floured surface and knead for 10-15 minutes until elastic and smooth (or use a stand mixer and dough hook for 8-10 minutes).

    * Transfer to a lightly oiled mixing bowl, cover with a clean tea towel and leave somewhere warm to rise until doubled in size for 1 hour (or leave overnight in the fridge). Once risen, knead the dough again on the work surface to redistribute the air bubbles (also known as knocking back), then roll out using a rolling pin until 2-3cm thick. Use an 8cm round cutter to stamp out 8-10 discs from the dough, re-rolling the dough. Put the discs on baking paper, scatter with a little flour and cover loosely with cling film. Leave to prove (rise) for 25-30 minutes until puffed.

    * Heat a wide, heavy-based frying pan over a medium heat and grease with a little butter. Carefully transfer 3-4 of the muffins into the pan using a broad spatula, turn the heat down to low-medium and cook for 6-7 minutes, making sure they don’t burn on the underside. Once golden on the bottom and the sides are starting to look cooked, carefully flip the muffins and repeat. Transfer to a wire rack  while you cook the rest. Split in half, butter and eat straightaway or cool completely before toasting.


    *If kneading by hand, add 250ml warm milk in step 2, and use as little 
flour on the surface as possible. Too much extra flour will make them hard. If you’re making the dough in a stand mixer, use 300ml milk. The softer the dough, the better. 
Keep an eye on the dough while it’s rising and proving (step 3).If it rises too quickly, make them before the allotted time. 

    You should get 10 muffins out of the dough (step 3). If you find you have to re-roll the dough, the last couple won’t be as uniform as the first batch, but they will still taste as great. 

    For more guidelines you can visit Delicious UK for a great step by step tutorial on how to achieve the perfect English muffin. 
    Happy weekend! x