Imagine my elation at receiving an invite for a day out with Fusion Design and fellow bloggers at the breathtaking Groot Constantia Wine Estate. The day, September 1st being a serendipitous day of firsts, started outside of theJonkershuisrestaurant beneath a beautiful old oak tree. Founder of Fusion design, Carmen Lerm and Editor Kim van Niekerk warmly received us alongside a bubbly station with mouthwatering little morsels of heaven to celebrate a day of ‘firsts’. I do apologize in advance for the over-use of the word ‘delicious’.
We moved toward the historic Cloete cellar, where their infamous Chocolate and wine pairing took place. My favourite pairing was the Chardonnay beautifully paired with a delicious white chocolate with hints of lime and apricot, and the Sauvignon Blanc paired with a tropical guava white chocolate. The pairing ended with a little surprise, a tasting of one of South Africa’s oldest wines, the ‘Grand Constance’ a natural sweet wine enticing not only in it’s gorgeous amber hue but it’s delicious robust sweet flavours of peaches, honey and caramel. It is recommended that ‘Grand Constance’ is best served between 12-14 degrees C. Pair with fruit-based puddings or chocolate, dried fruits, nuts or cheese.
Lunch was held at the bistro style Jonkershuis restaurant, a short walk from the cellar. Note: visit Jonkershuis hungry! lunch was a three course meal, options vary from Steamed to order Black Mussels with a masala and lentil cream and a slice of toasted Woodstock Sourdough, to a handcut fillet seared with porcini cream. Dessert was a delectable milktart with a apricot and vanilla compote. I had my eye on the very popular Apple cake with vanilla ice cream, unfortunately by the time I decided on it, it was all sold out. The food and service at Jonkershuis was impeccable and definitely worth another visit or two! Another first was the launch of their infused Grape seed oils for culinary usage, of which is produced on site. The one I was lucky enough to take home was the Garlic infused Grape seed oil. So far I’ve been using the oil in almost every savoury dish I can think up!
What I loved most about the day was that most of us had not met each other before, the successful ice breaker being copious amounts of delicious wine and food is what brought us all together at the end of the day. Many of us walked a away having made a few new connections and for some new friends too! There is so much to experience, taste and see at Groot Constantia! Take your family, loved ones or friends for a perfect brunch date, wine tasting with friends.
Here’s to many more firsts! xo
**Disclaimer: I was invited as a guest of Fusion Design and Groot Constantia Wine Estate.**
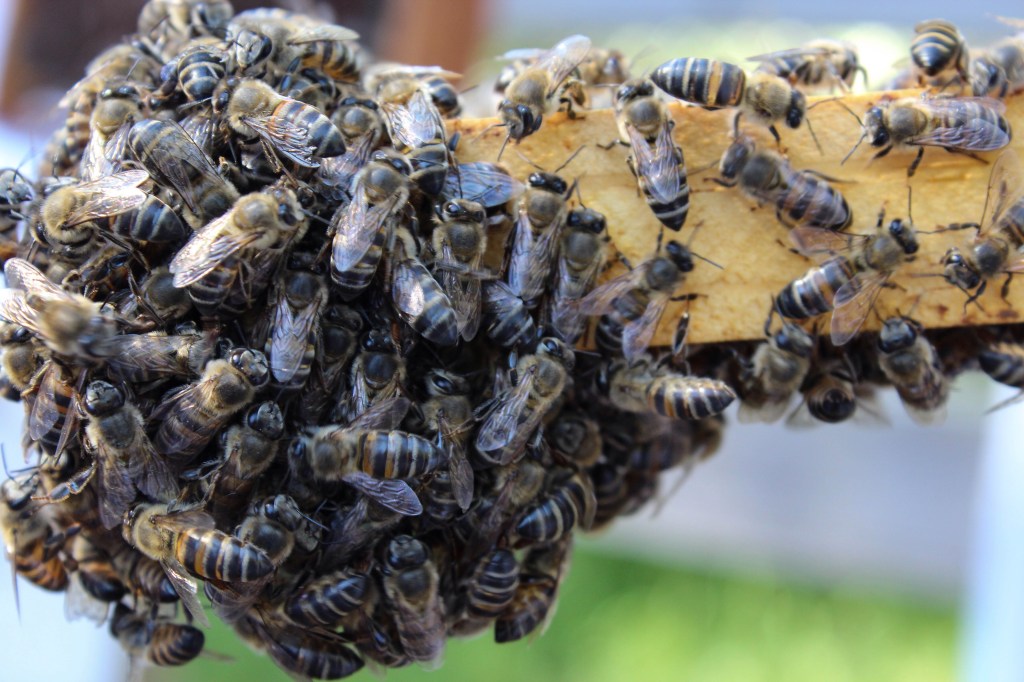
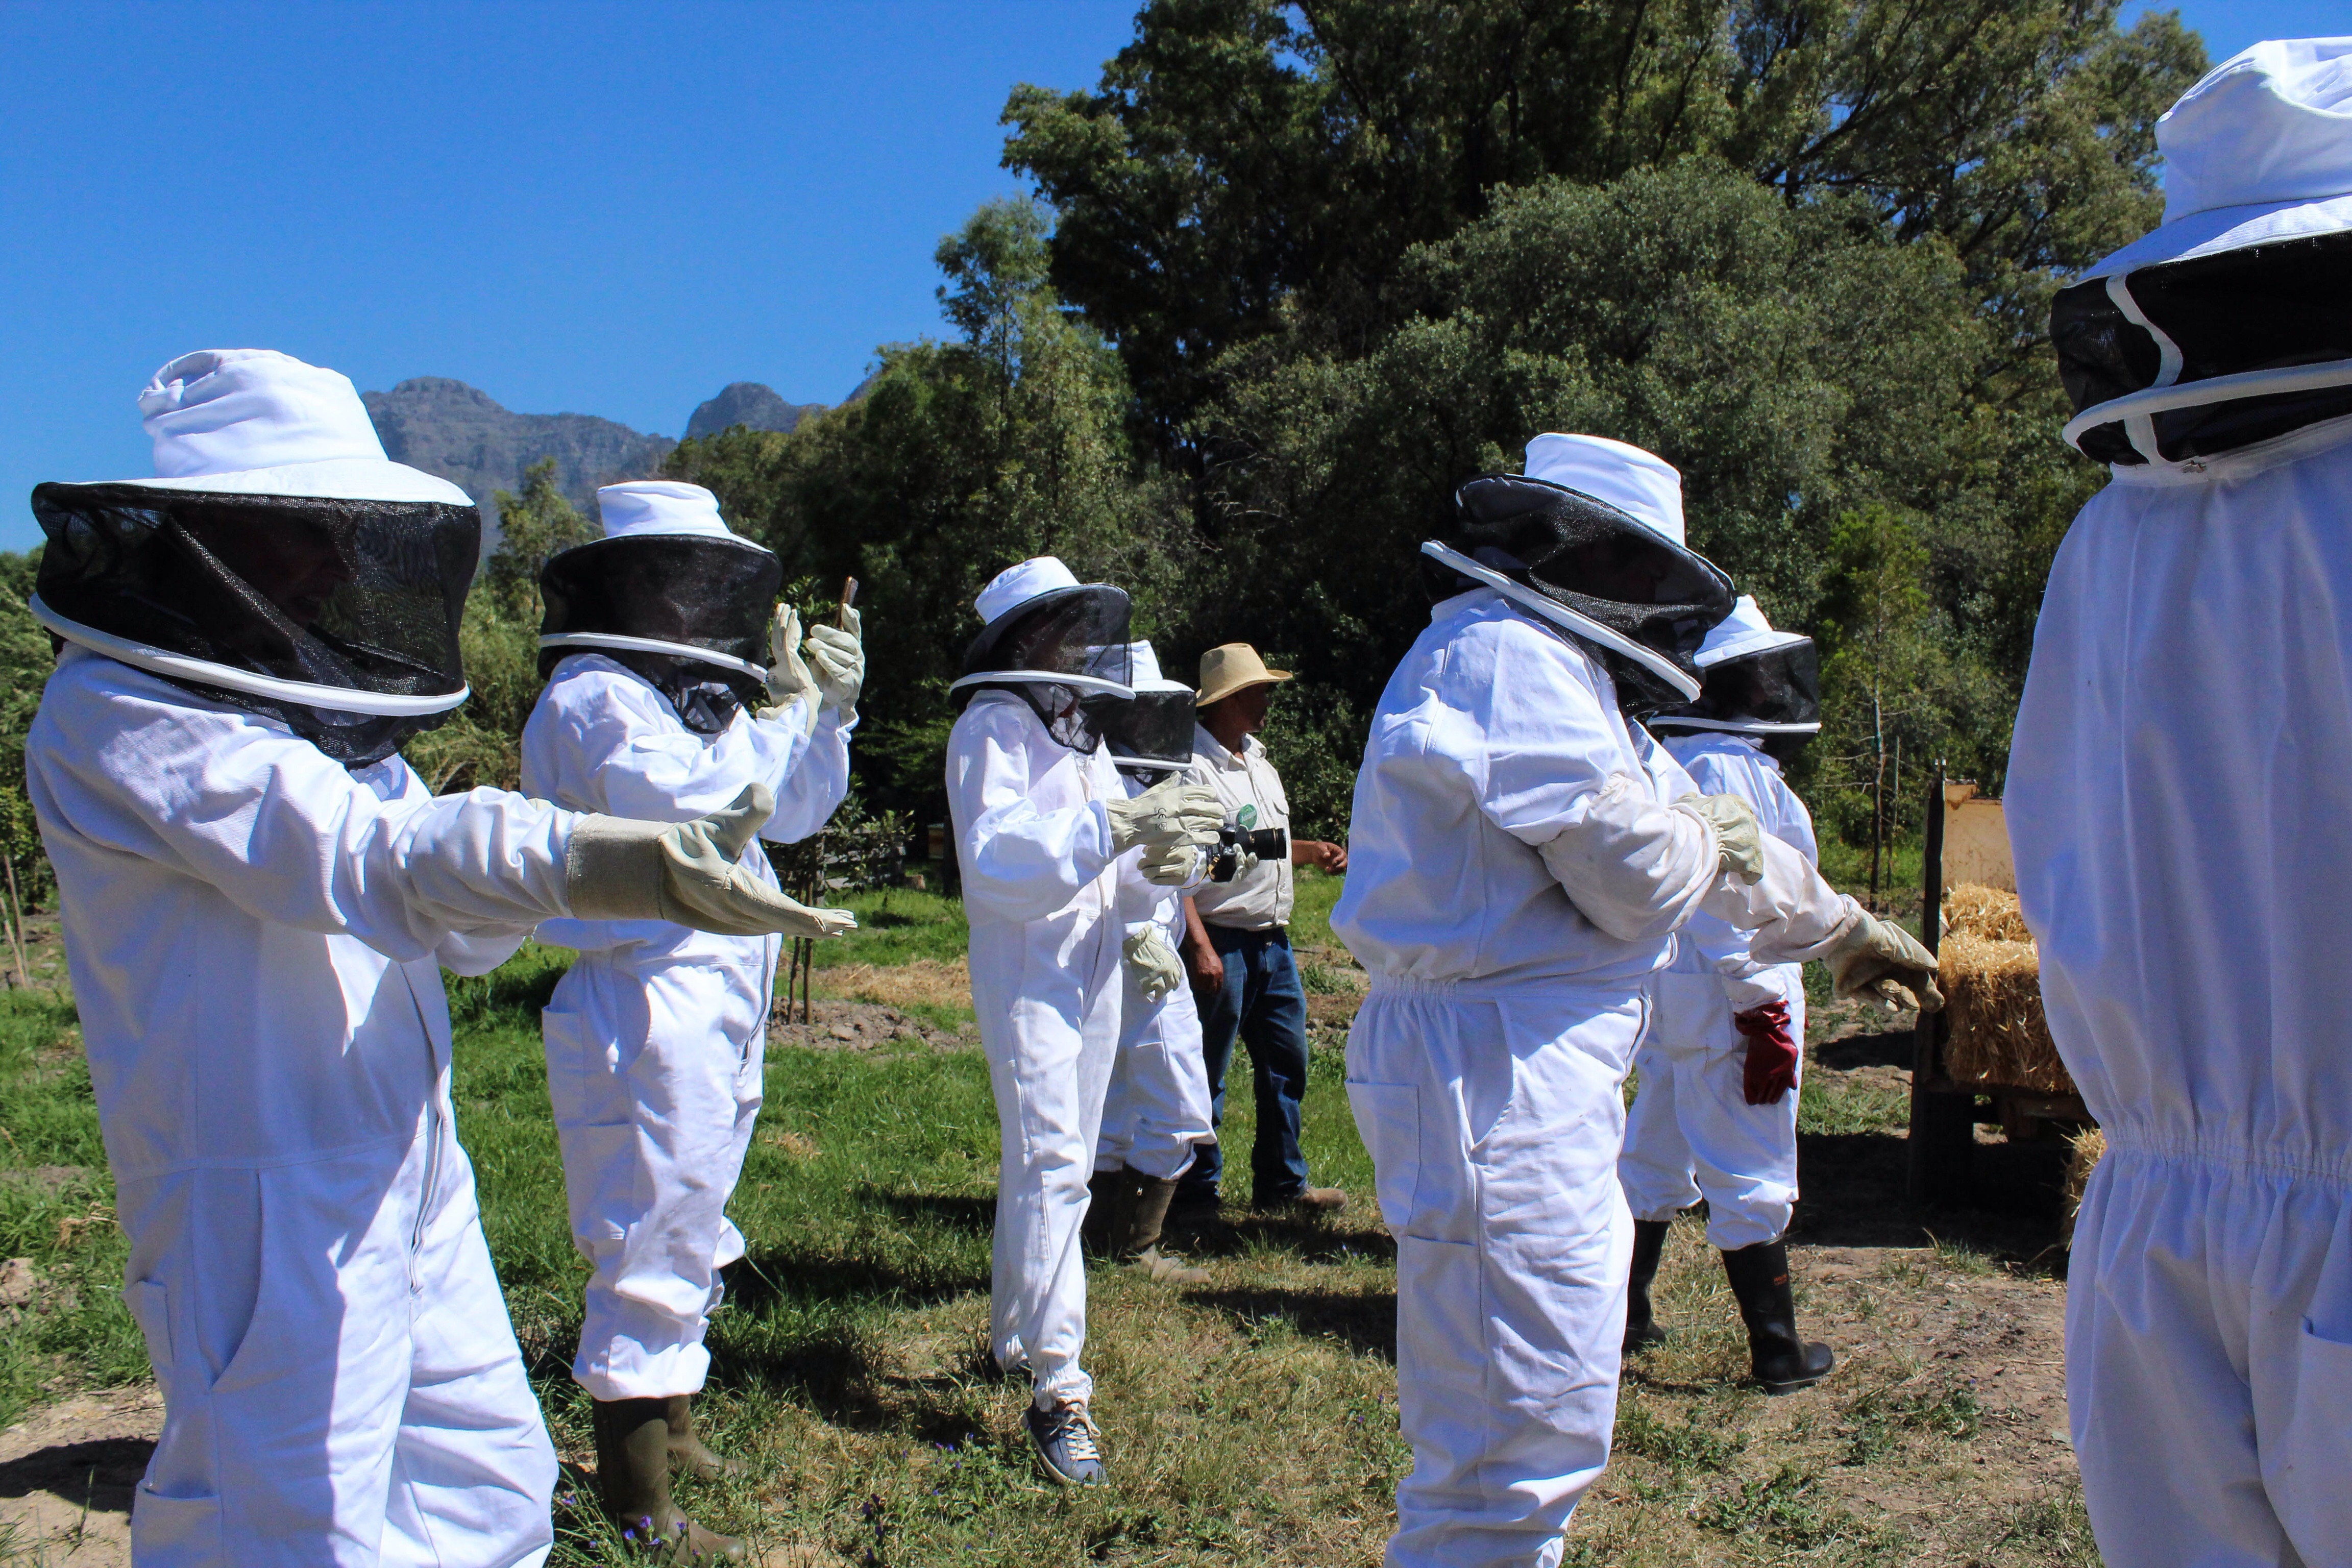
Did you know, the reason beekeepers overalls are white is that bees can’t see white? This is according to the renowned bee researcher at the Agricultural Research Council, Mike Allsopp. This is only but a few facts and wisdom that Mike generously imparted upon us. The Secret Life of Bees workshop was held at the picturesque farm, Babylonstoren in Simondium about 40 minutes outside of Cape Town. Apart from staying at their 5 star luxury farm hotel, Visitors can walk about in their lush and exotic gardens and thereafter have a rustic farm fresh lunch at the Greenhouse or if you’re looking for more of a trendier farm to table experience, Babel is the place to dine!
What was probably one of the hottest days of the year so far, the workshop started off with a walk through the gardens towards the farm loft where Q&A’s and a very insightful talk by Mike had us buzzing(excuse the pun)with insight and excitement. Here’s another fun fact, honey is a 50/50 mixture of glucose and fructose and only adult bees feed on honey. Under usual circumstances and normal temperatures, the workshop starts off with attendees going to the apiary first, but at 32 degree weather at 11:00 am it was advisable we visit the on-site apiary last.
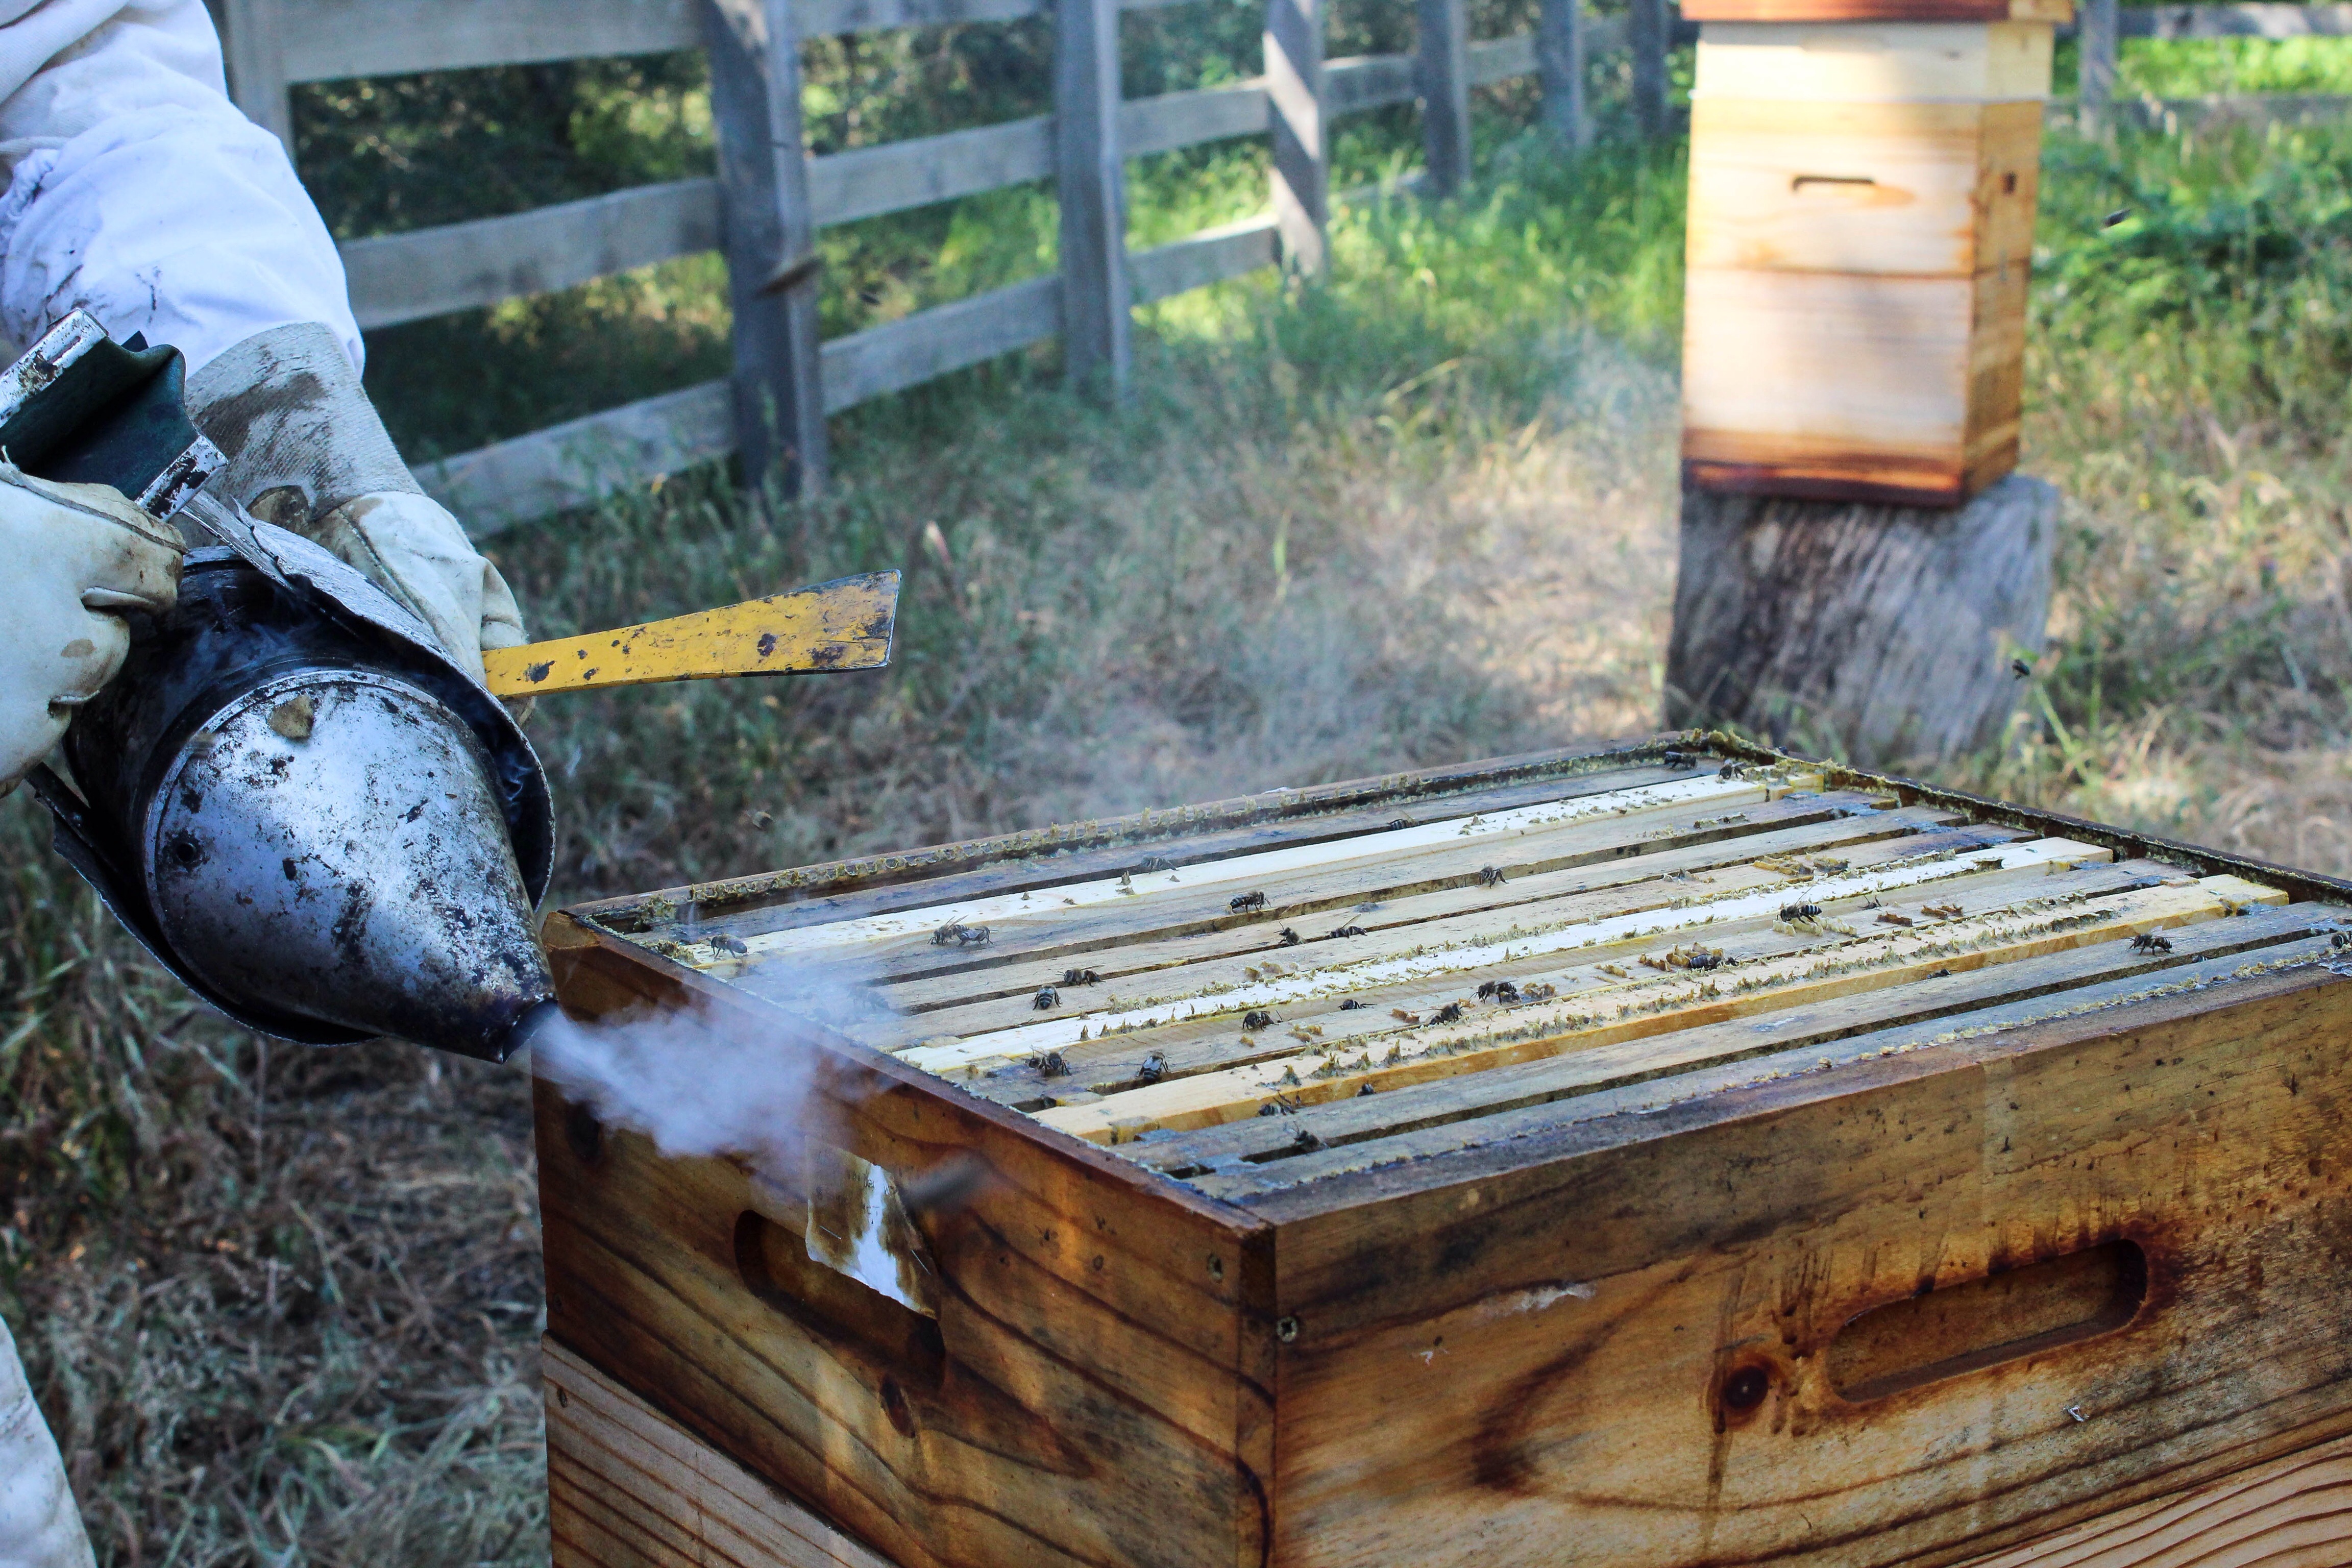
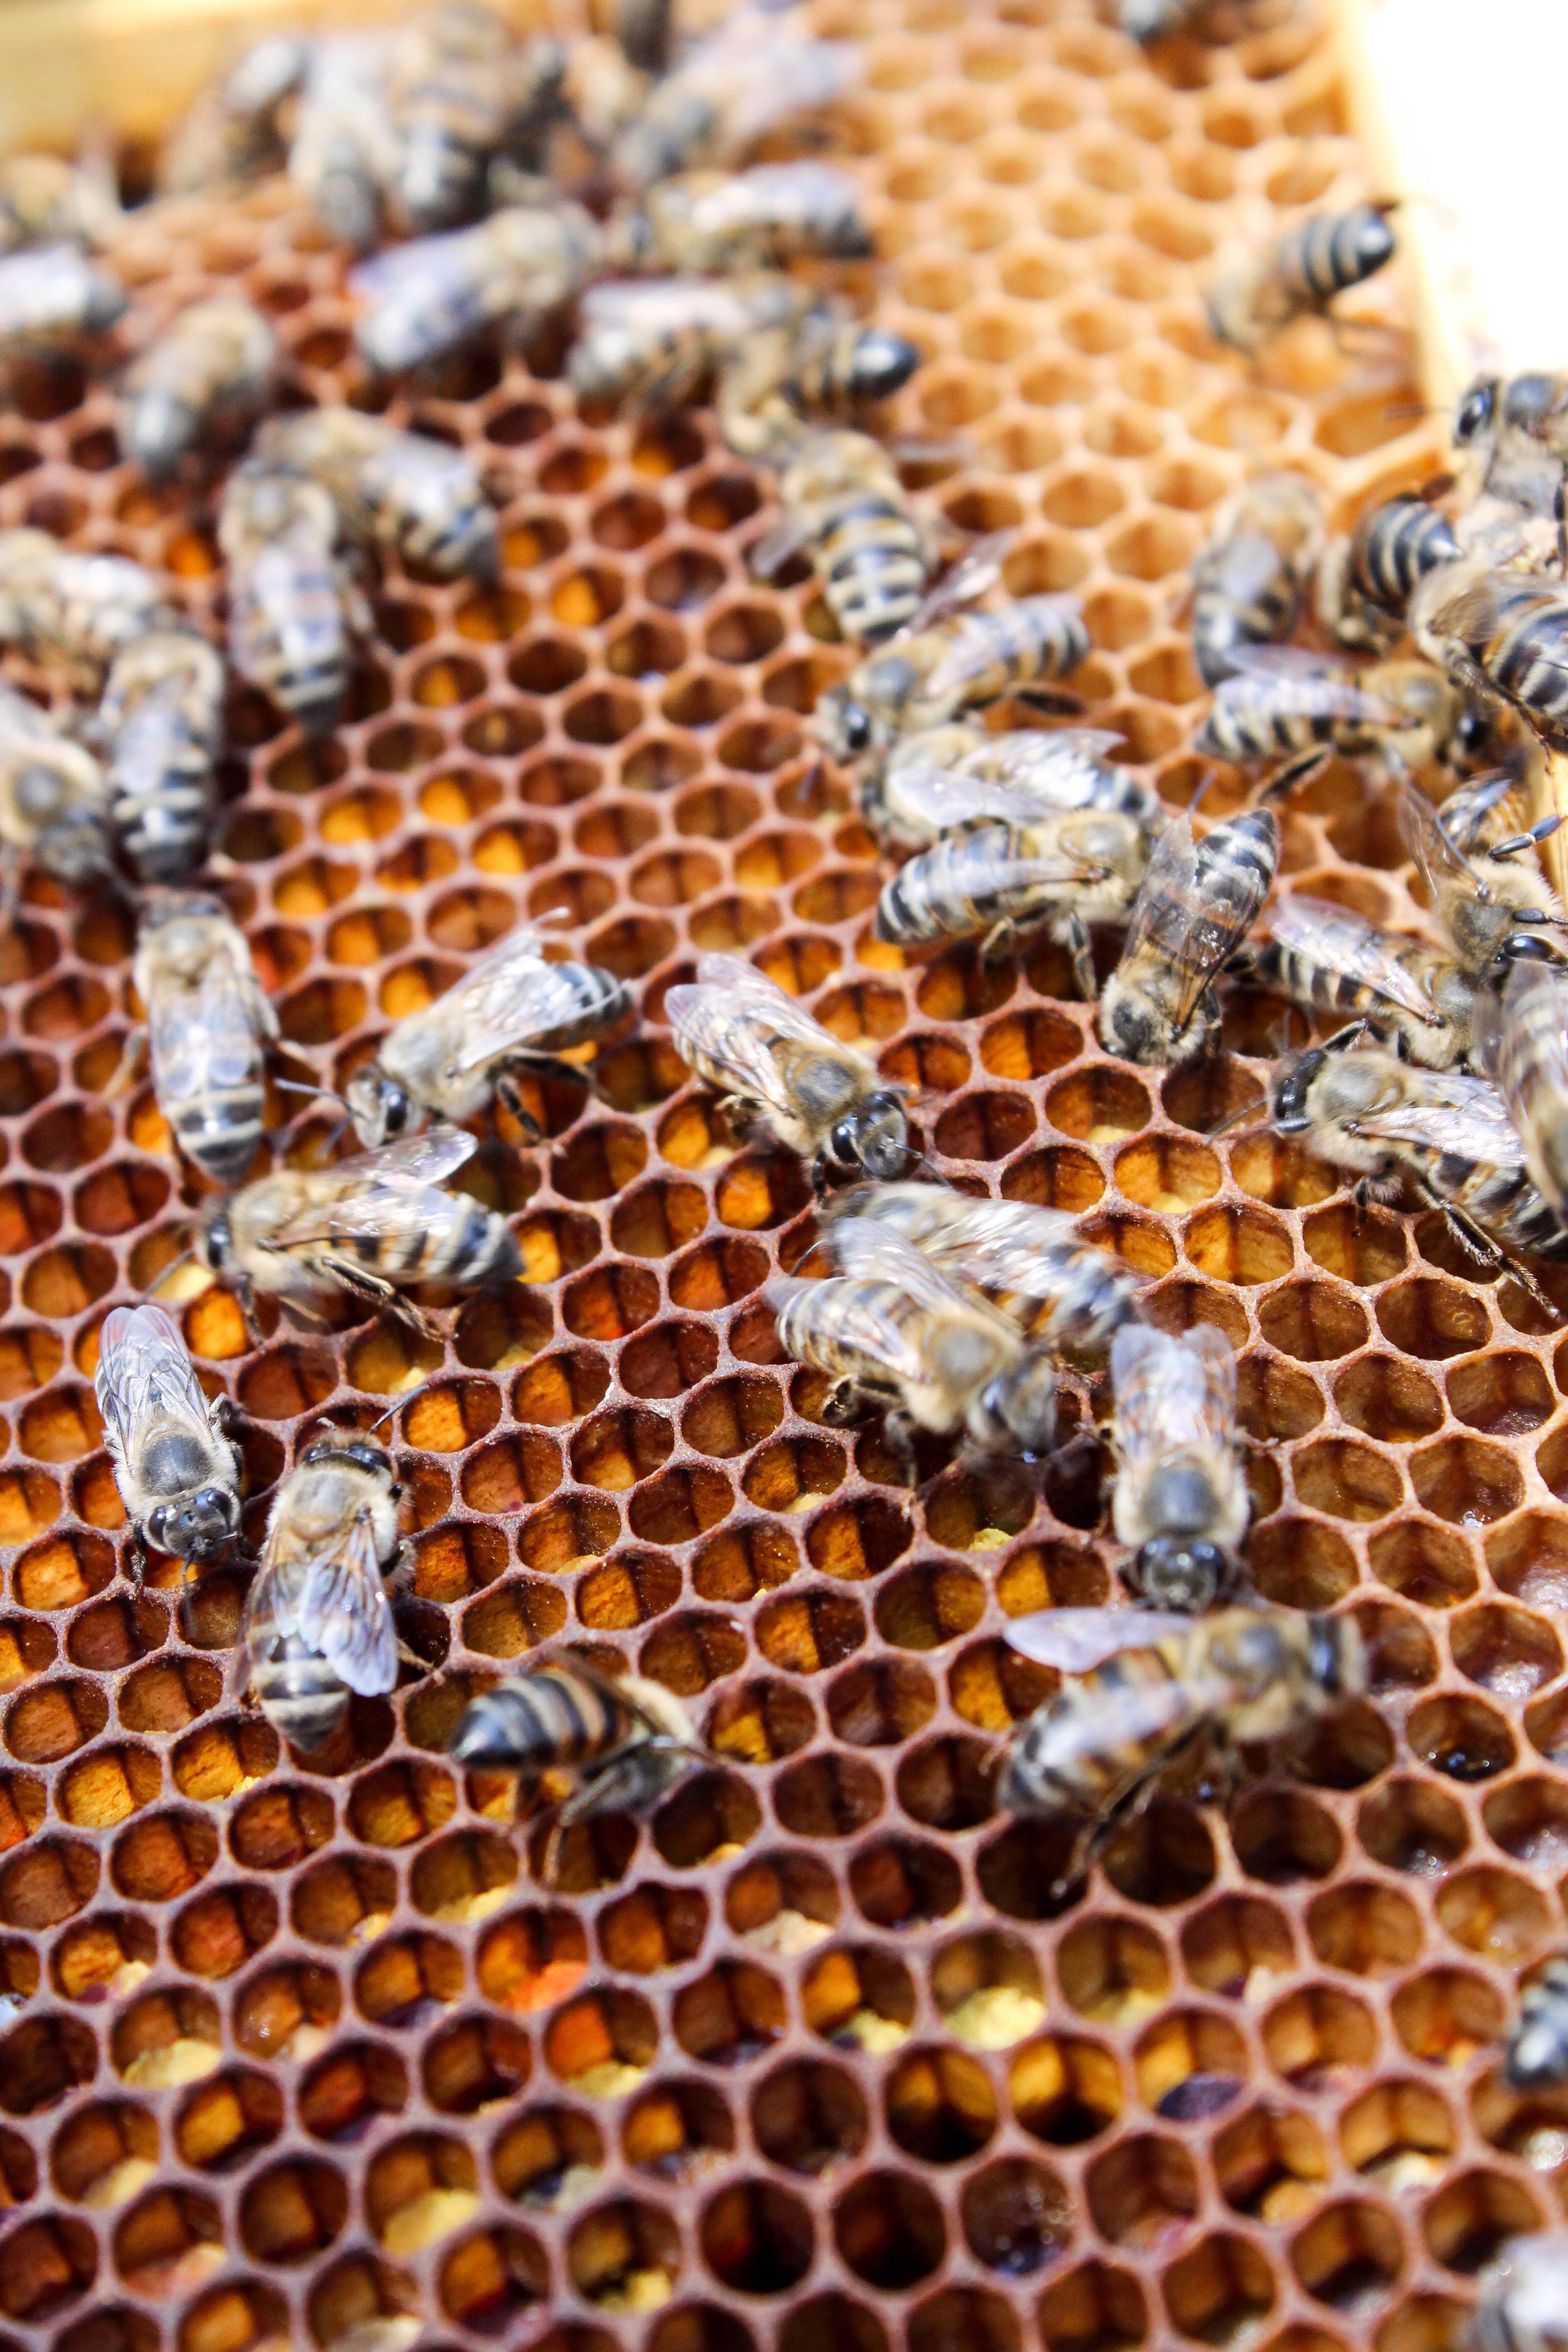
There are a few beekeeping methods, such as the Top bar beekeeping,the non-movable frame colonies and the extraction beekeeping methods.The most recommended is the extraction method which requires re-use of frames and the addition of honey chambers to increase production. There are many types of extraction methods too, and the most widely used is Langstroth type of hives. One will notice that on most of the hives we see today, it is fitted with aluminium tops, this is to ensure insulation of temperature and to keep the hive and bees cool. At 37 degrees Celsius, the hive is at a normal temperature, anything above this is far too hot for the bees. The worker bees are all female and have a life expectancy of 20-45 days, the worker bees are responsible for all hive activities. The queen bees are also female, and in every colony exists only one queen. The queen bee starts mating at a precocious age of only 3-4 days old. How is a queen bee formed? Baby larvae is fed Royal jelly, which then develops into a queen bee. The incubation period for a queen bee is approximately 14 days, a normal worker bee, 18-21 days, and a drone cell 24 days. The mere purpose of a drone is to mate with a queen and thereafter immediately dies.
Honey is ripened nectar for the adult bees as said above, wax is synthesized by the bees and for every 8g of honey there is 1g of wax. Propolis, termed by Mike as ‘Bee Glue’ originates from plant resin and bees use it to stick to everything, close gaps and has antibiotic properties for the bees. However, there seems to be a common misconception according to Mike, that there is a trend specifically in health stores that it has tremendous health benefits to humans, this he says is false.
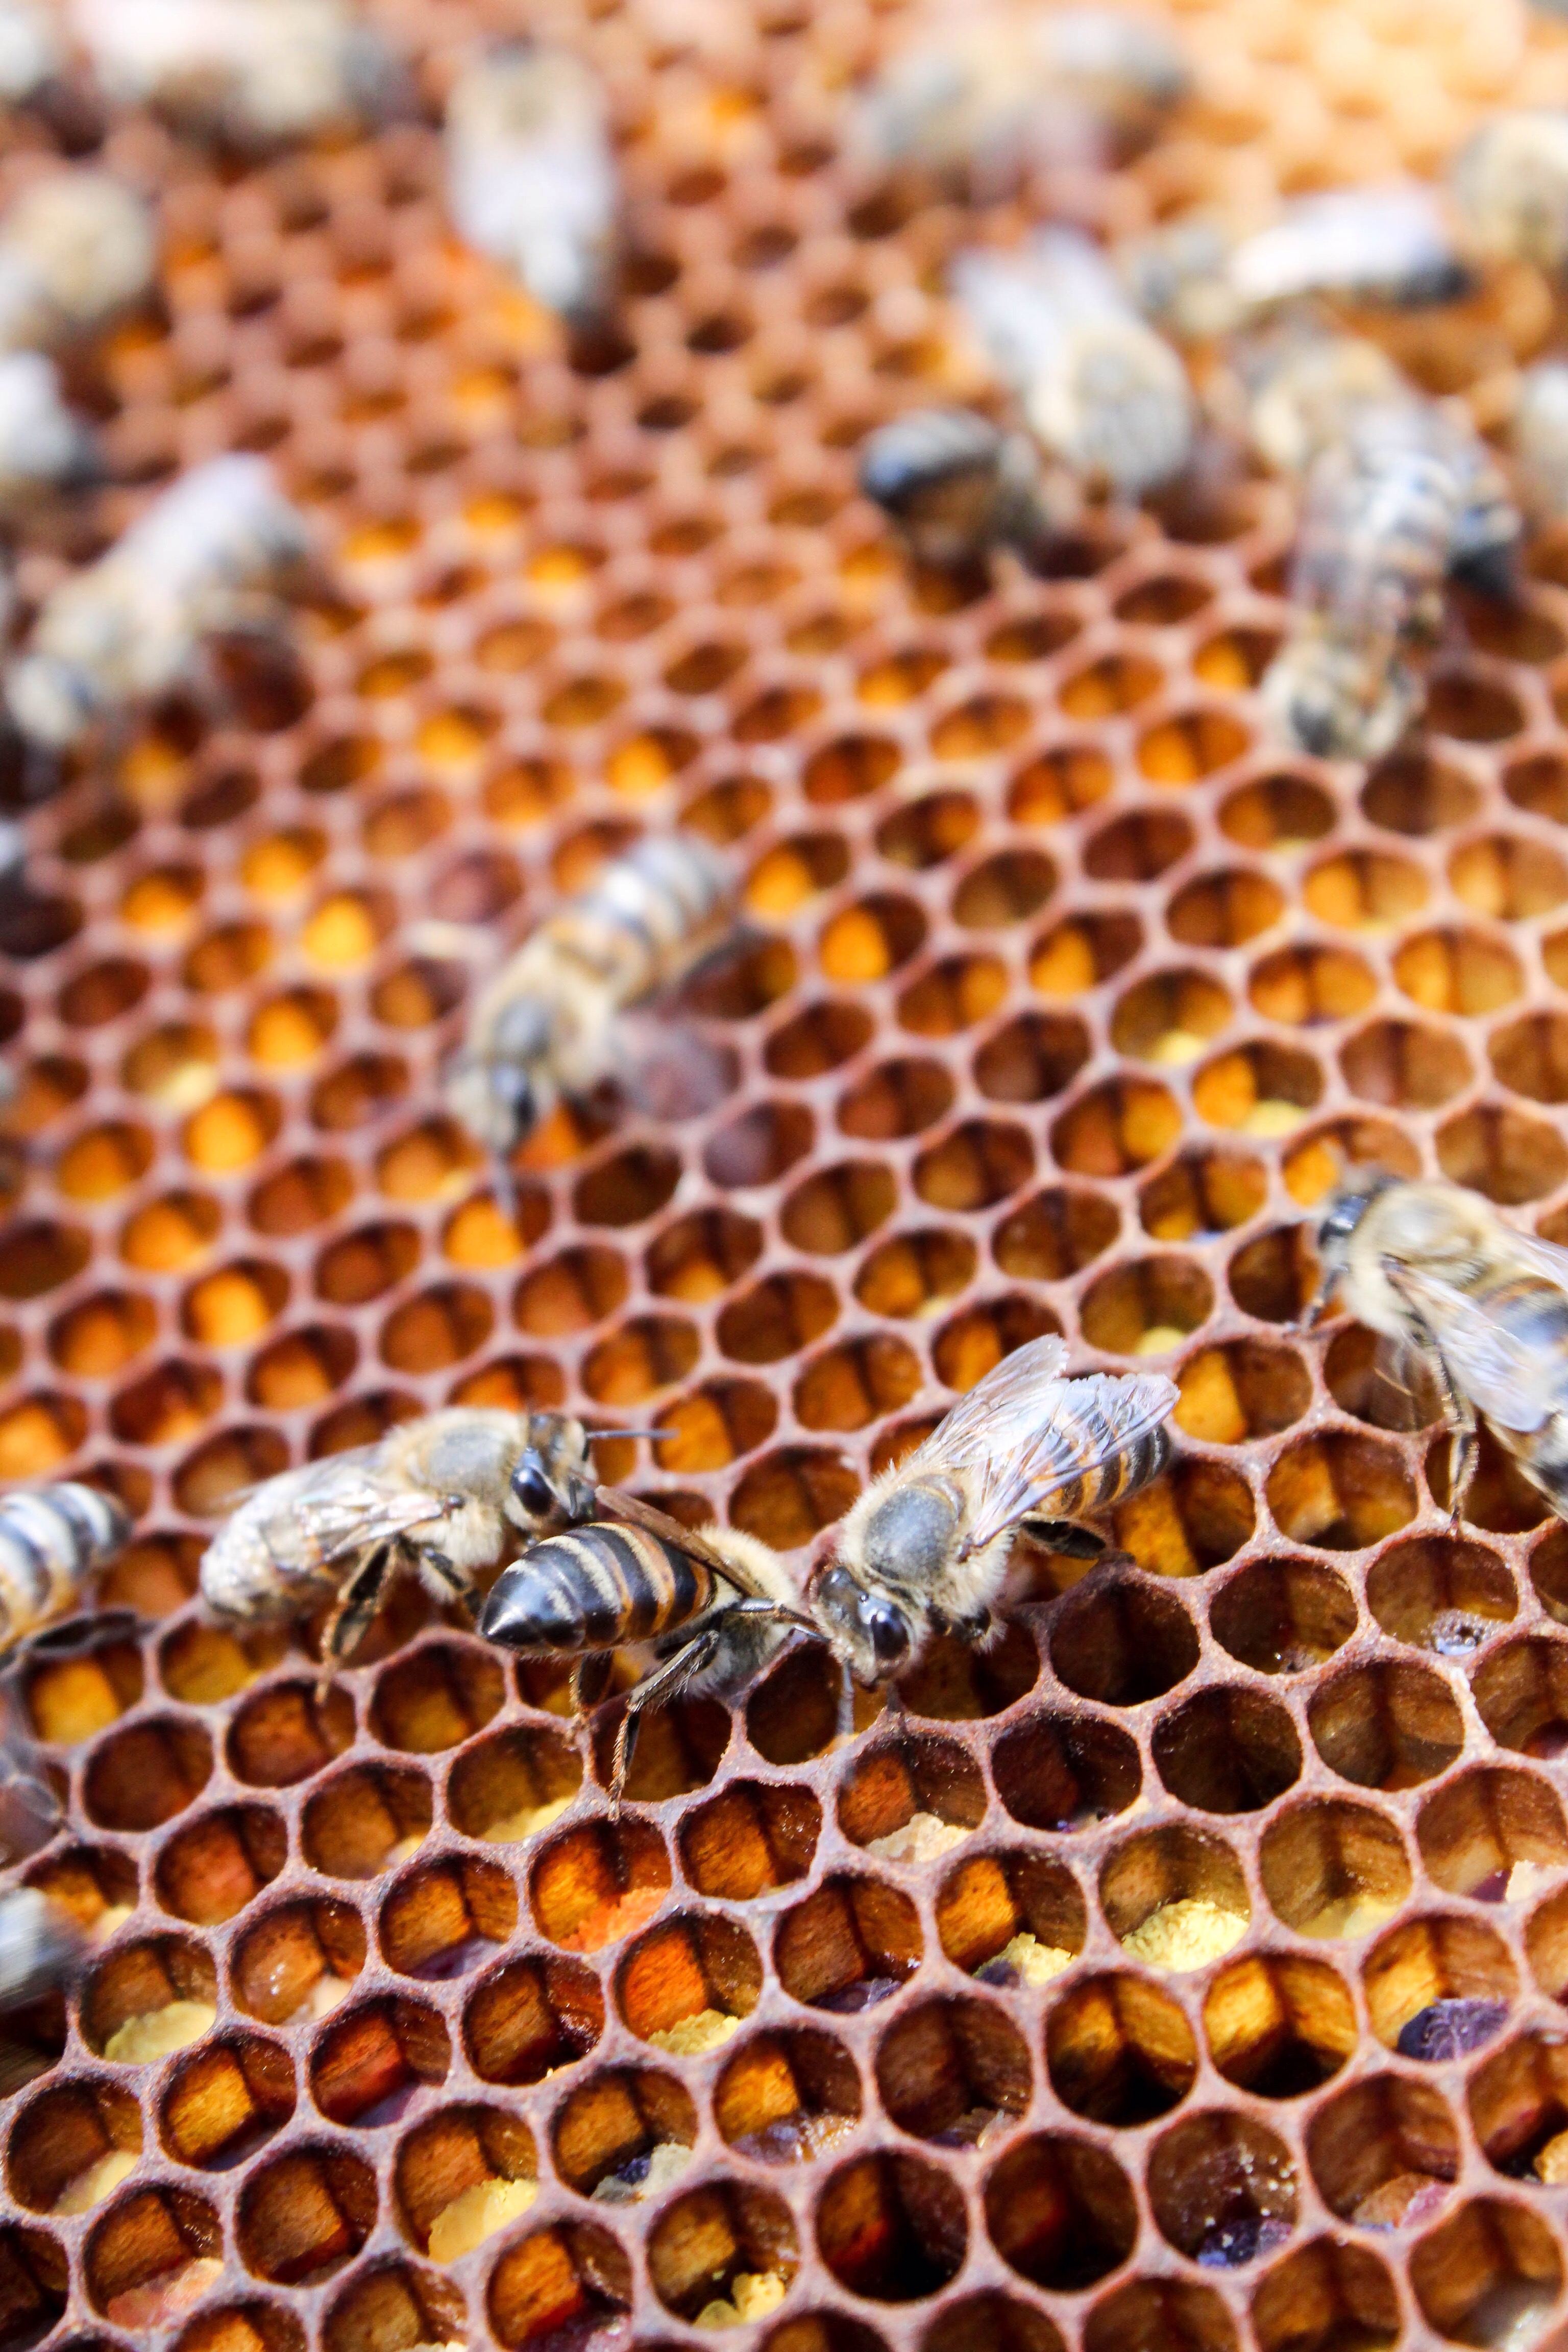
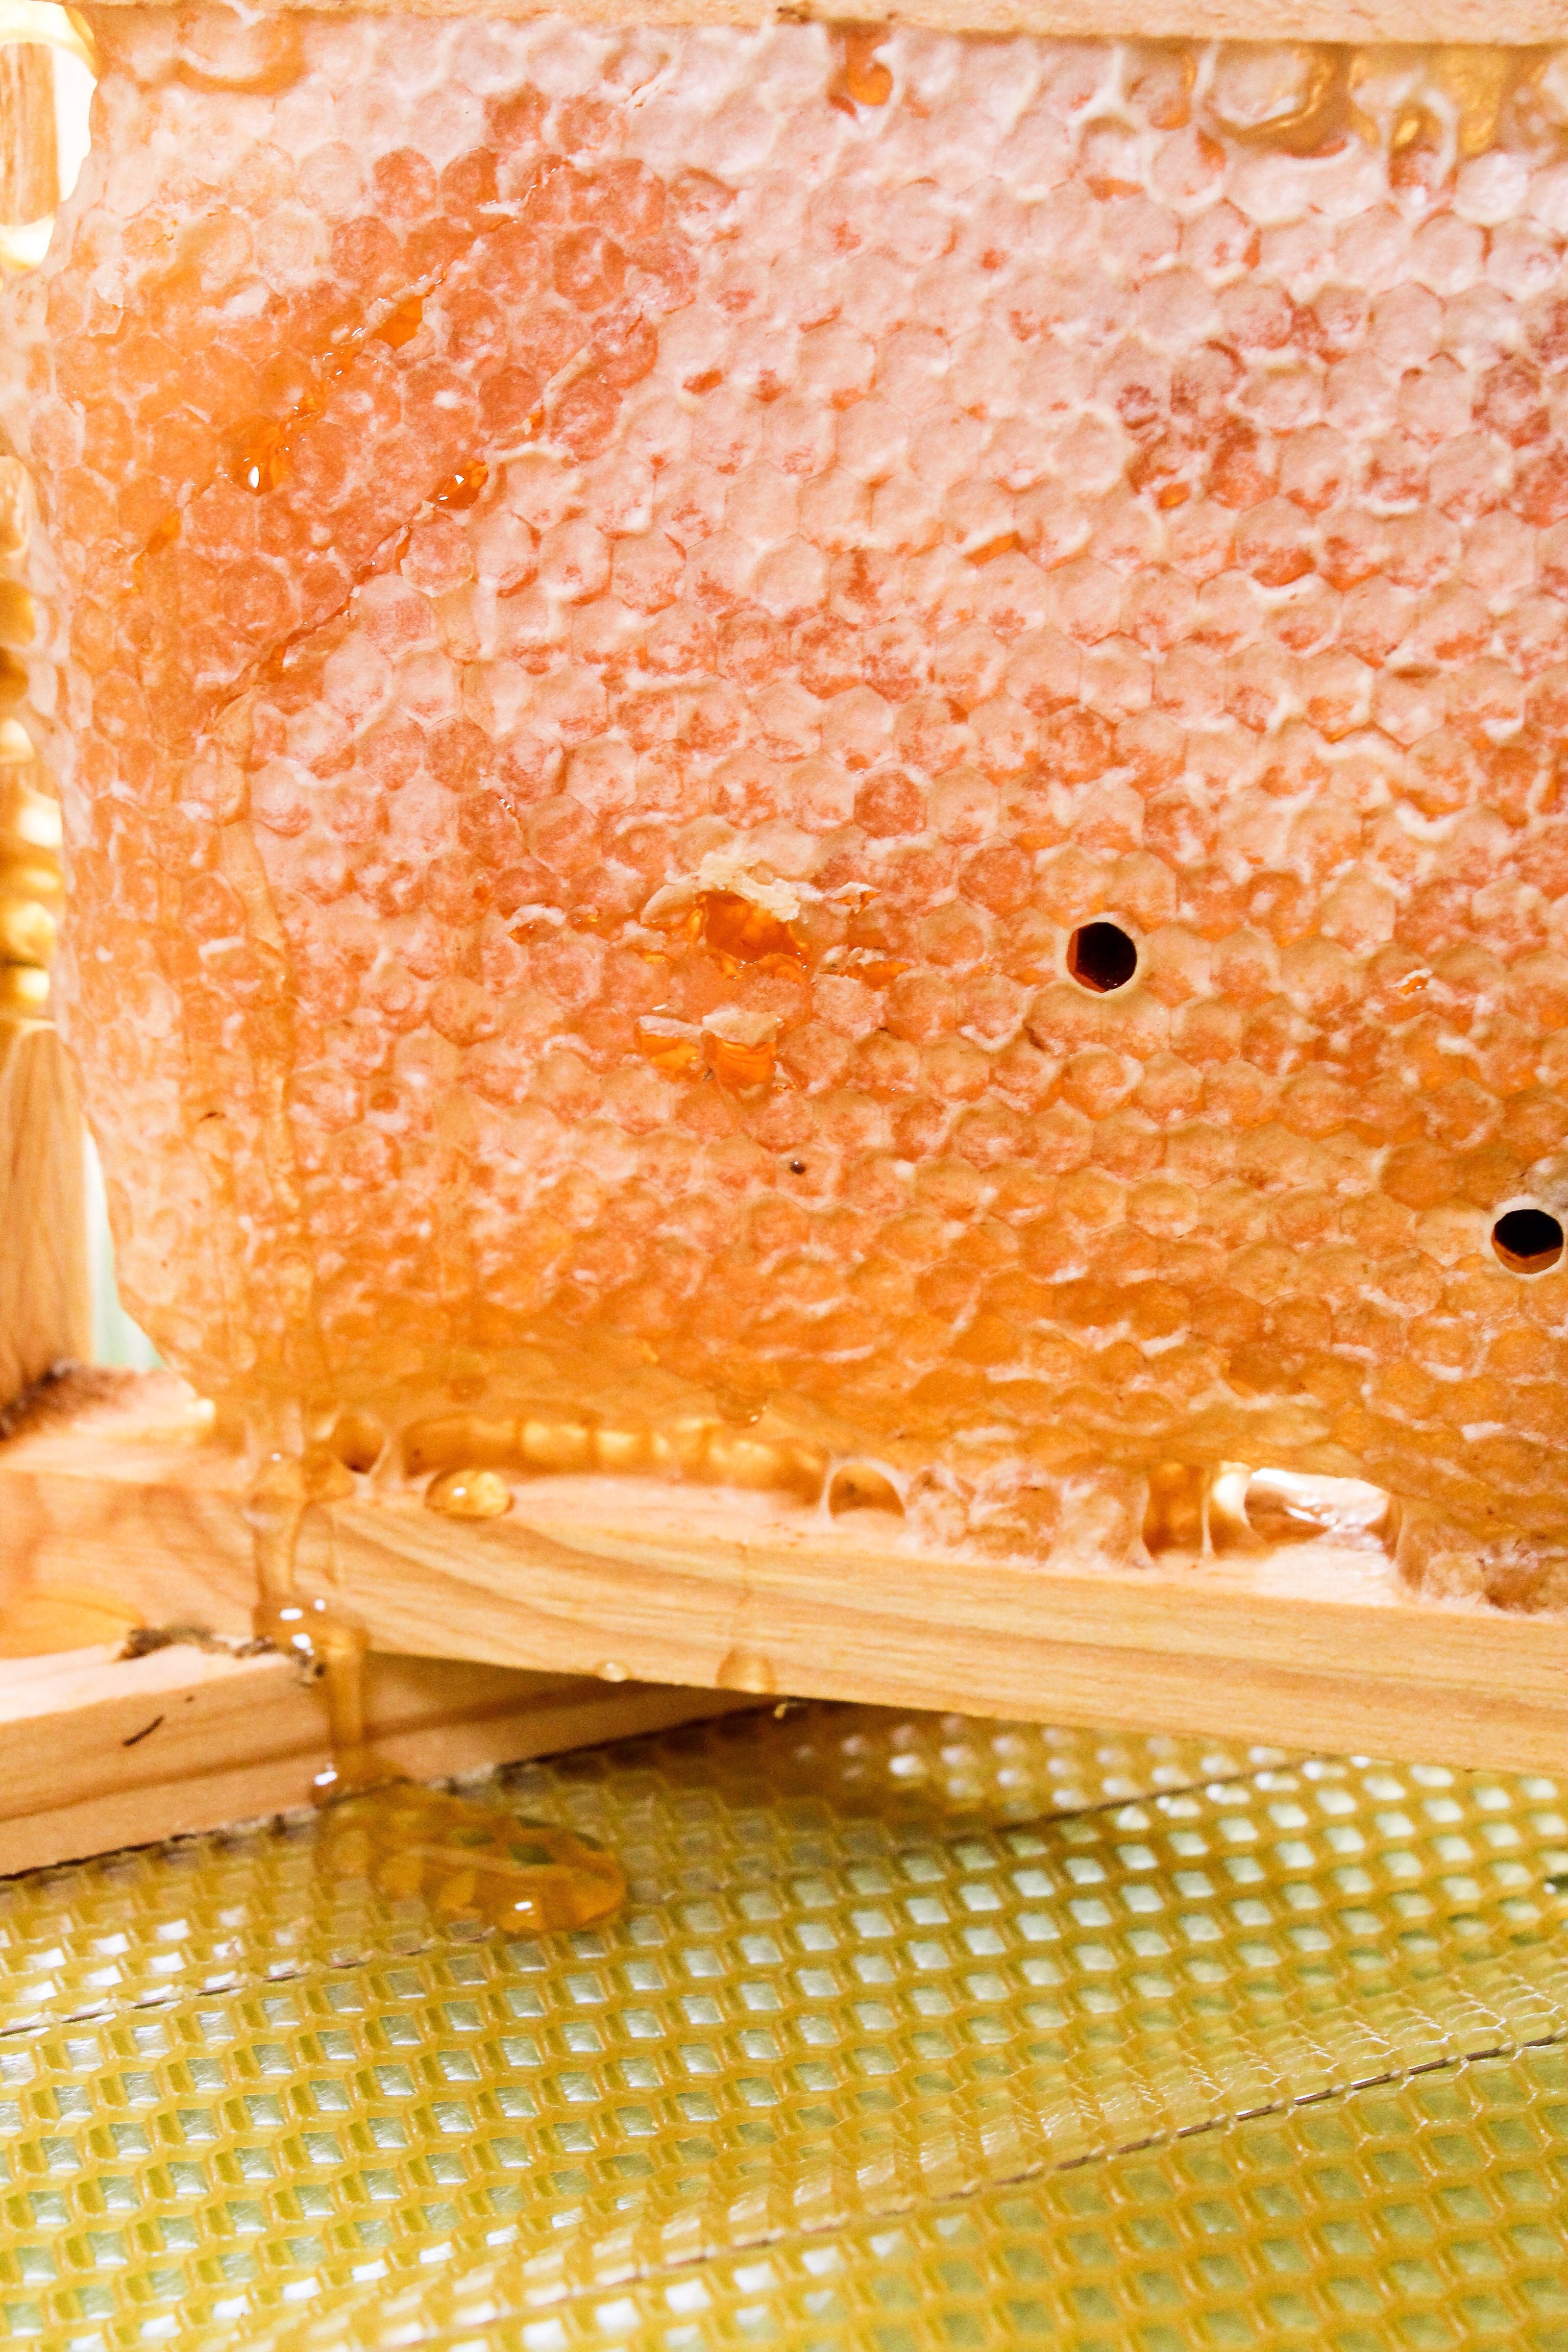
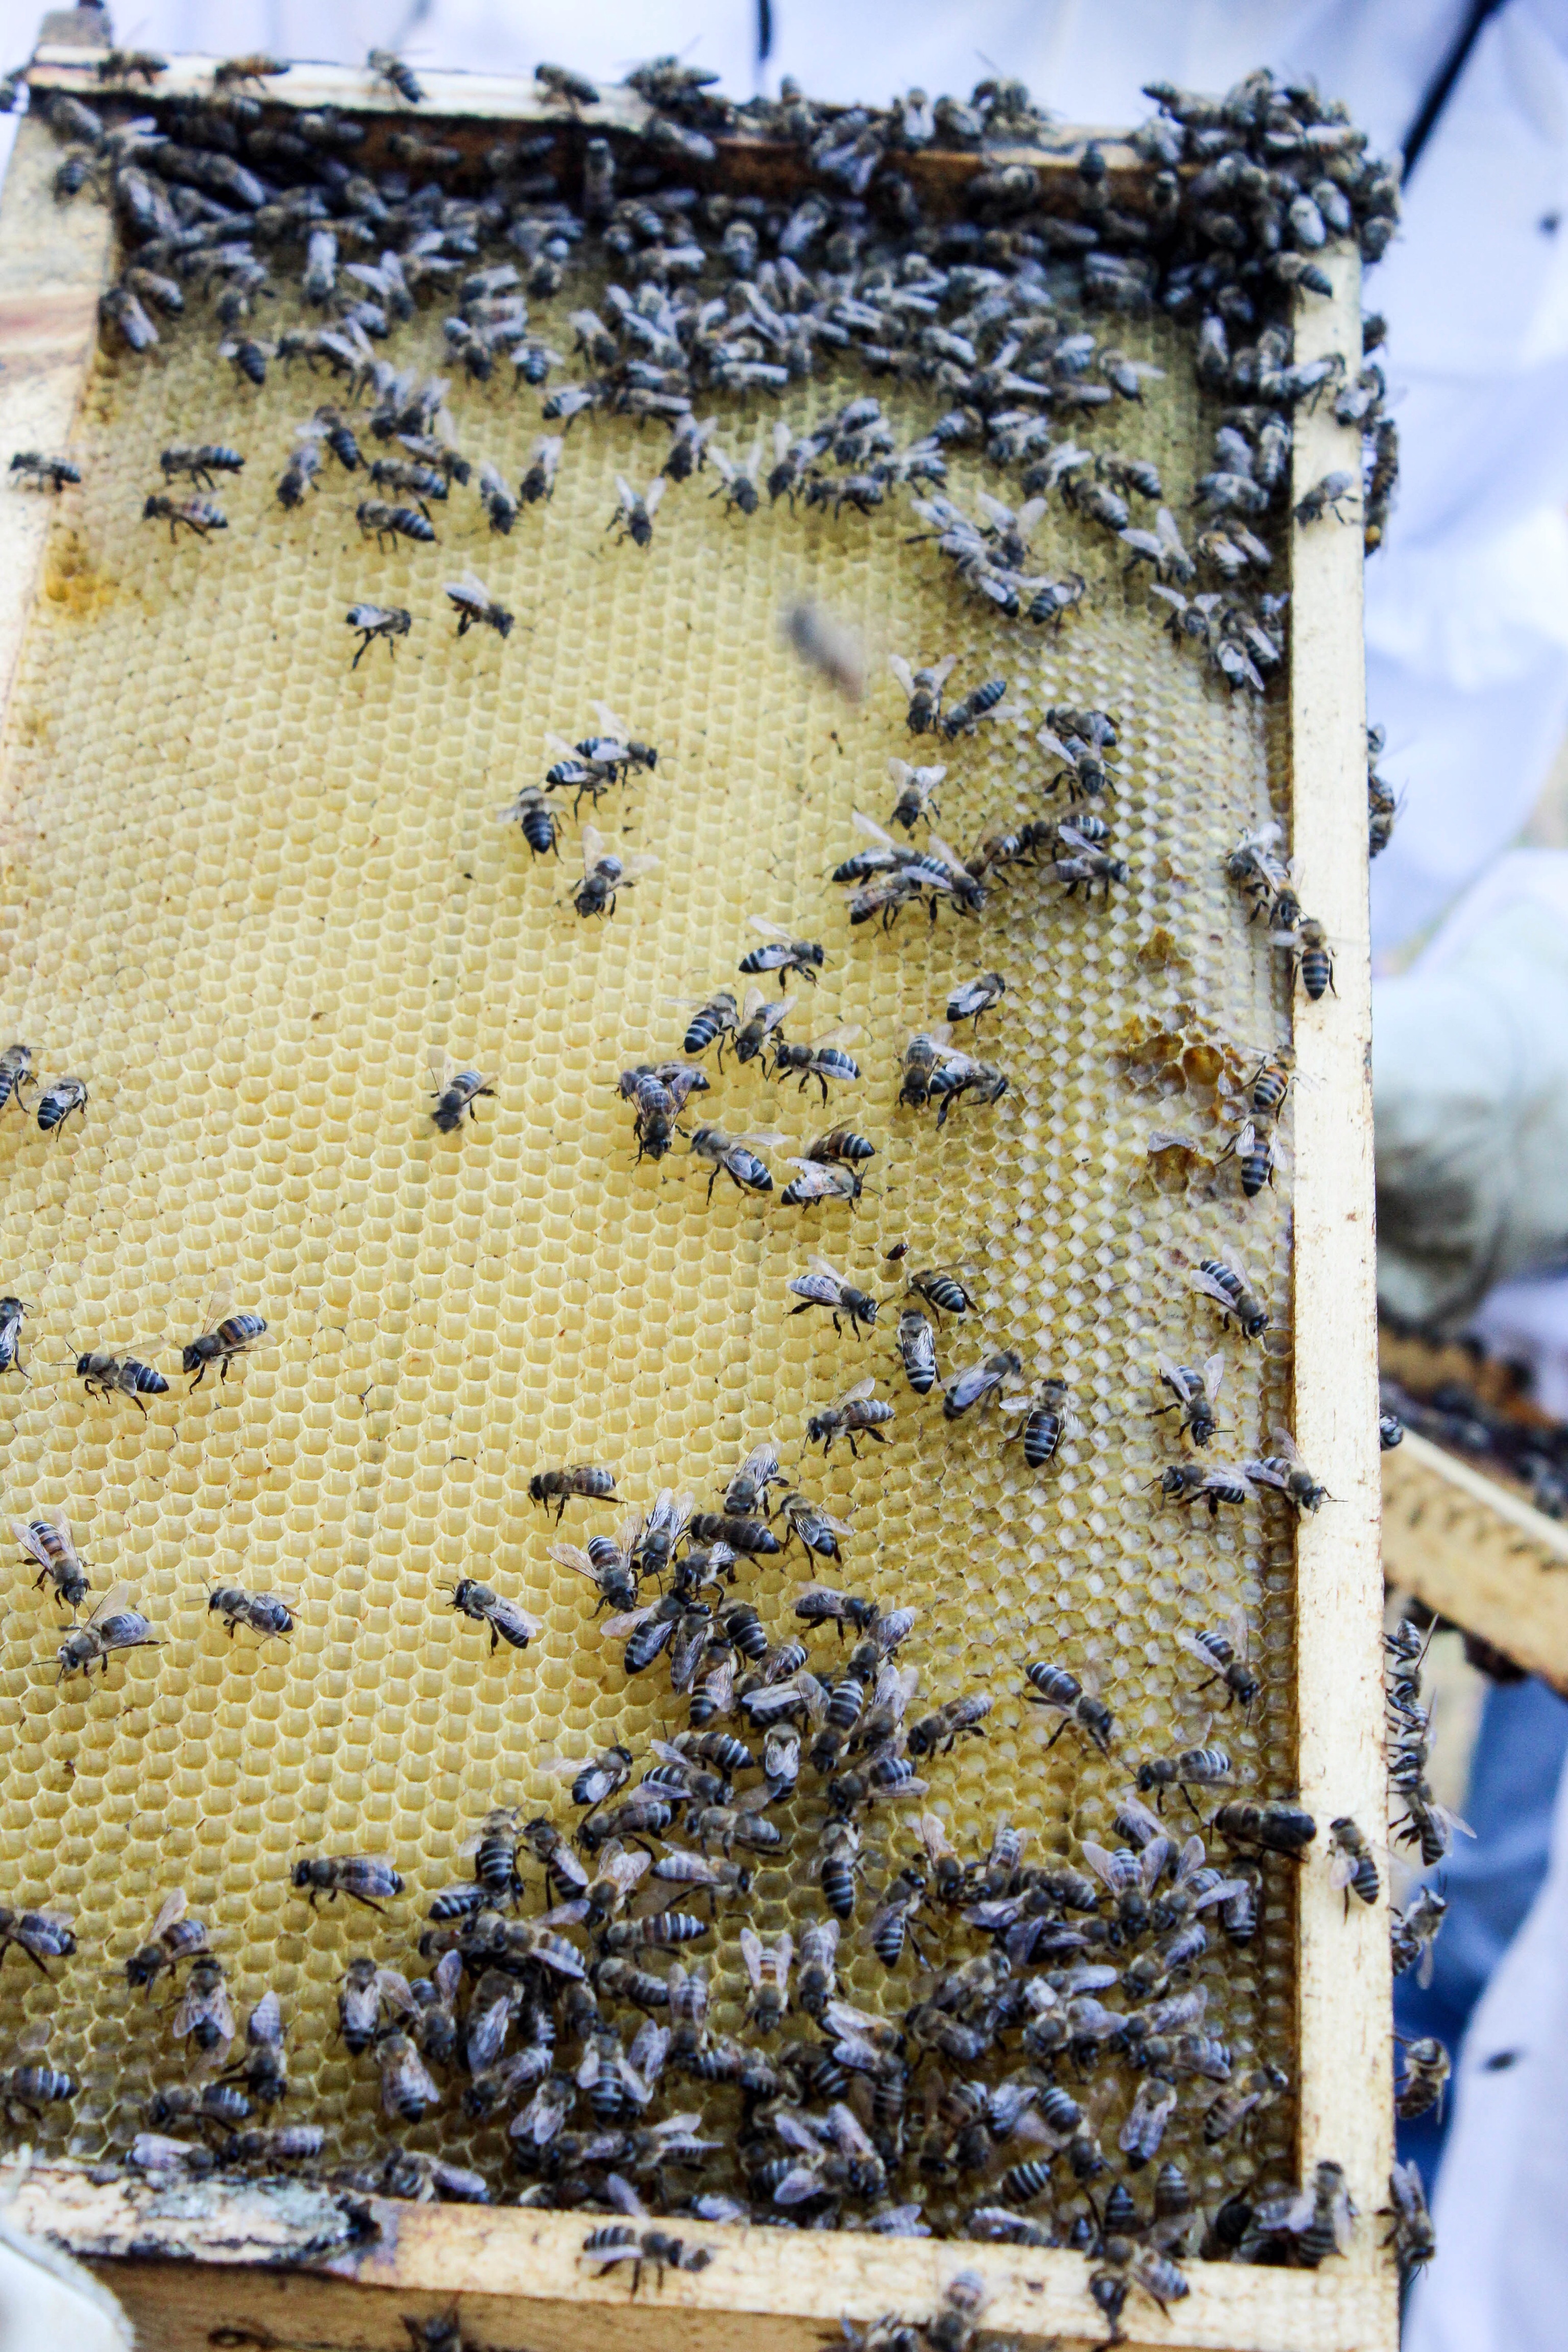
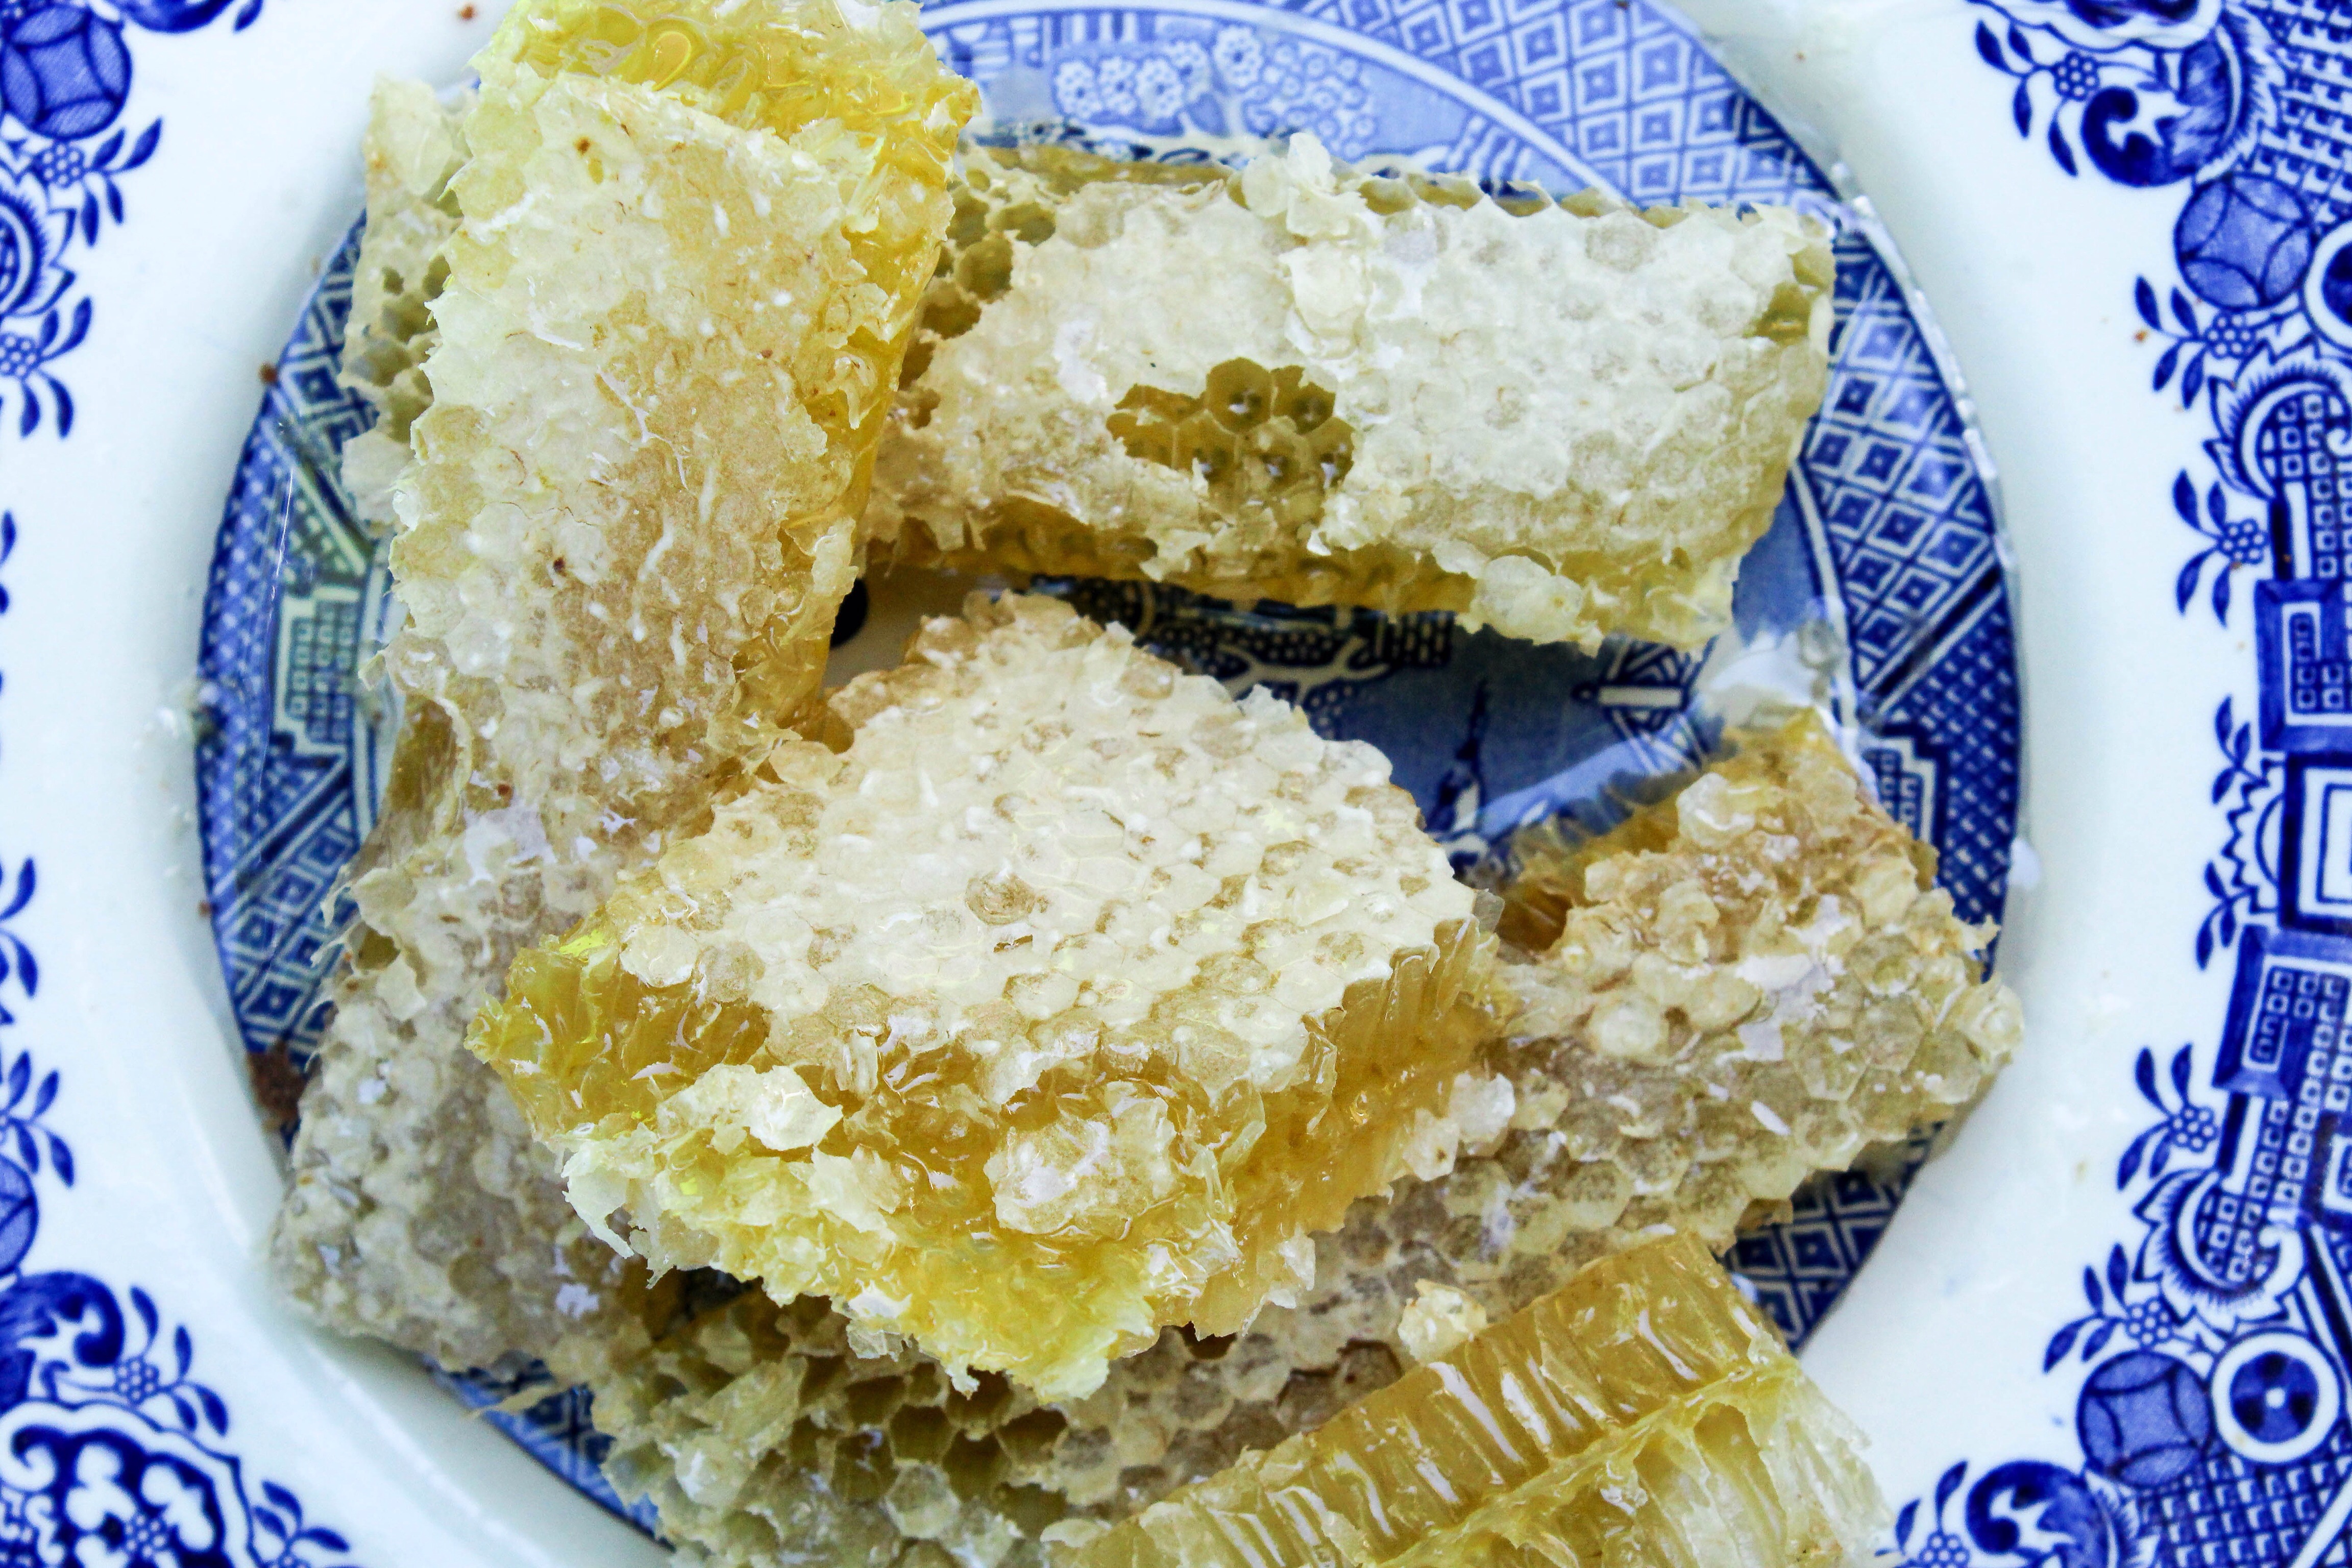
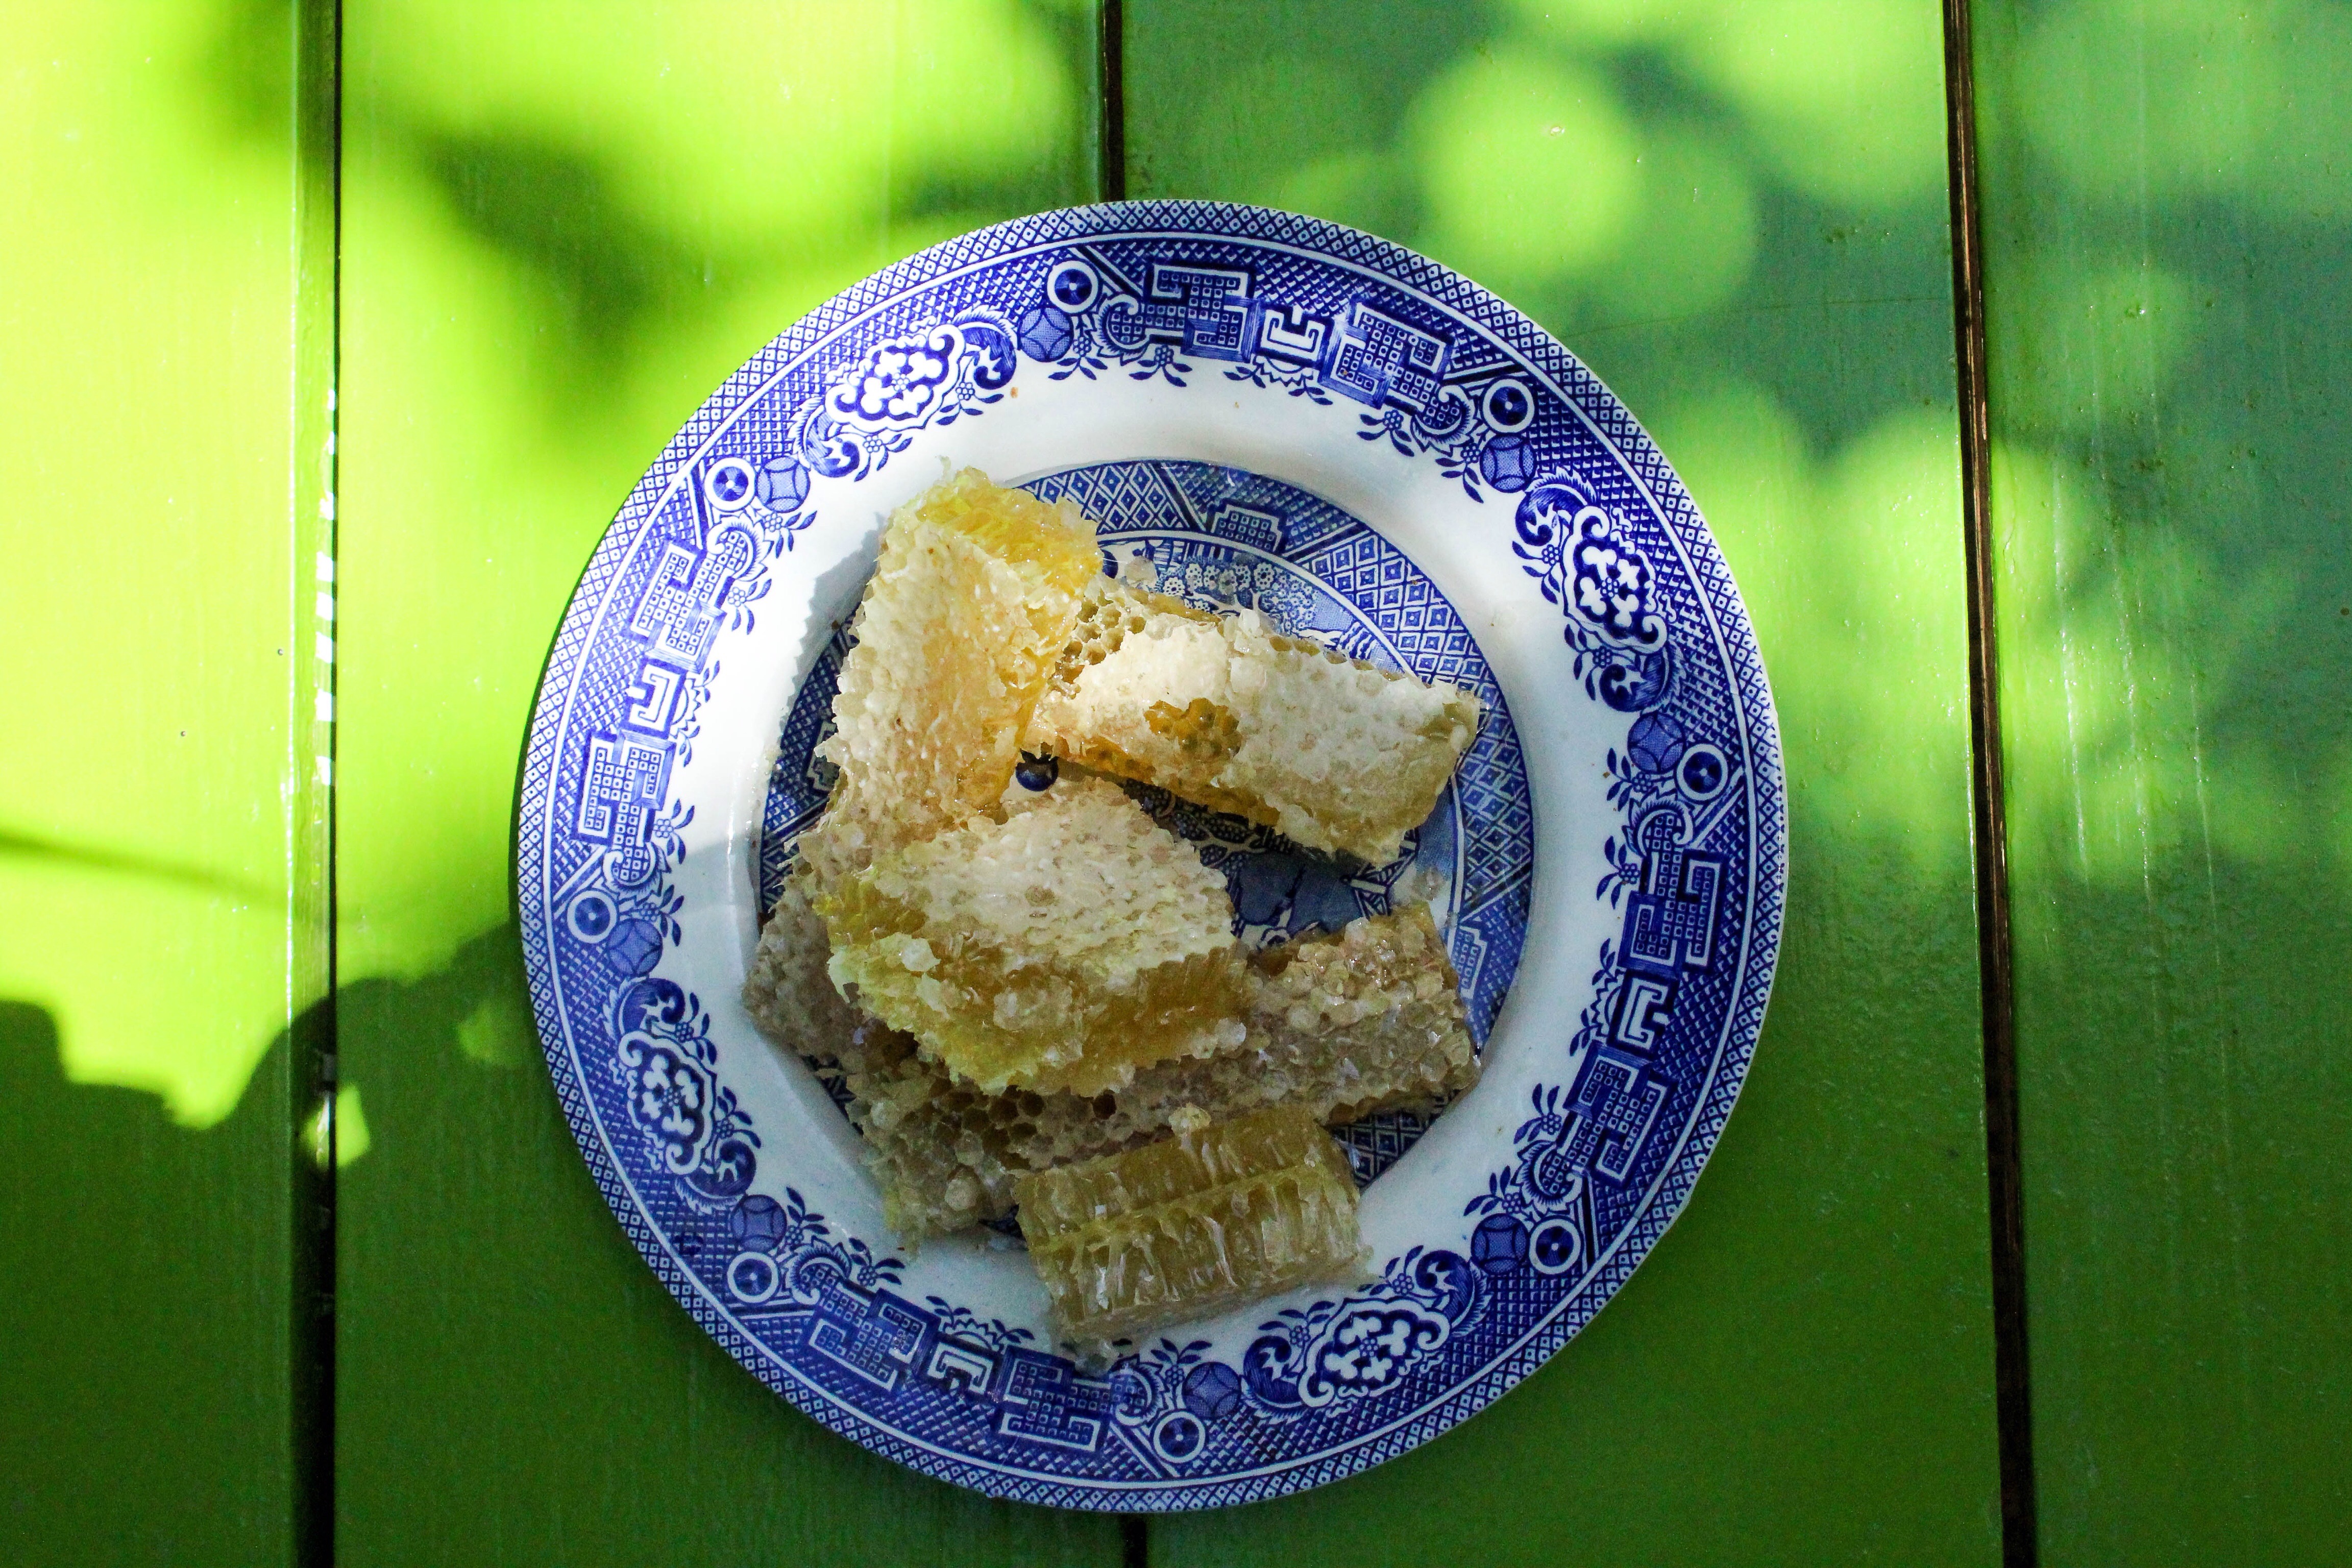
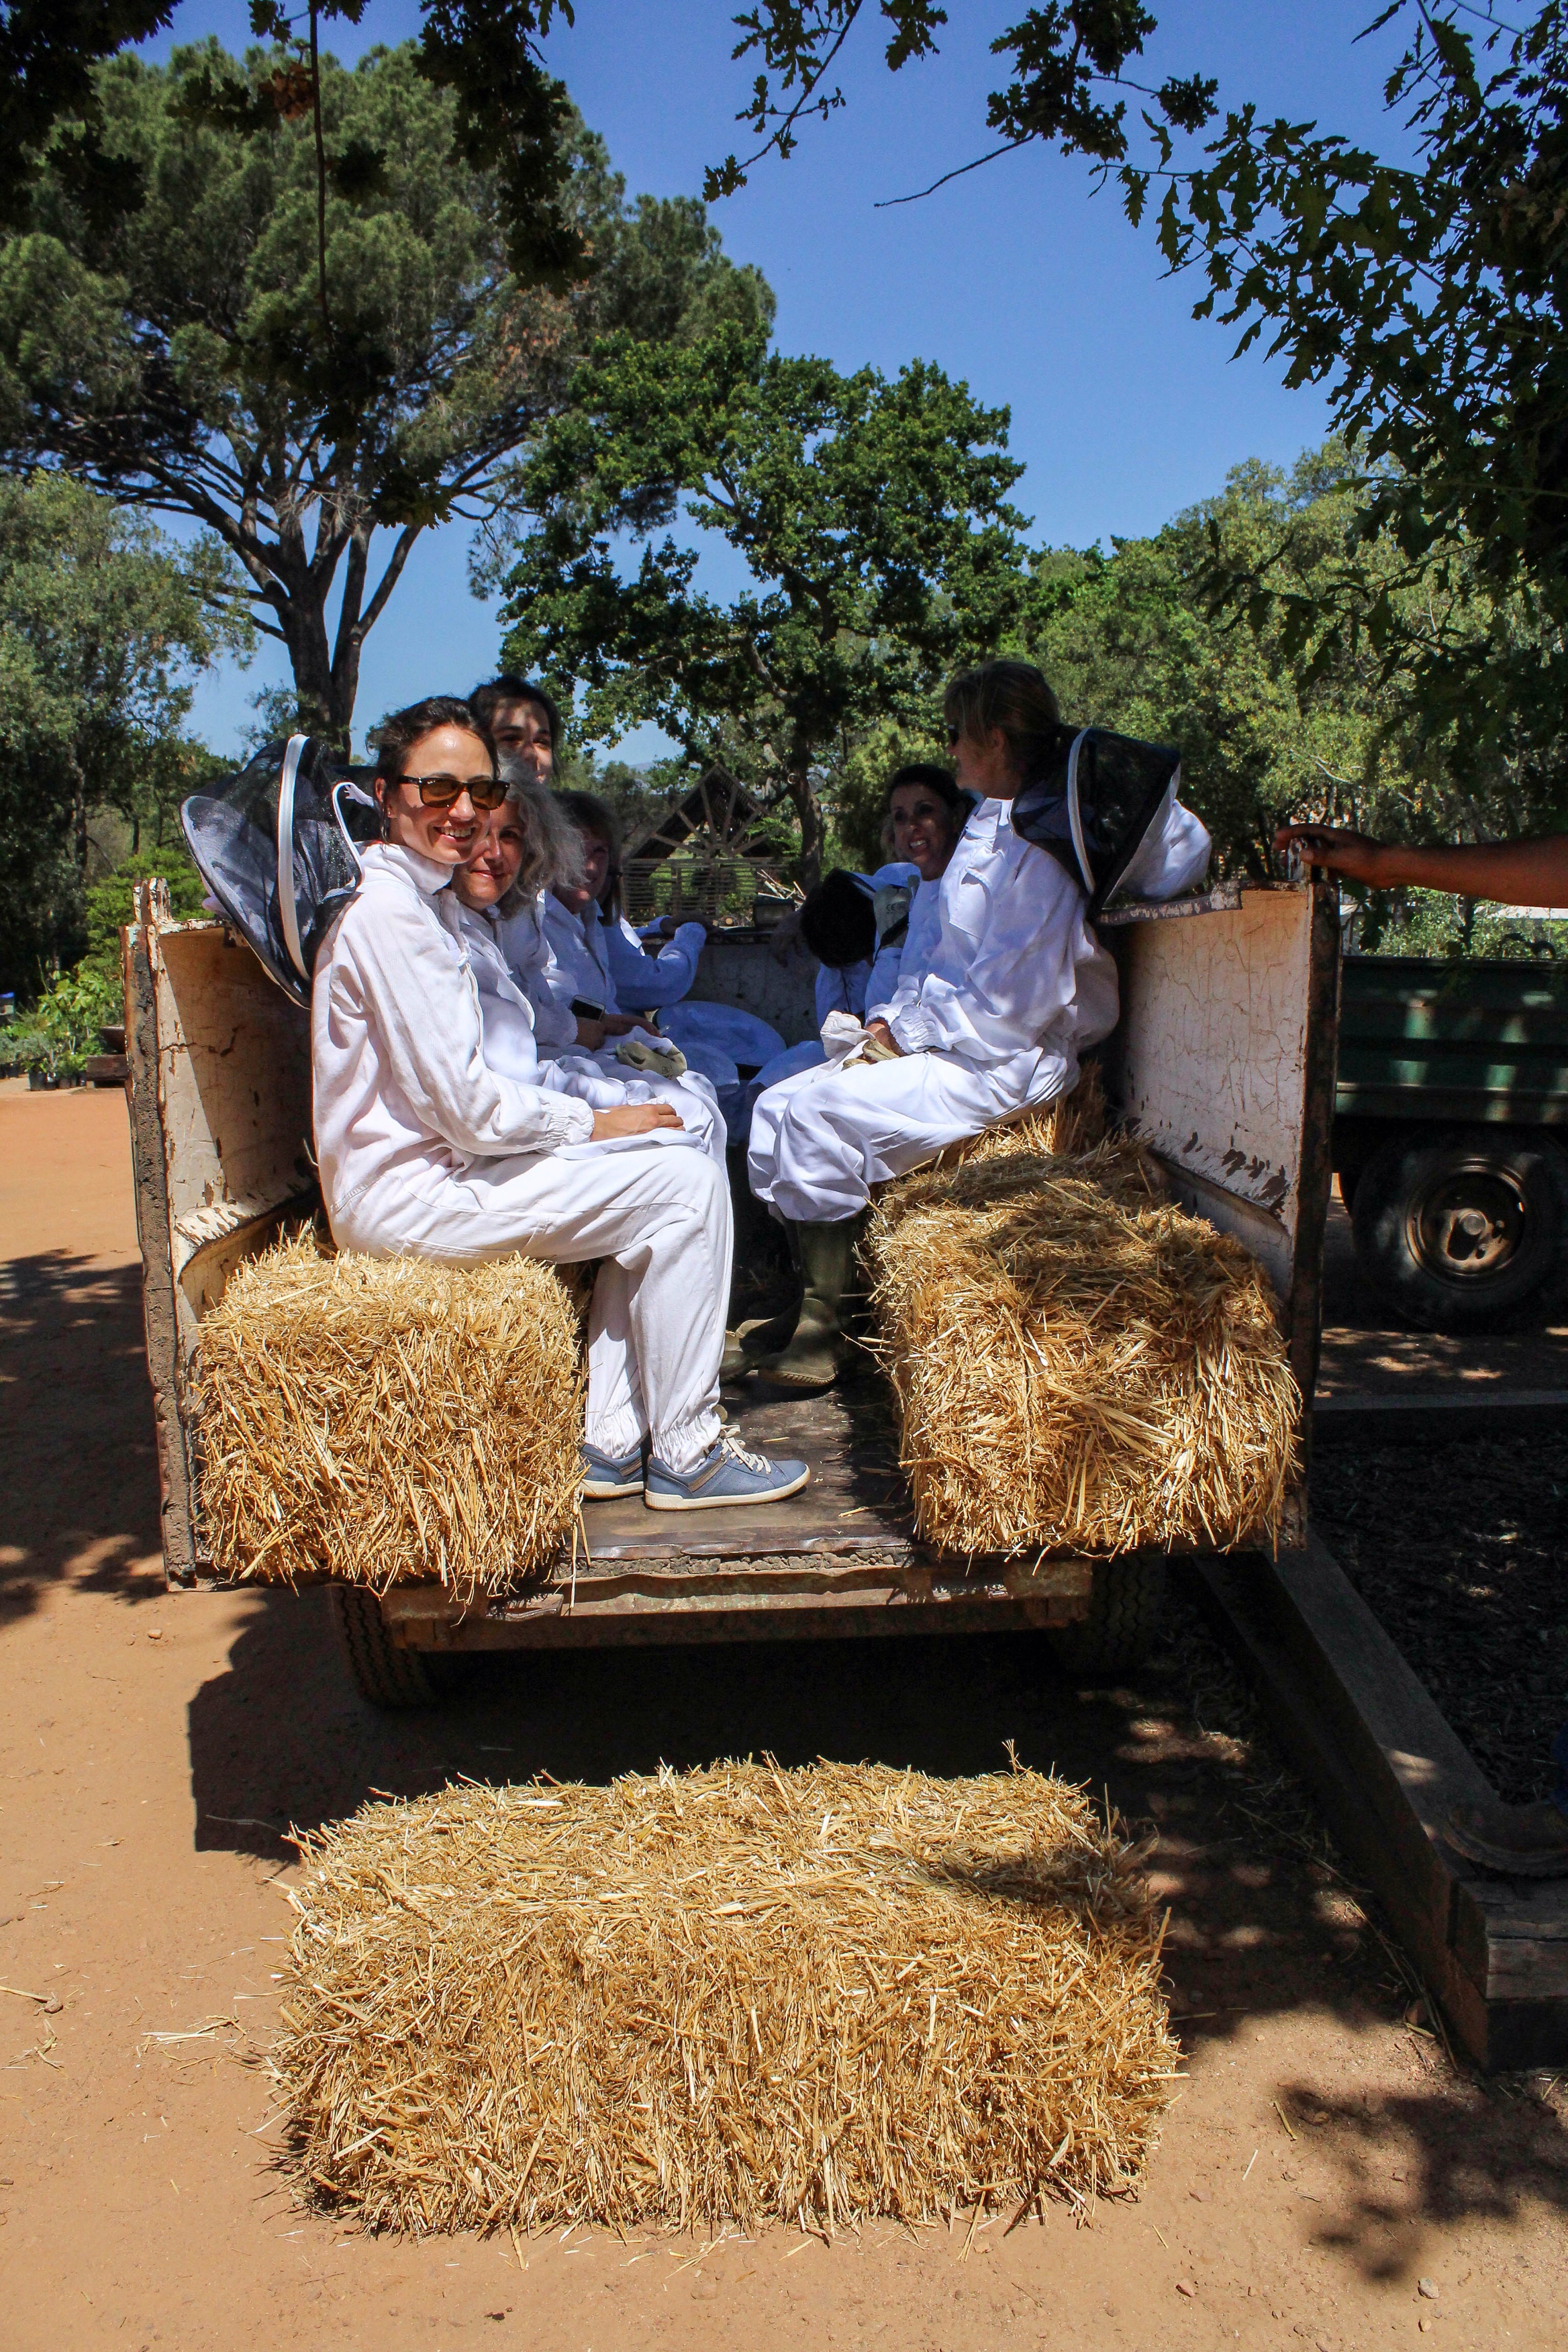
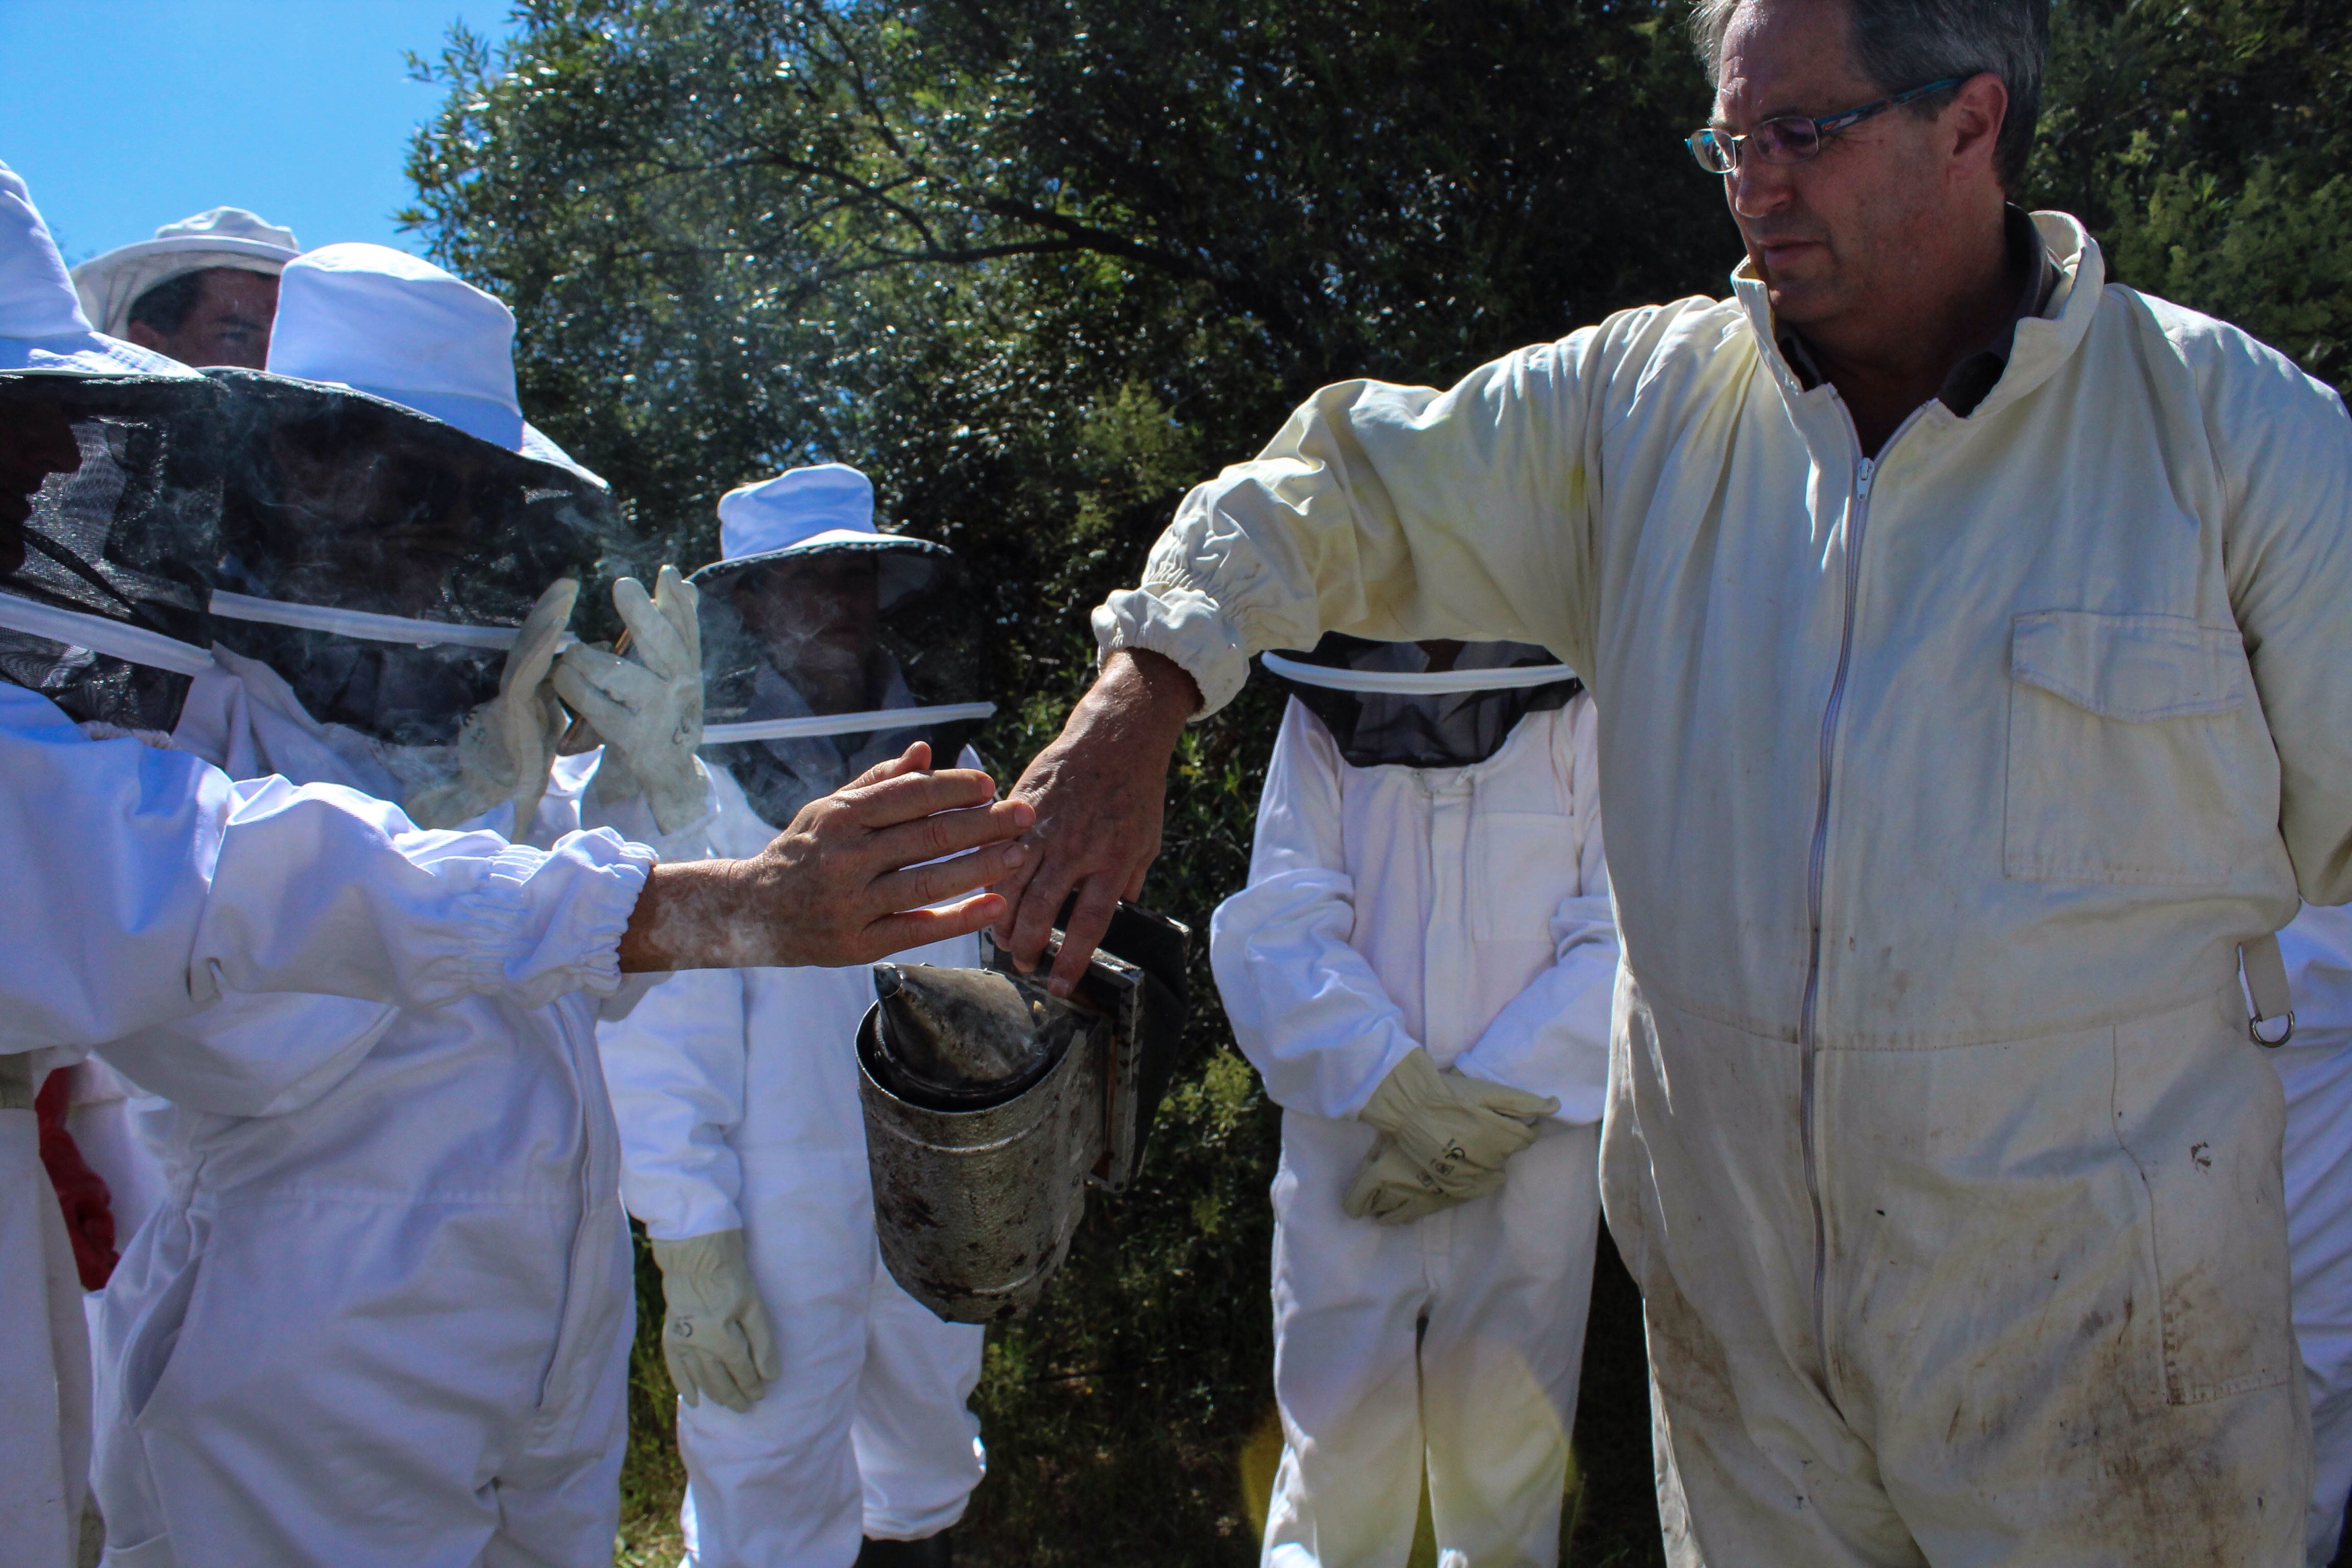
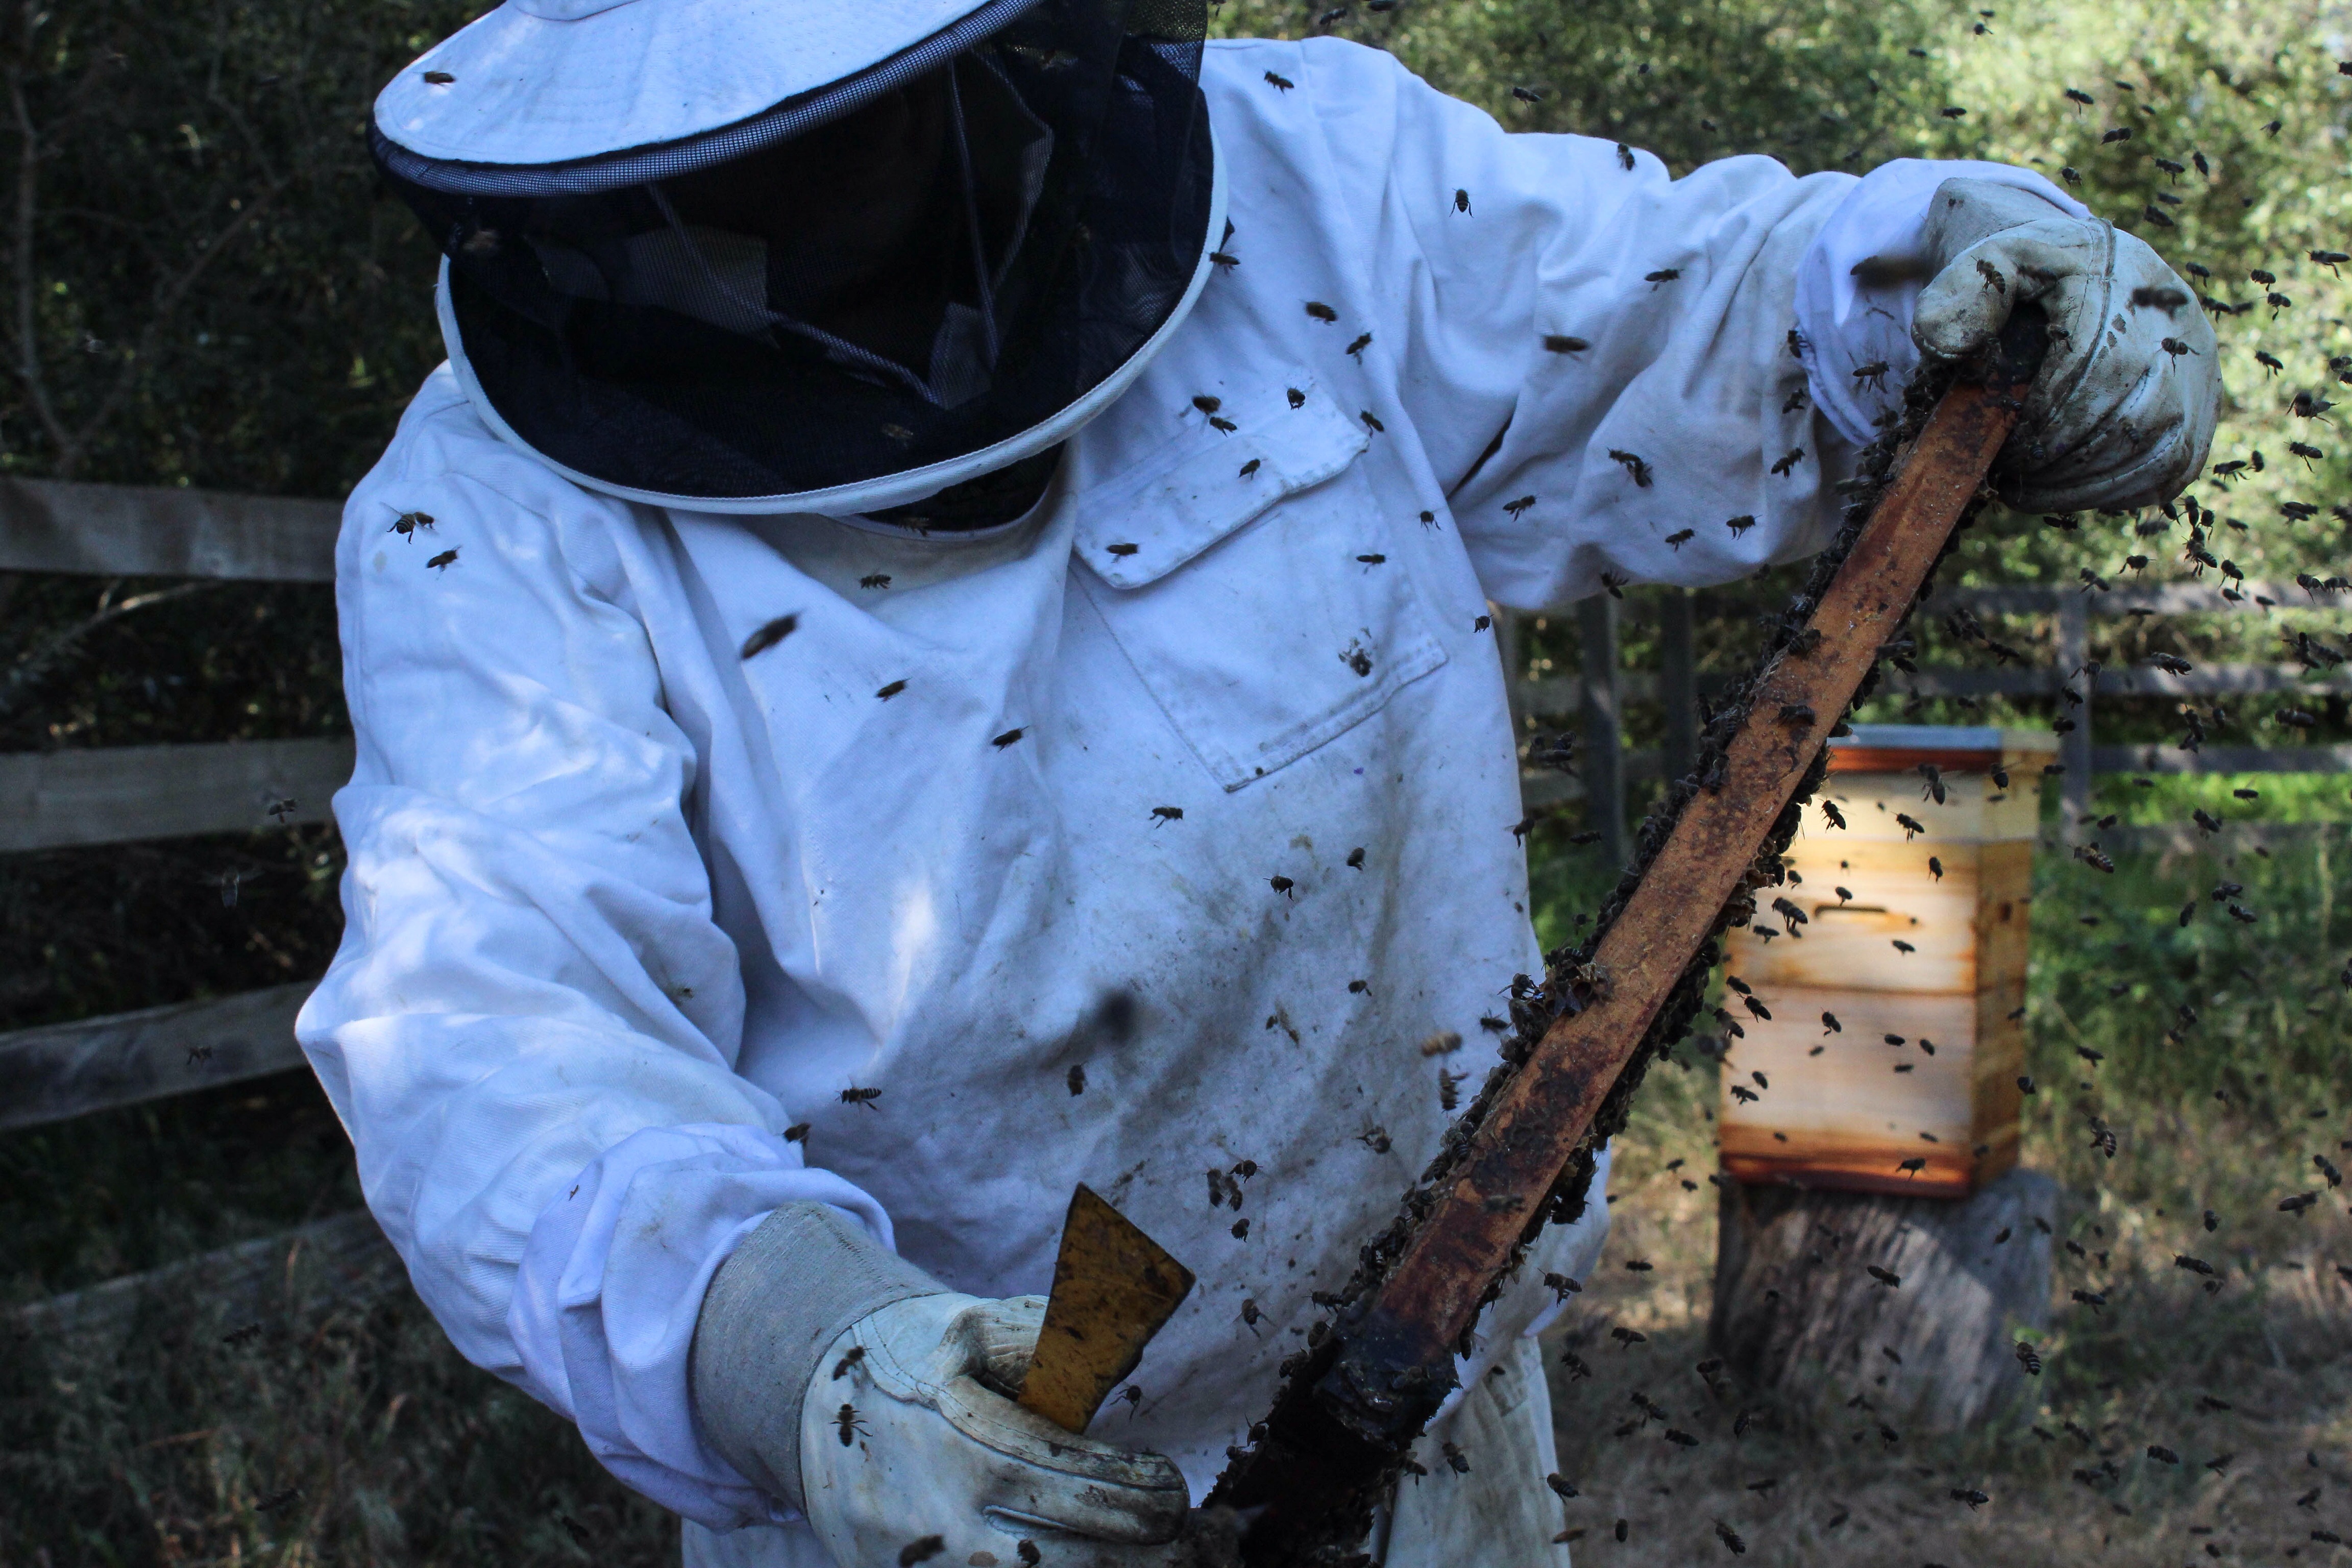
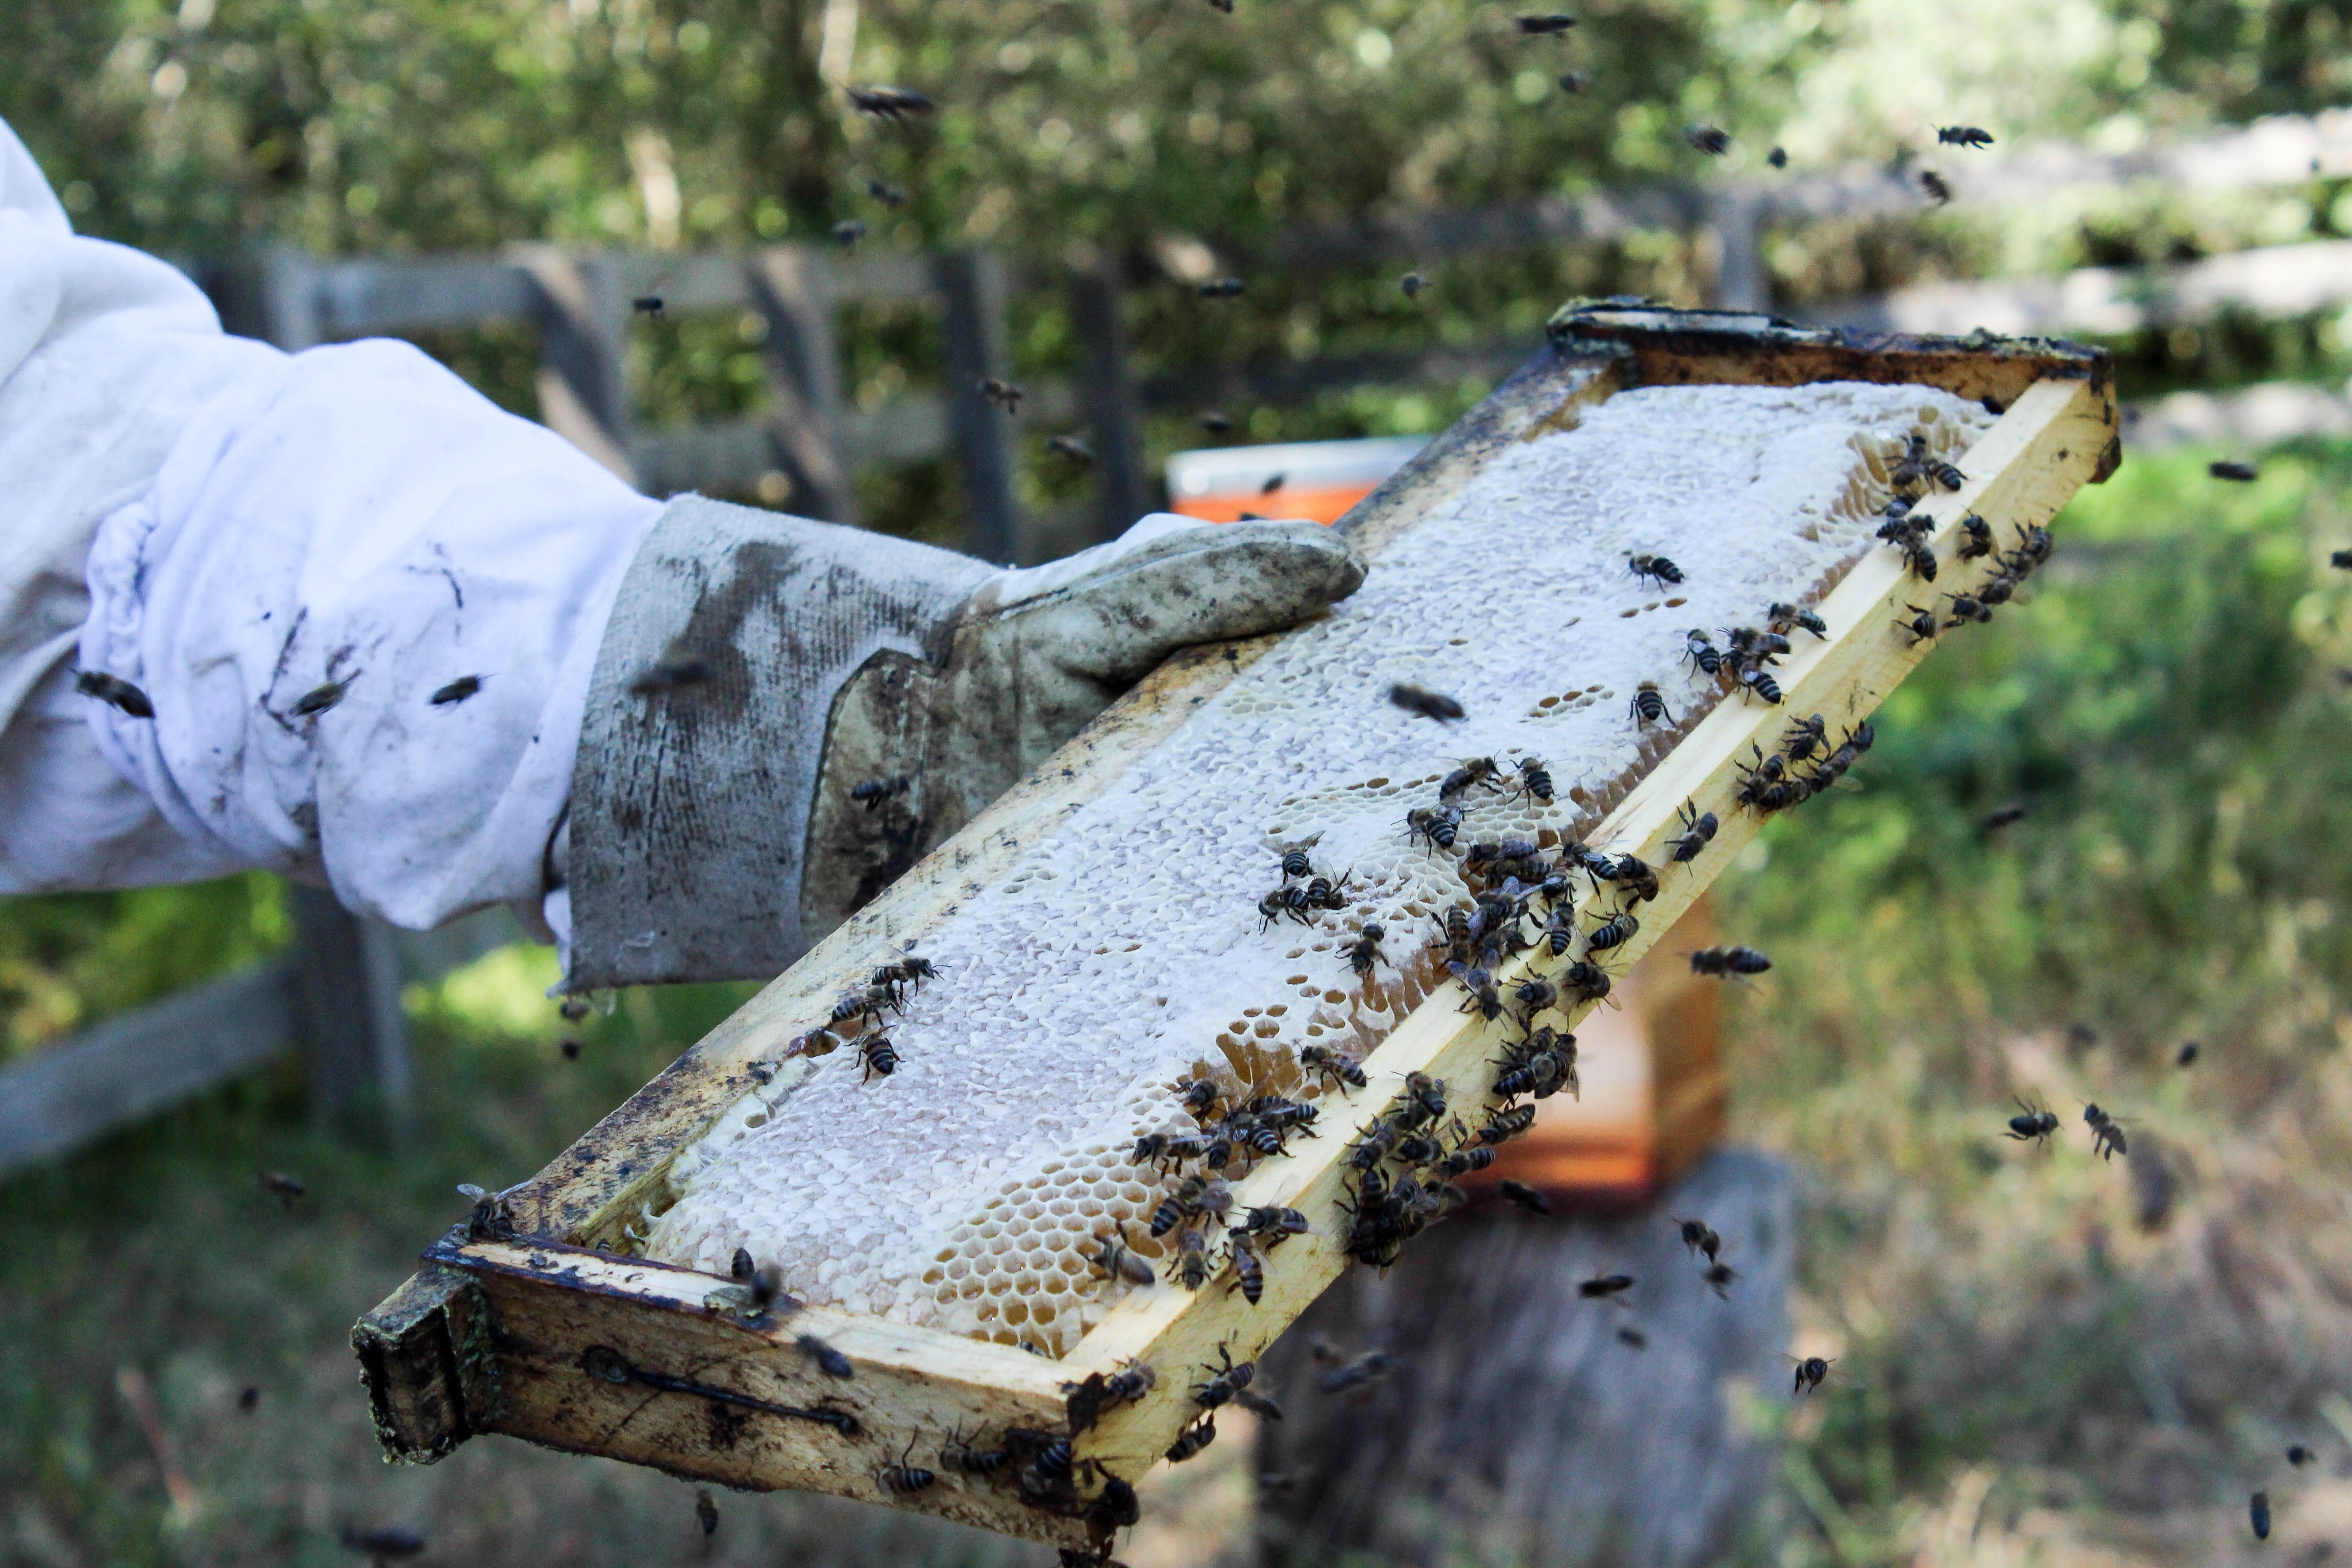
After picking Mike’s brain about all things bees, we headed out to the Greenhouse for an aesthetically appealing lunch, the curried beef, lentil and waterblommetjie pie served was delicious and filing but a tad heavy for that day’s unforgiving heat, but the refreshments on hand, such as their homemade lemonade and iced tea was beyond heavenly, bursting with so much flavour.Using only what is on the farm, the cordials used in the iced tea and lemonade can be purchased at the Farm shop, something I wished I had done before I left to go home! On the table was a platter of freshly gathered seasonal vegetables of which a light and crisp salad was served on the side and as an extra special touch a plate of actual honeycomb with freshly baked bread on the side. I think this was the very first time I ate honeycomb, and what a treat it was! Going back to the loft we all had to be kitted out in beekeeping suits, all suits had to be baggy enough, so the bees couldn’t easily sting us through the suit if it were too tight. Ankles had to be covered up as well, so I brought along my rain boots as recommended by Liesl and Mike. Kitted out and on the back of a truck with hay bales we sat on and admired the scenery as we were chauffeured to the apiary which was about 2km’s from the farm on the same property. Once there, Mike lit the handheld smoker and gave us a run down of do’s and don’ts when lighting the smoker. Tip number 1: Always ensure the smoke that the smoker emits is cool enough, demonstrated by blowing the smoke on your wrist or hand, if it is cool enough for you, then it is safe enough for the bees. Like all things to do with fire, never leave the smoker unattended, this has been done in the past and has been reported to have burned down property, vegetation and even harm/kill the bees.
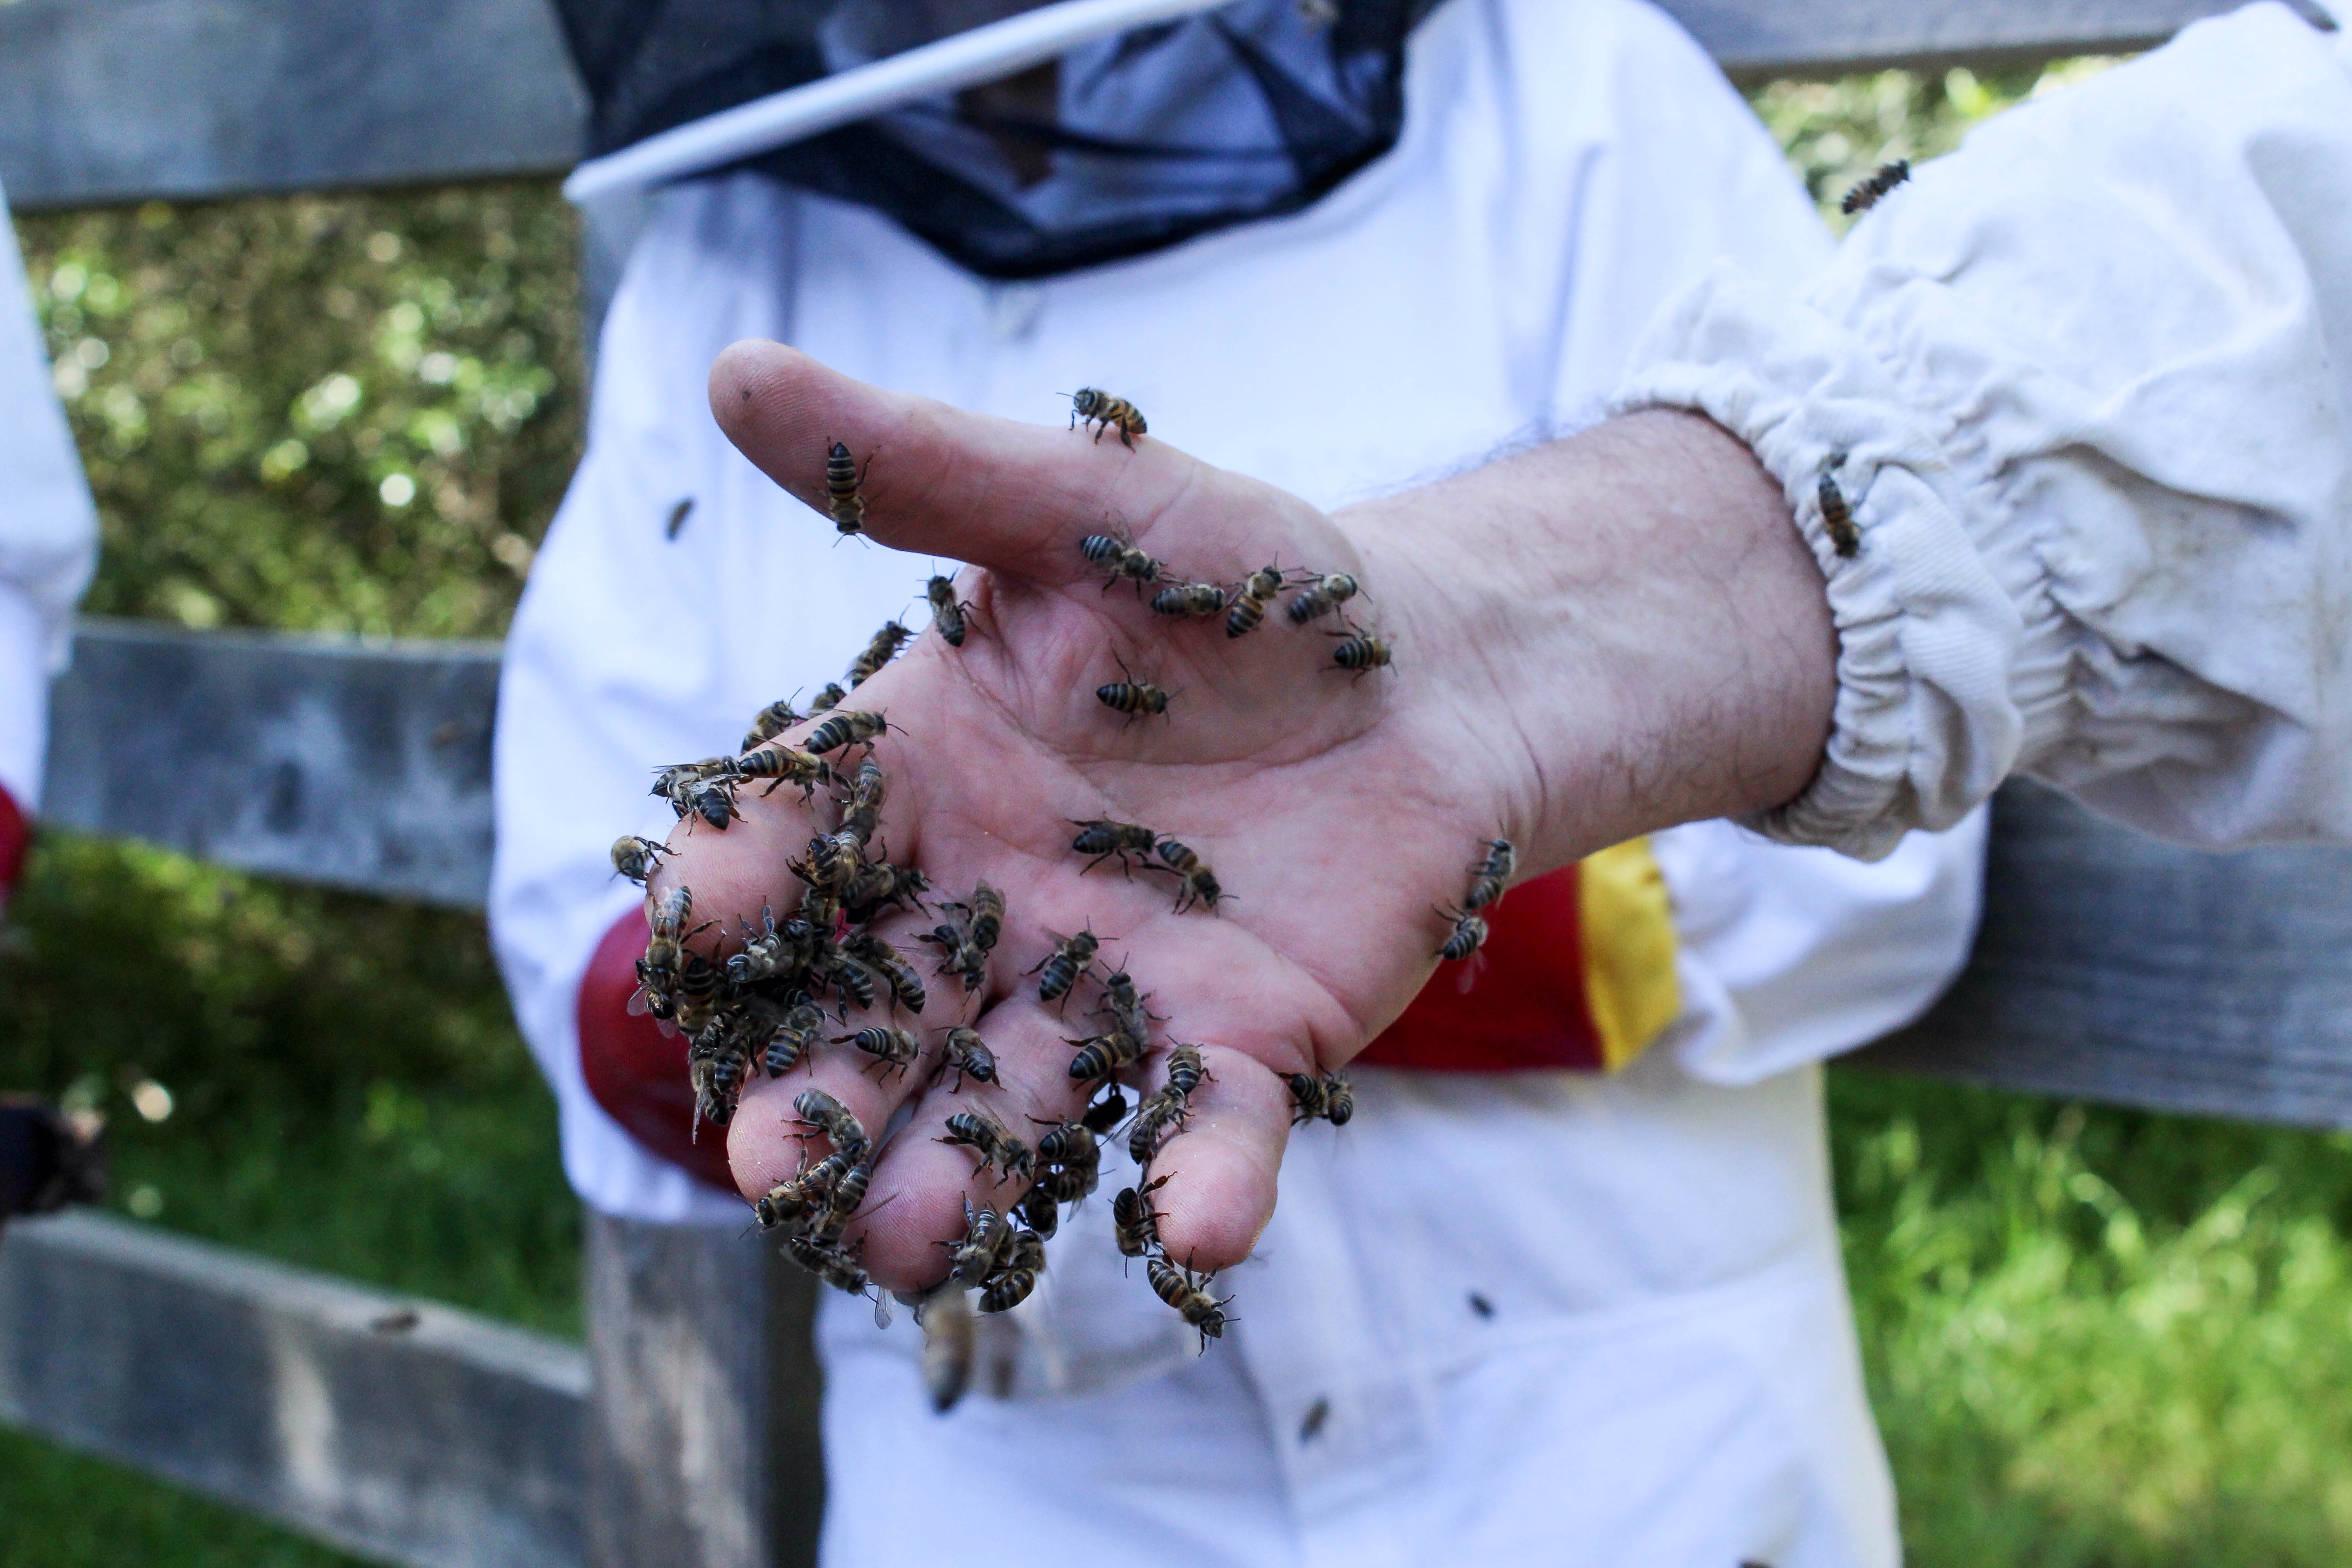
Mike’s hand full of calm and slightly sedated bees. Not to be attempted at home.
Heading into the apiary is quite an experience for the avid bee lover or for someone who wants to get over their fear of bees. The first hive that was opened was rather nervous, but after a few puffs of calming smoke, all was well and the bees seemed a lot more hospitable from the second and third hive. A few of things we spotted was a queen right at the bottom of a hive in a corner, where she would usually be, a worker bee being born, and a few bees feeding. The late afternoon heat was unforgiving and many of us were spent by the time we went to the apiary, but for most of us it will be an experience we will never forget!
Blue skies with a chance of bees!
The workshops take place annually, hosting only two in October, as this is the most convenient time, so as to not disturb the bees or their habitat. I would strongly recommend this insightful workshop to any avid or potential beekeepers, anyone who, like me is passionate about food or anyone looking for more information about bees with a sensory experience and meeting like minded individuals as an added bonus.
A sensory and educational experience it certainly was, I have gained so much insight into bees, their lifestyles, threats against them and their habitats. I definitely have more of an appreciation for bees now more than ever.
I look forward to sharing my next adventure with you!
Dominique x
**This post was not sponsored, all costs for the workshop I have paid for**
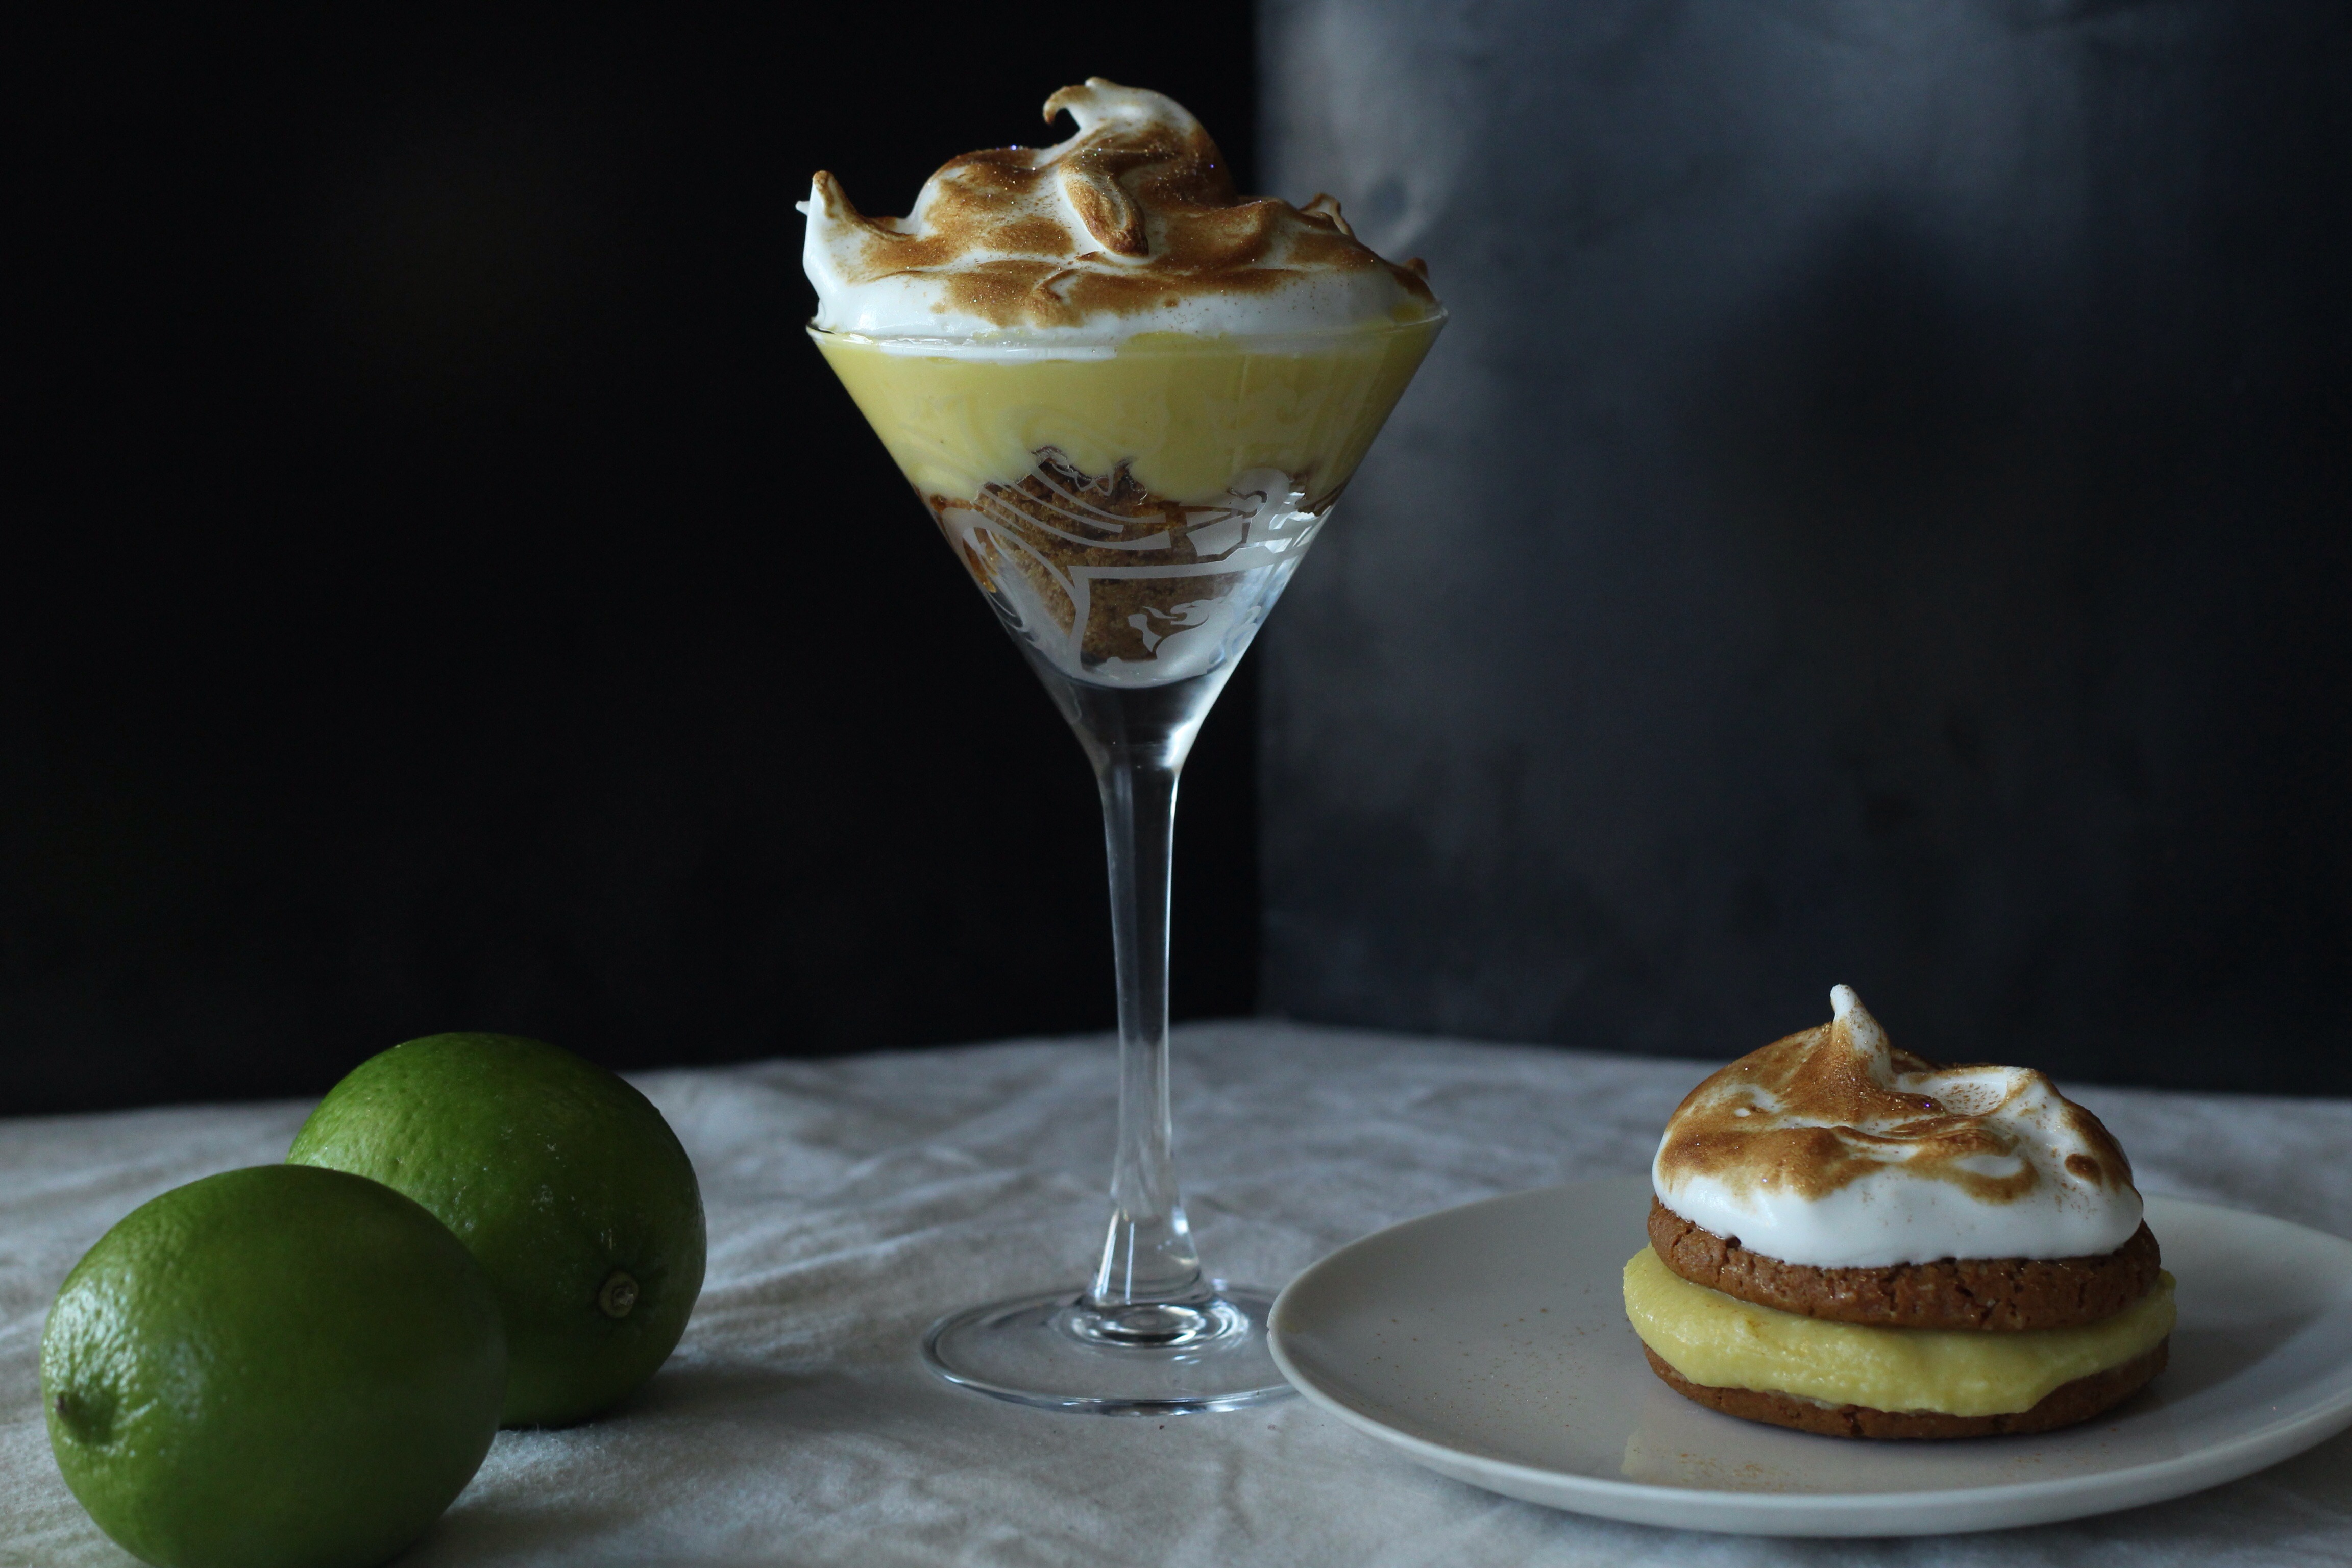
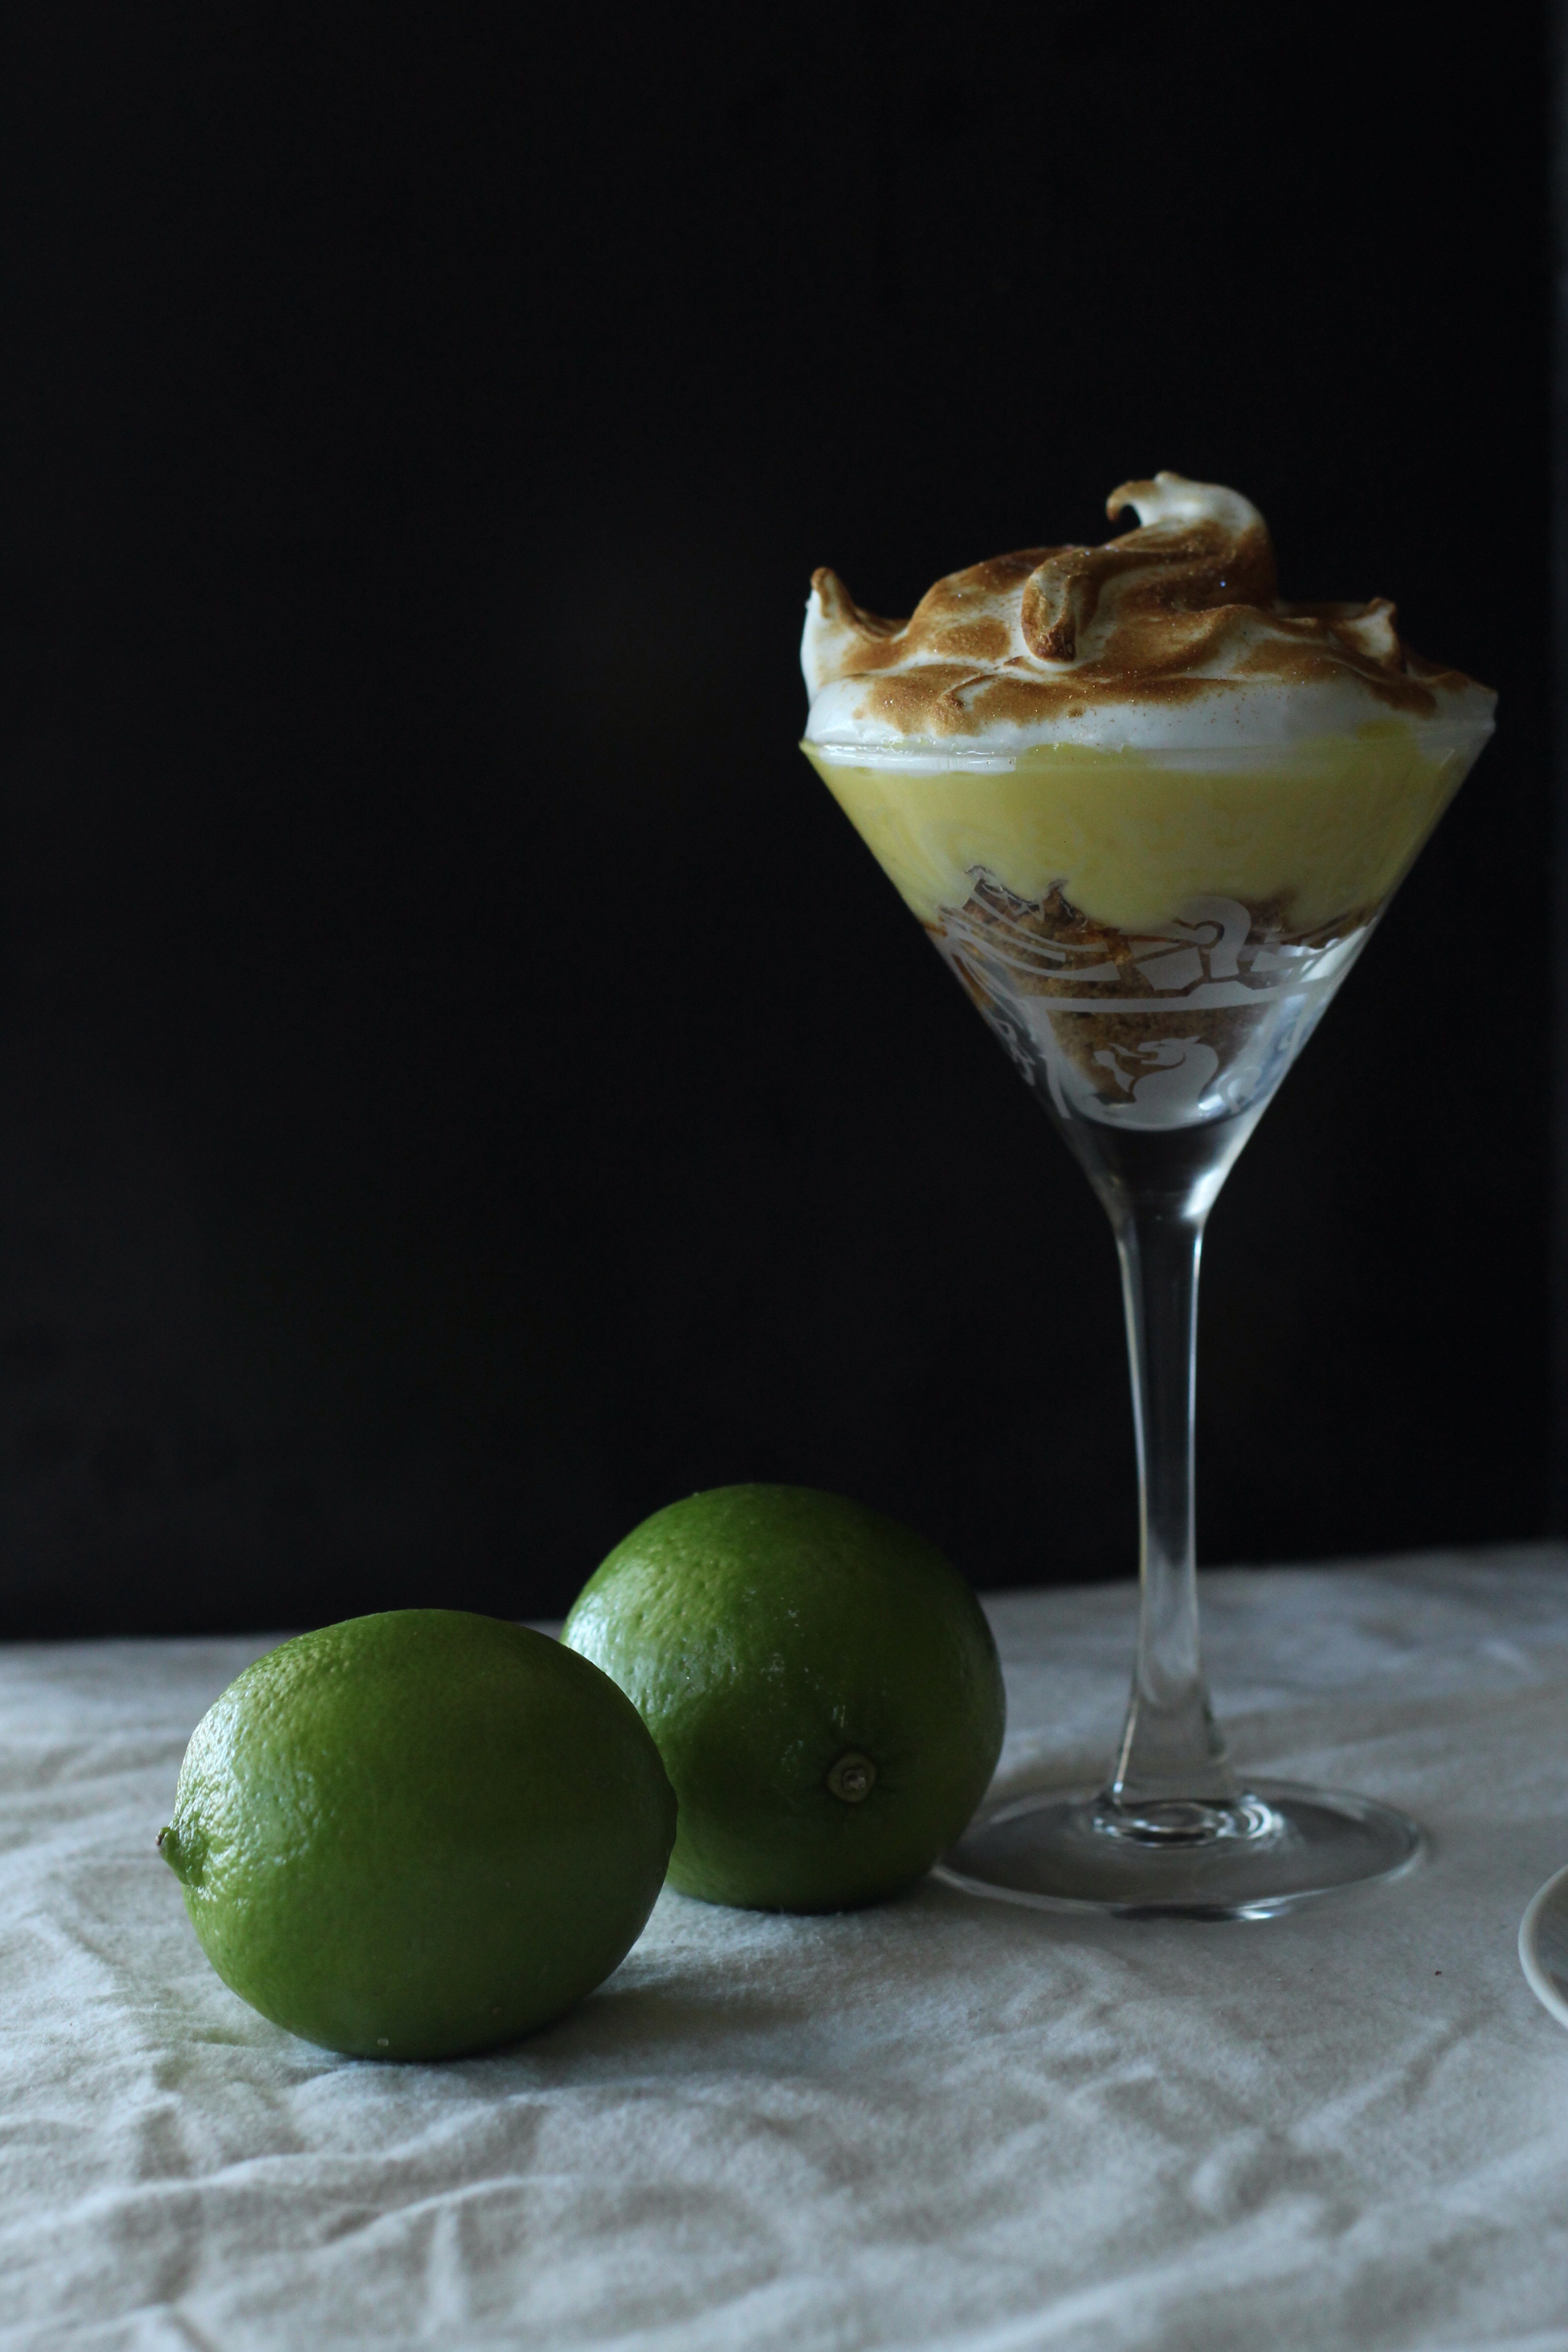
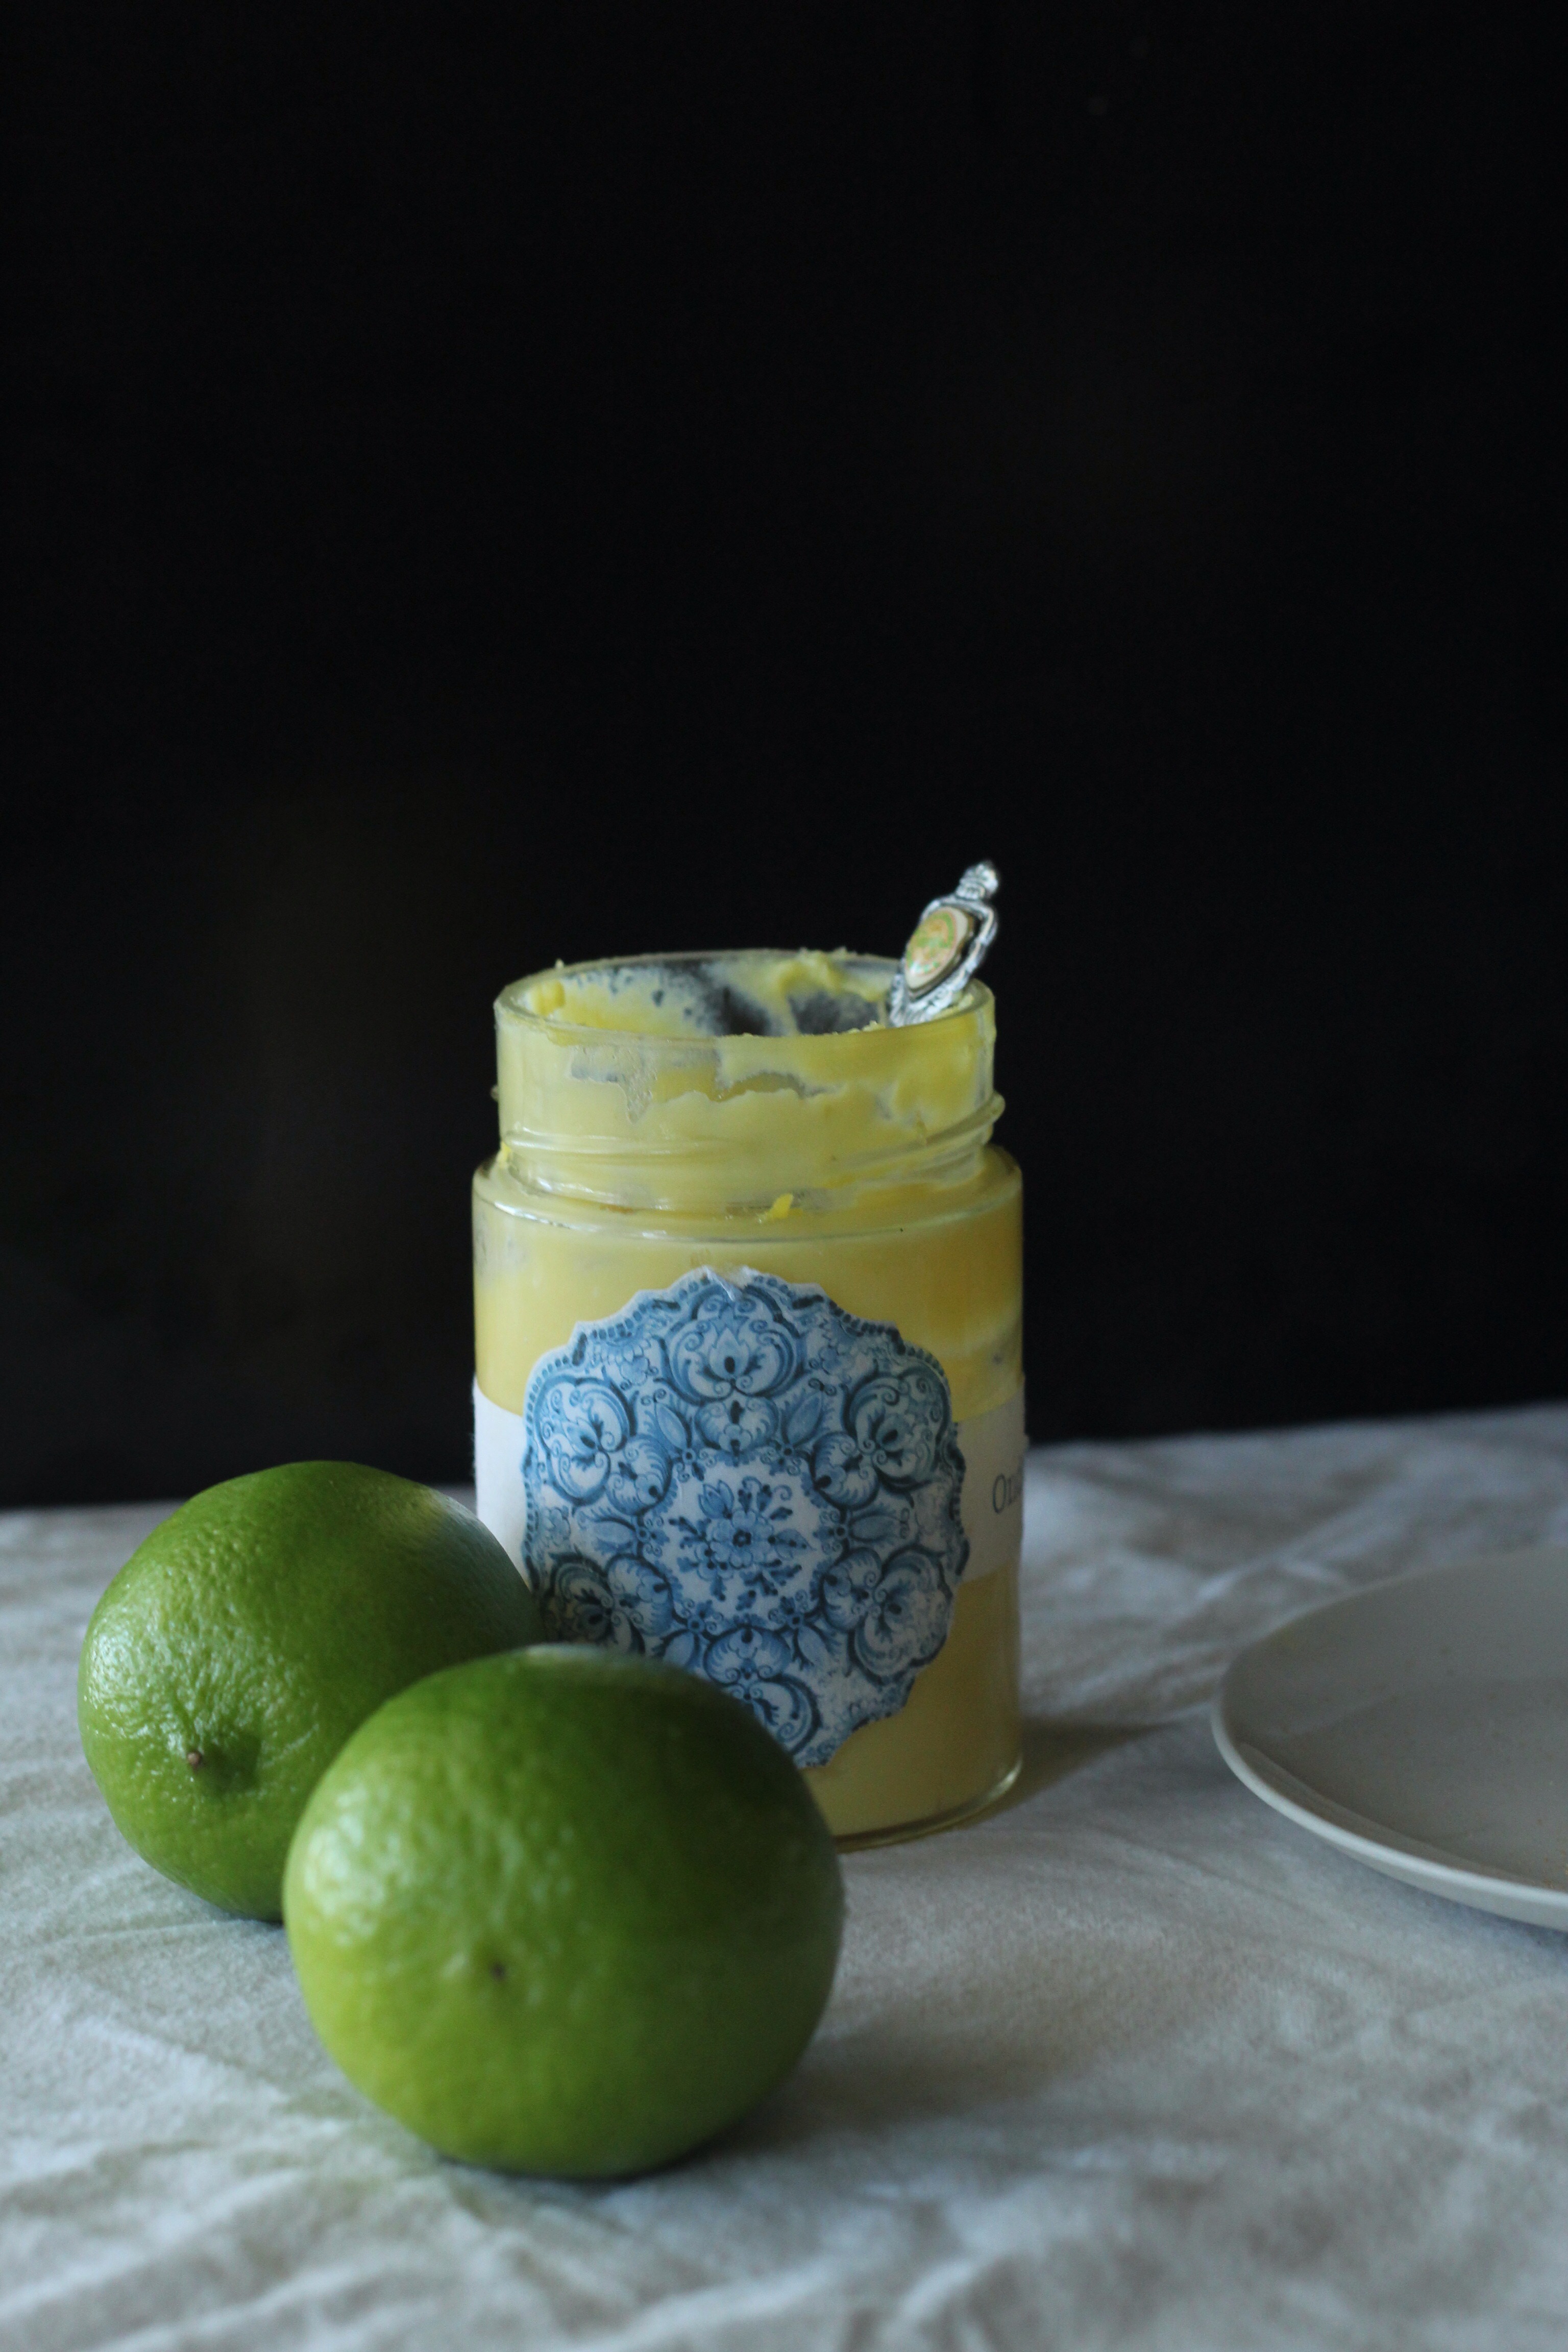
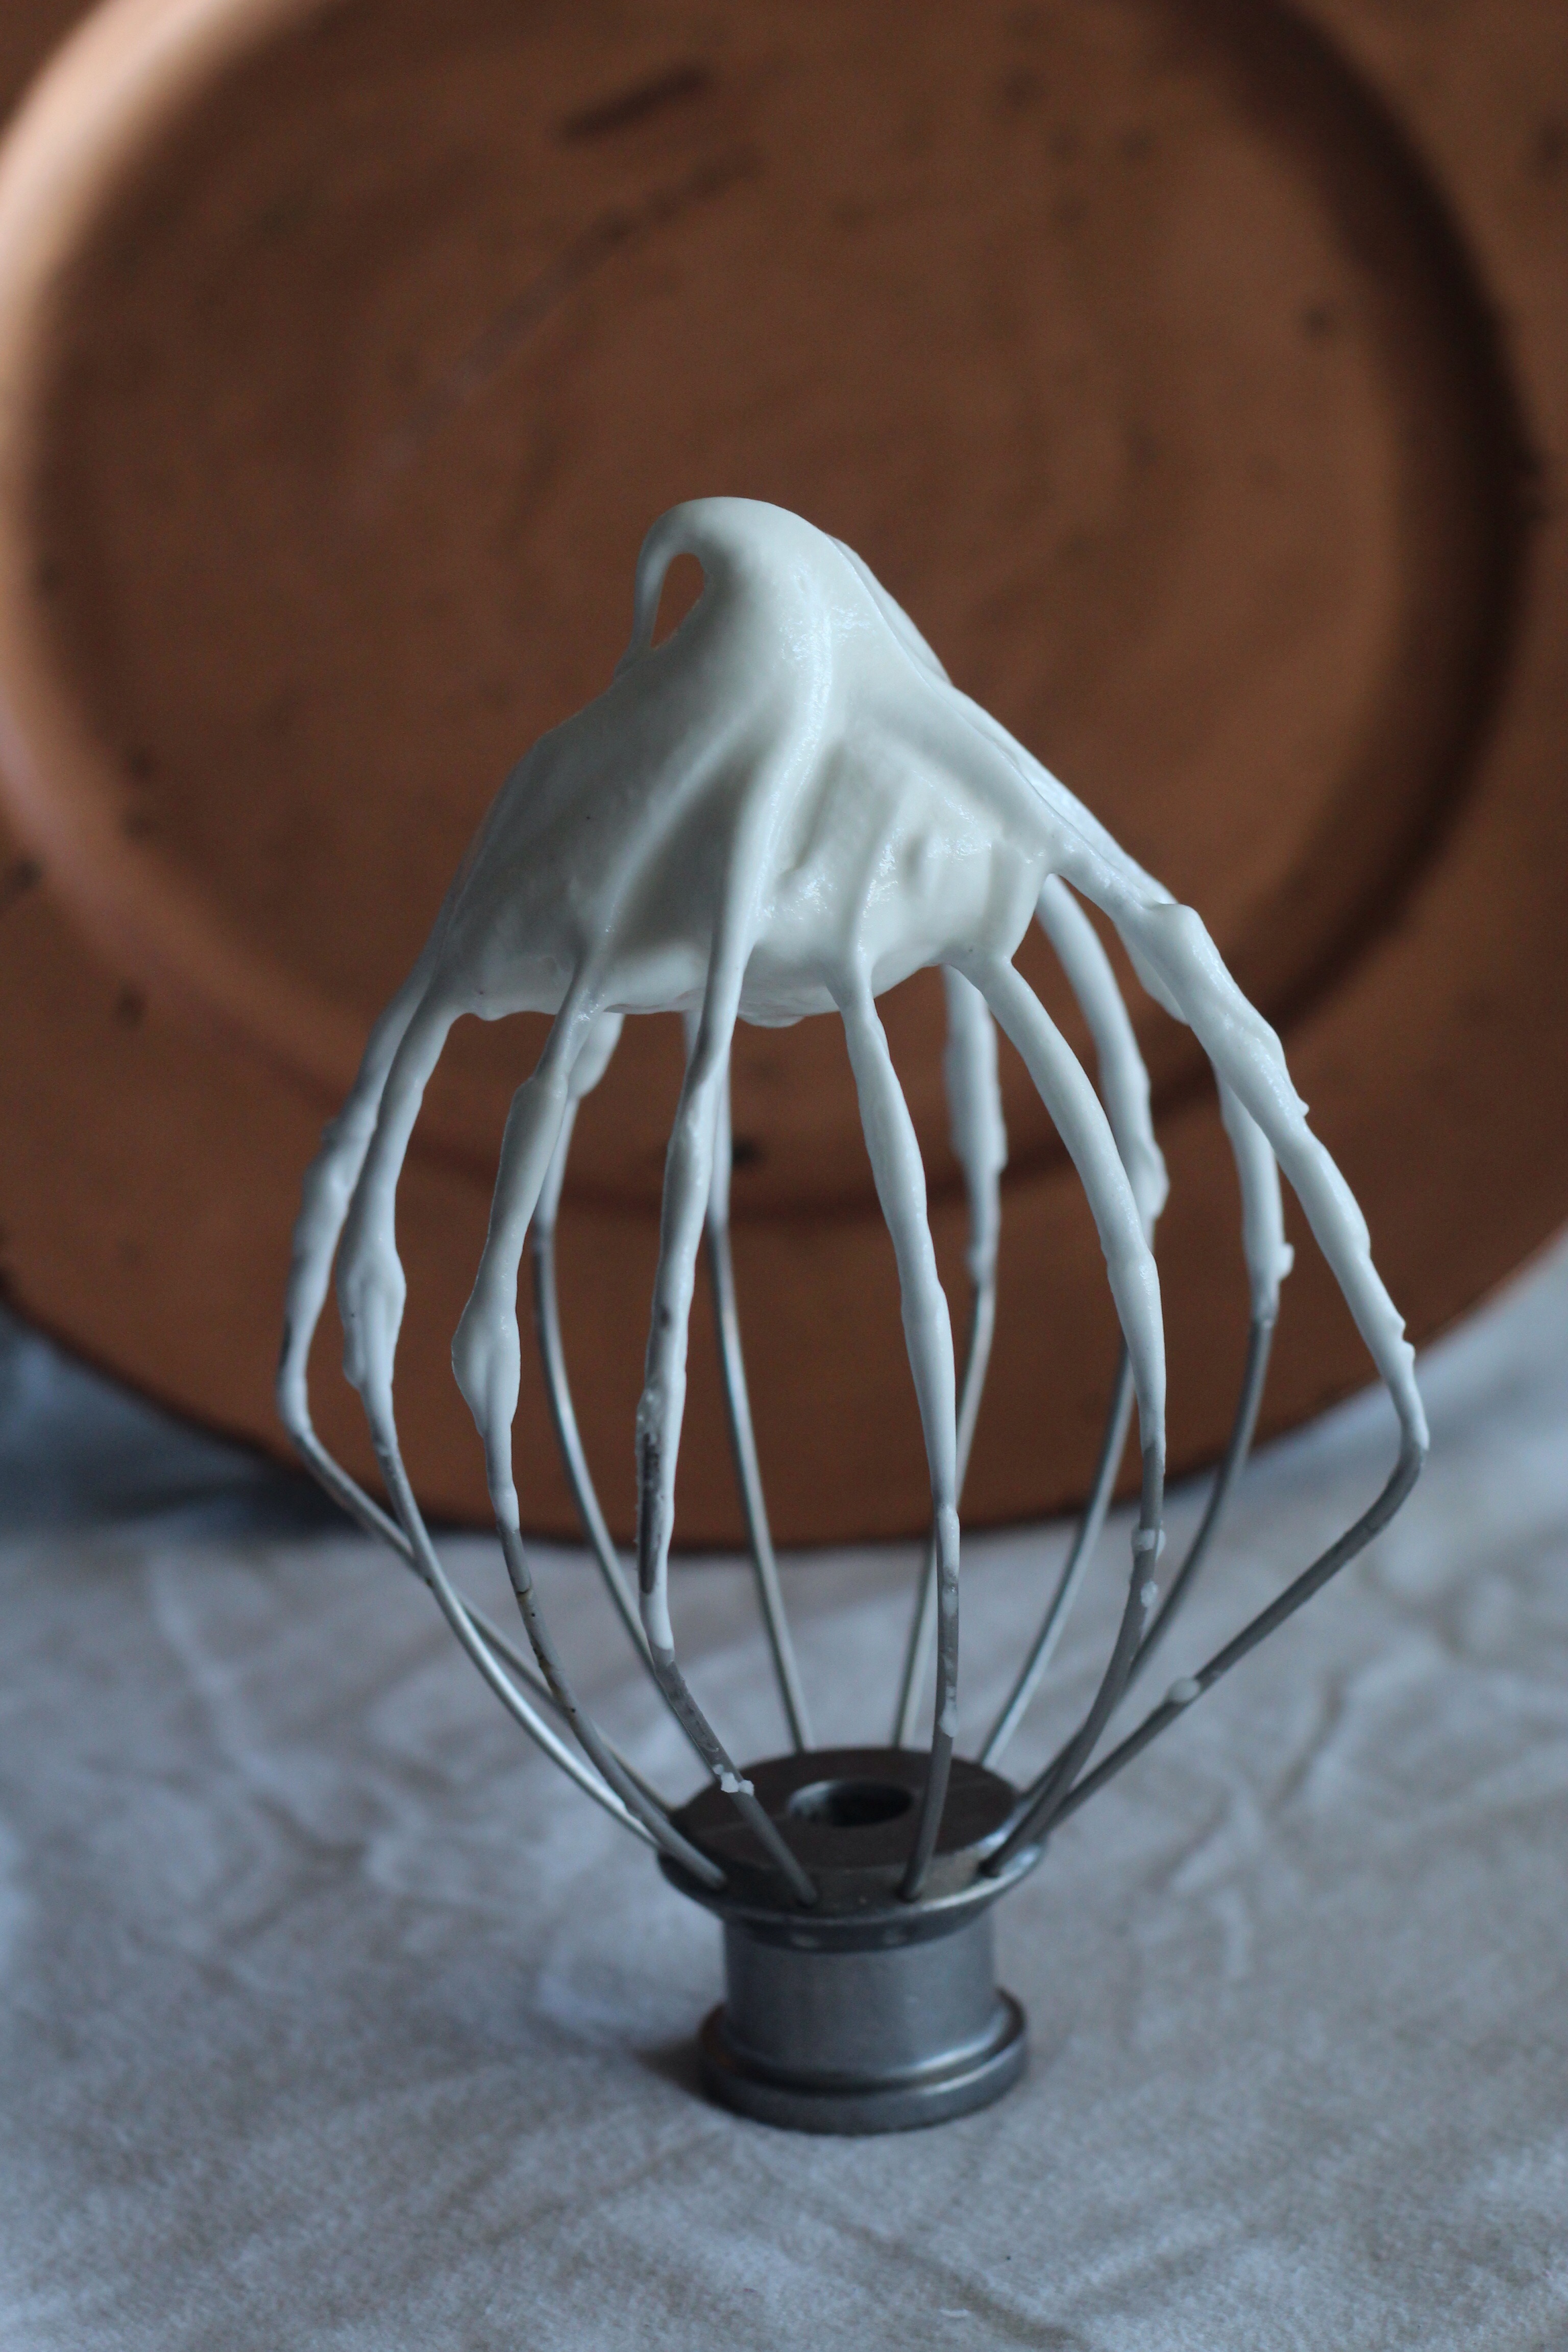
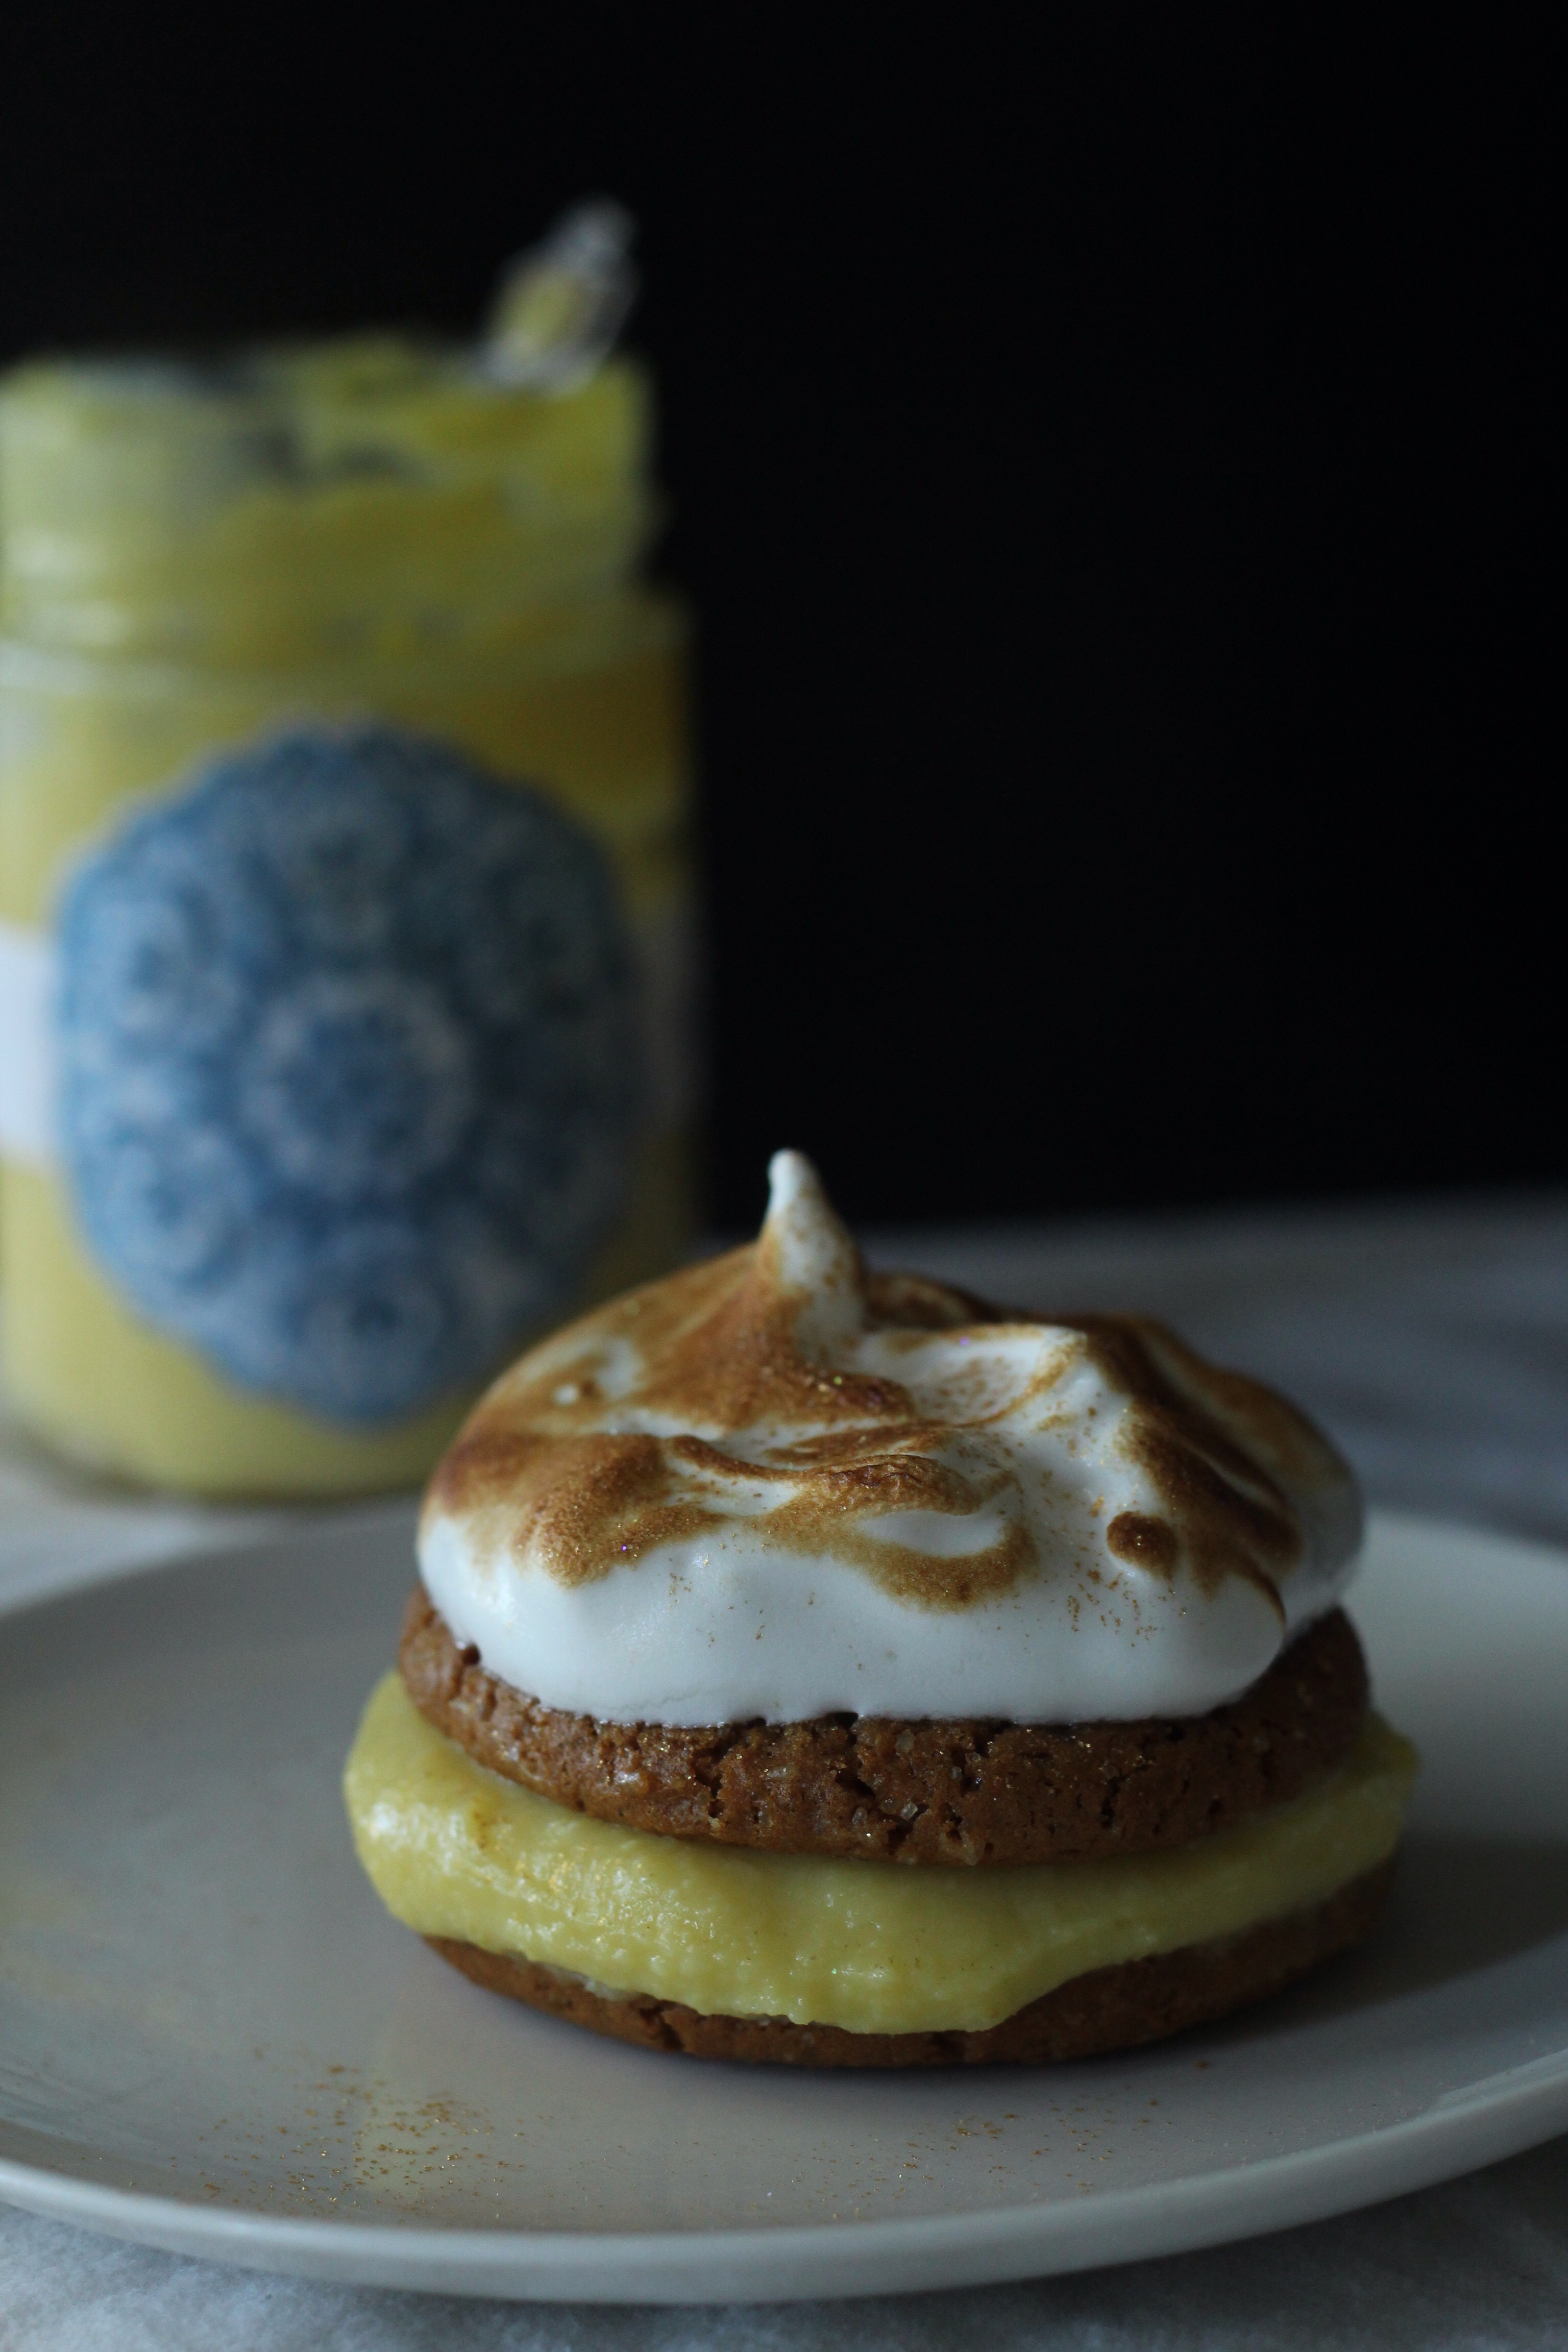
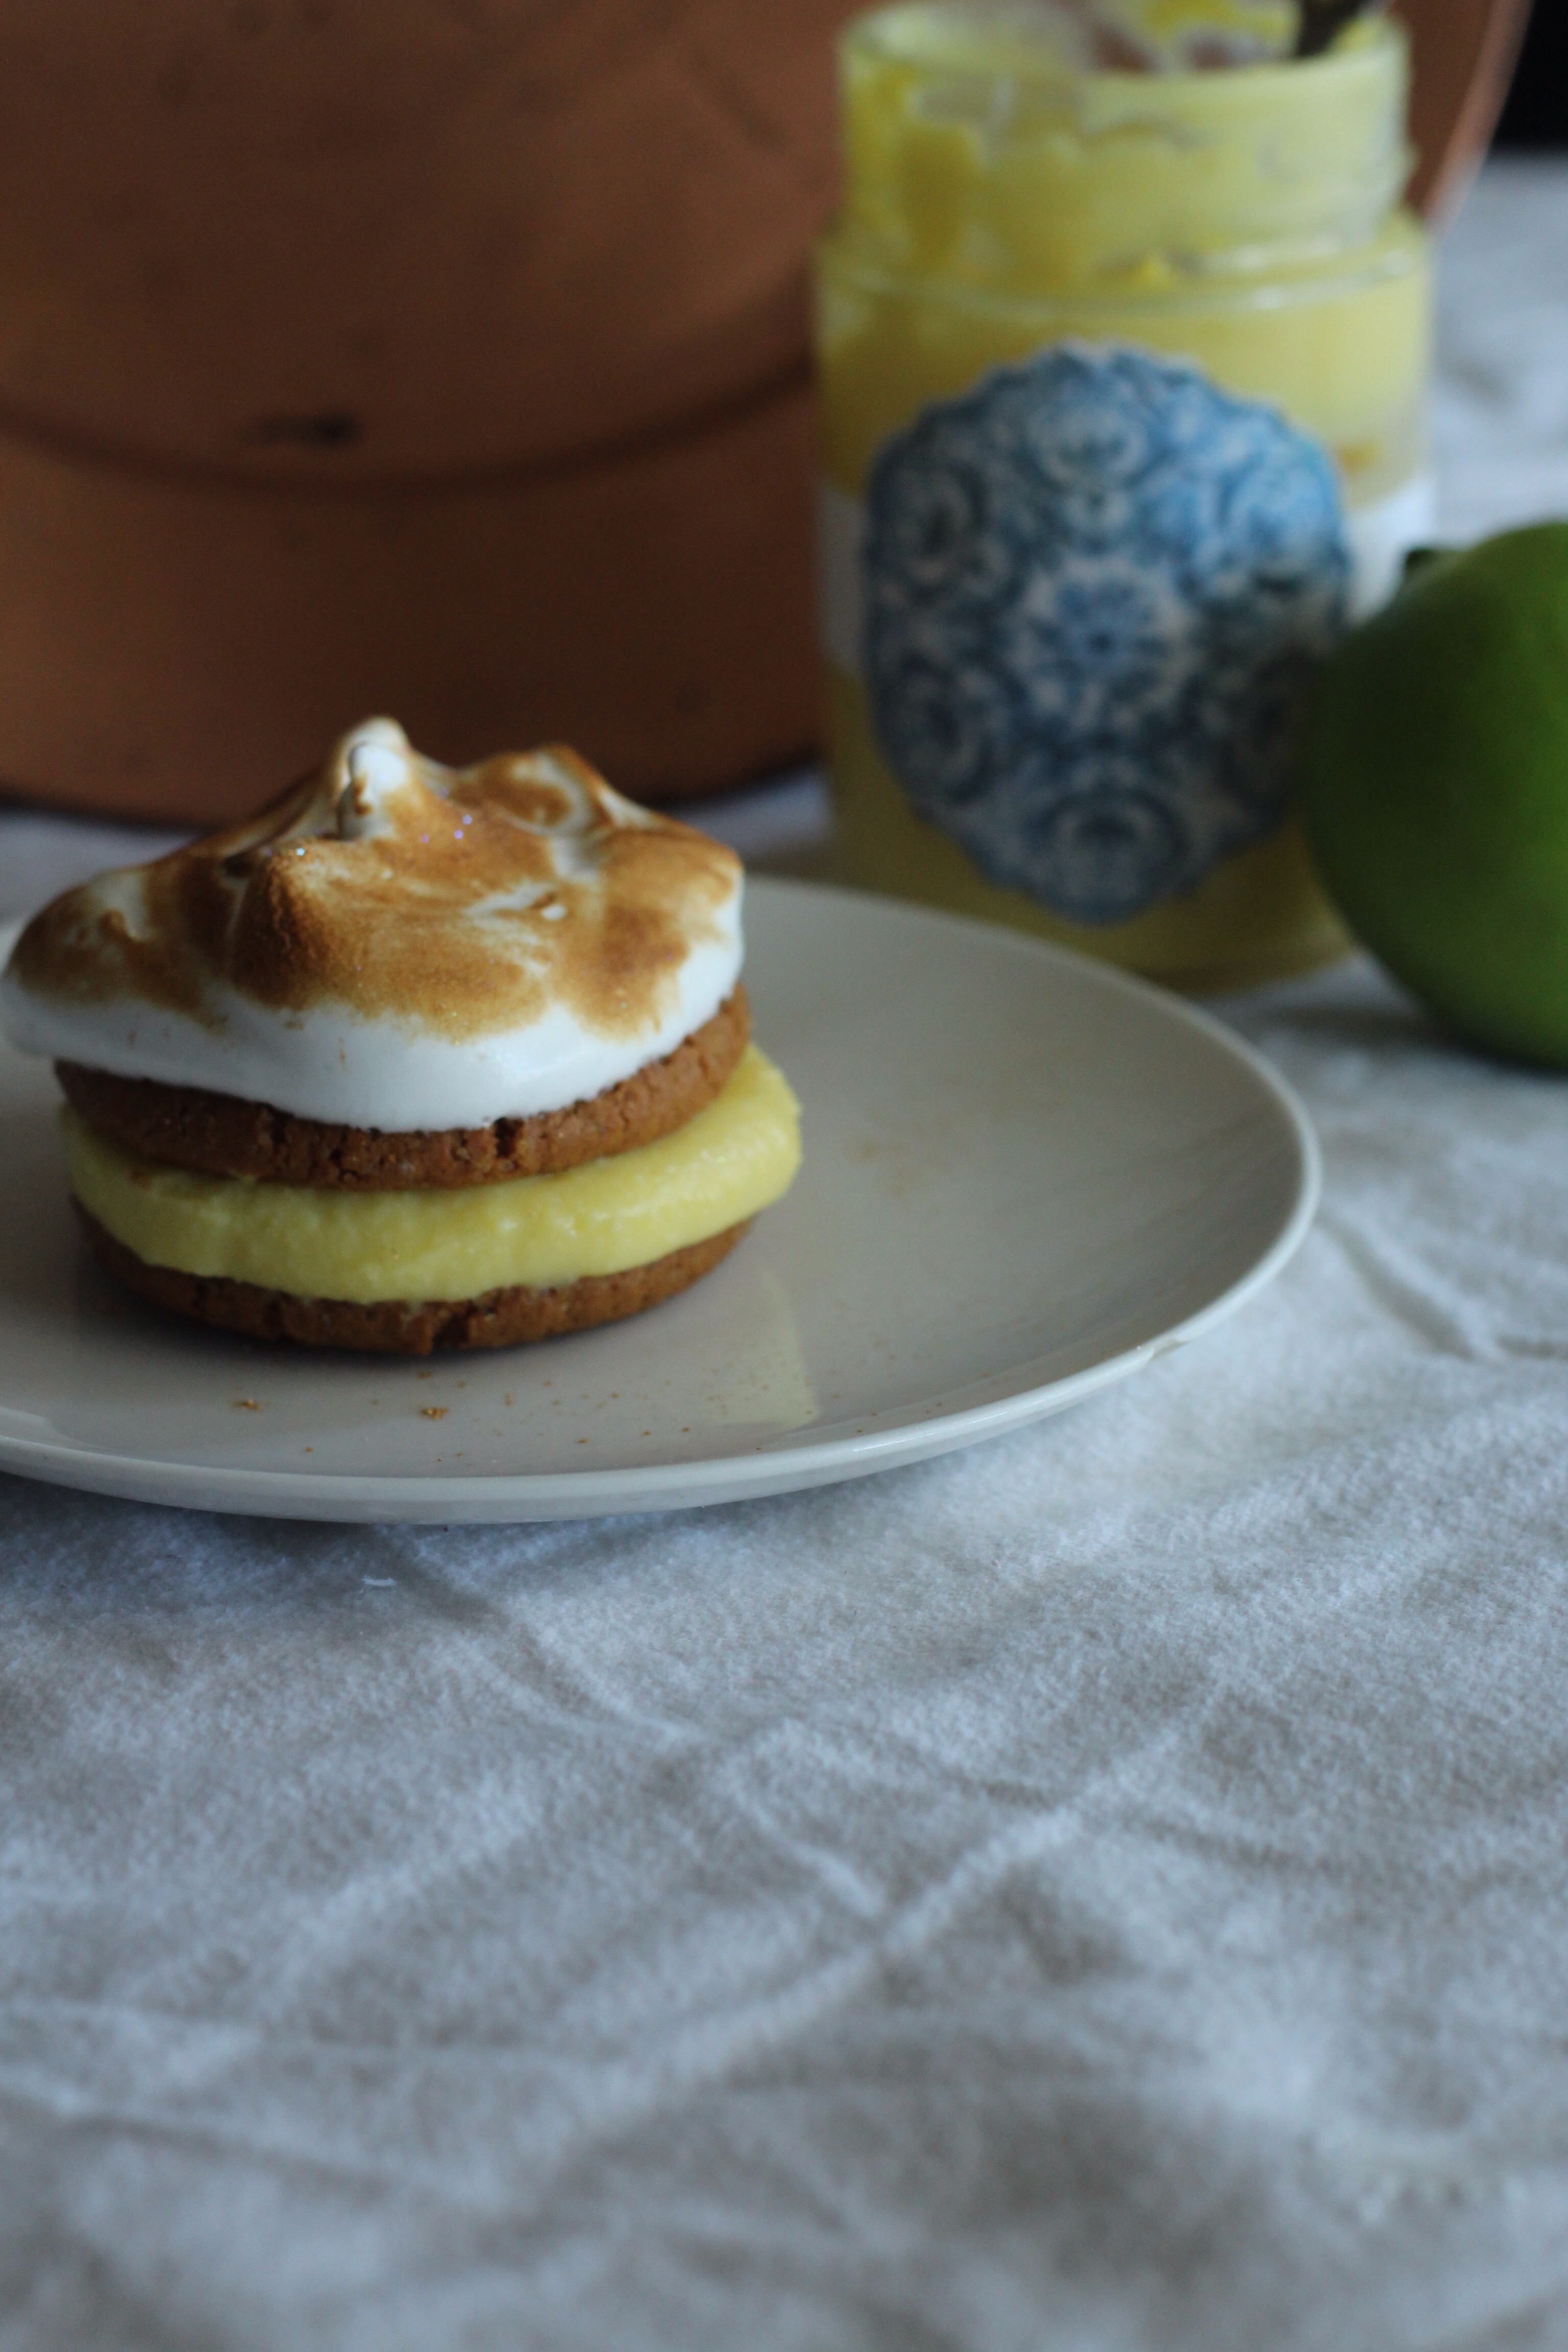
I took it upon myself to recreate a classic and also critically deconstruct it. This in essence is the very teaching and philosophy of Massimo Bottura, celebrating nostalgia but asking questions. I made a deconstructed lime meringue dessert with crushed ginger cookies as the base, and a lime meringue ginger cookie sandwich(think ice cream sandwich style, but way better). So with my fat pants on and guilty conscience happily abandoned at the door (this is a judgement free zone) so please feel free to recreate this dessert and even top it and take it to another level of indulgence! I made the speediest and tastiest lime curd just over a week ago, and it’s been sitting on the shelf of my fridge in a sealed jar staring at me asking me to eat it. To be honest it had me at hello! The lime curd was made in the microwave recipe found on Food52. The rest of the recipe for the desserts I have developed. I simply crushed ginger biscuits and drizzled with a little ginger syrup(a sweet twist) I then filled the glass with the lime curd and topped off with the whipped meringue and blowtorched to get the desired toastyness. Any excuse to use my awesome little blowtorch!
For the cookie sandwich, assemble the curd between the biscuits, gently press together and smooth out edges if oozing out, then top with the meringue and toast with the blowtorch. I think I had way too much fun doing this!
The photos were taken just before noon again, I find I take less photos these days when shooting for one post, as I find that I don’t need to take hundreds of photos to get that good batch of photos like I used to do. This must mean I am improving slowly 🙂 I’m super excited to share next week’s posts and photos with you! It’s going to be super chilled 🙂 that’s about all I’m letting you know for now.
This post was collated whilst listening to the incomparable David Bowie. Specifically the song ‘Heroes’.
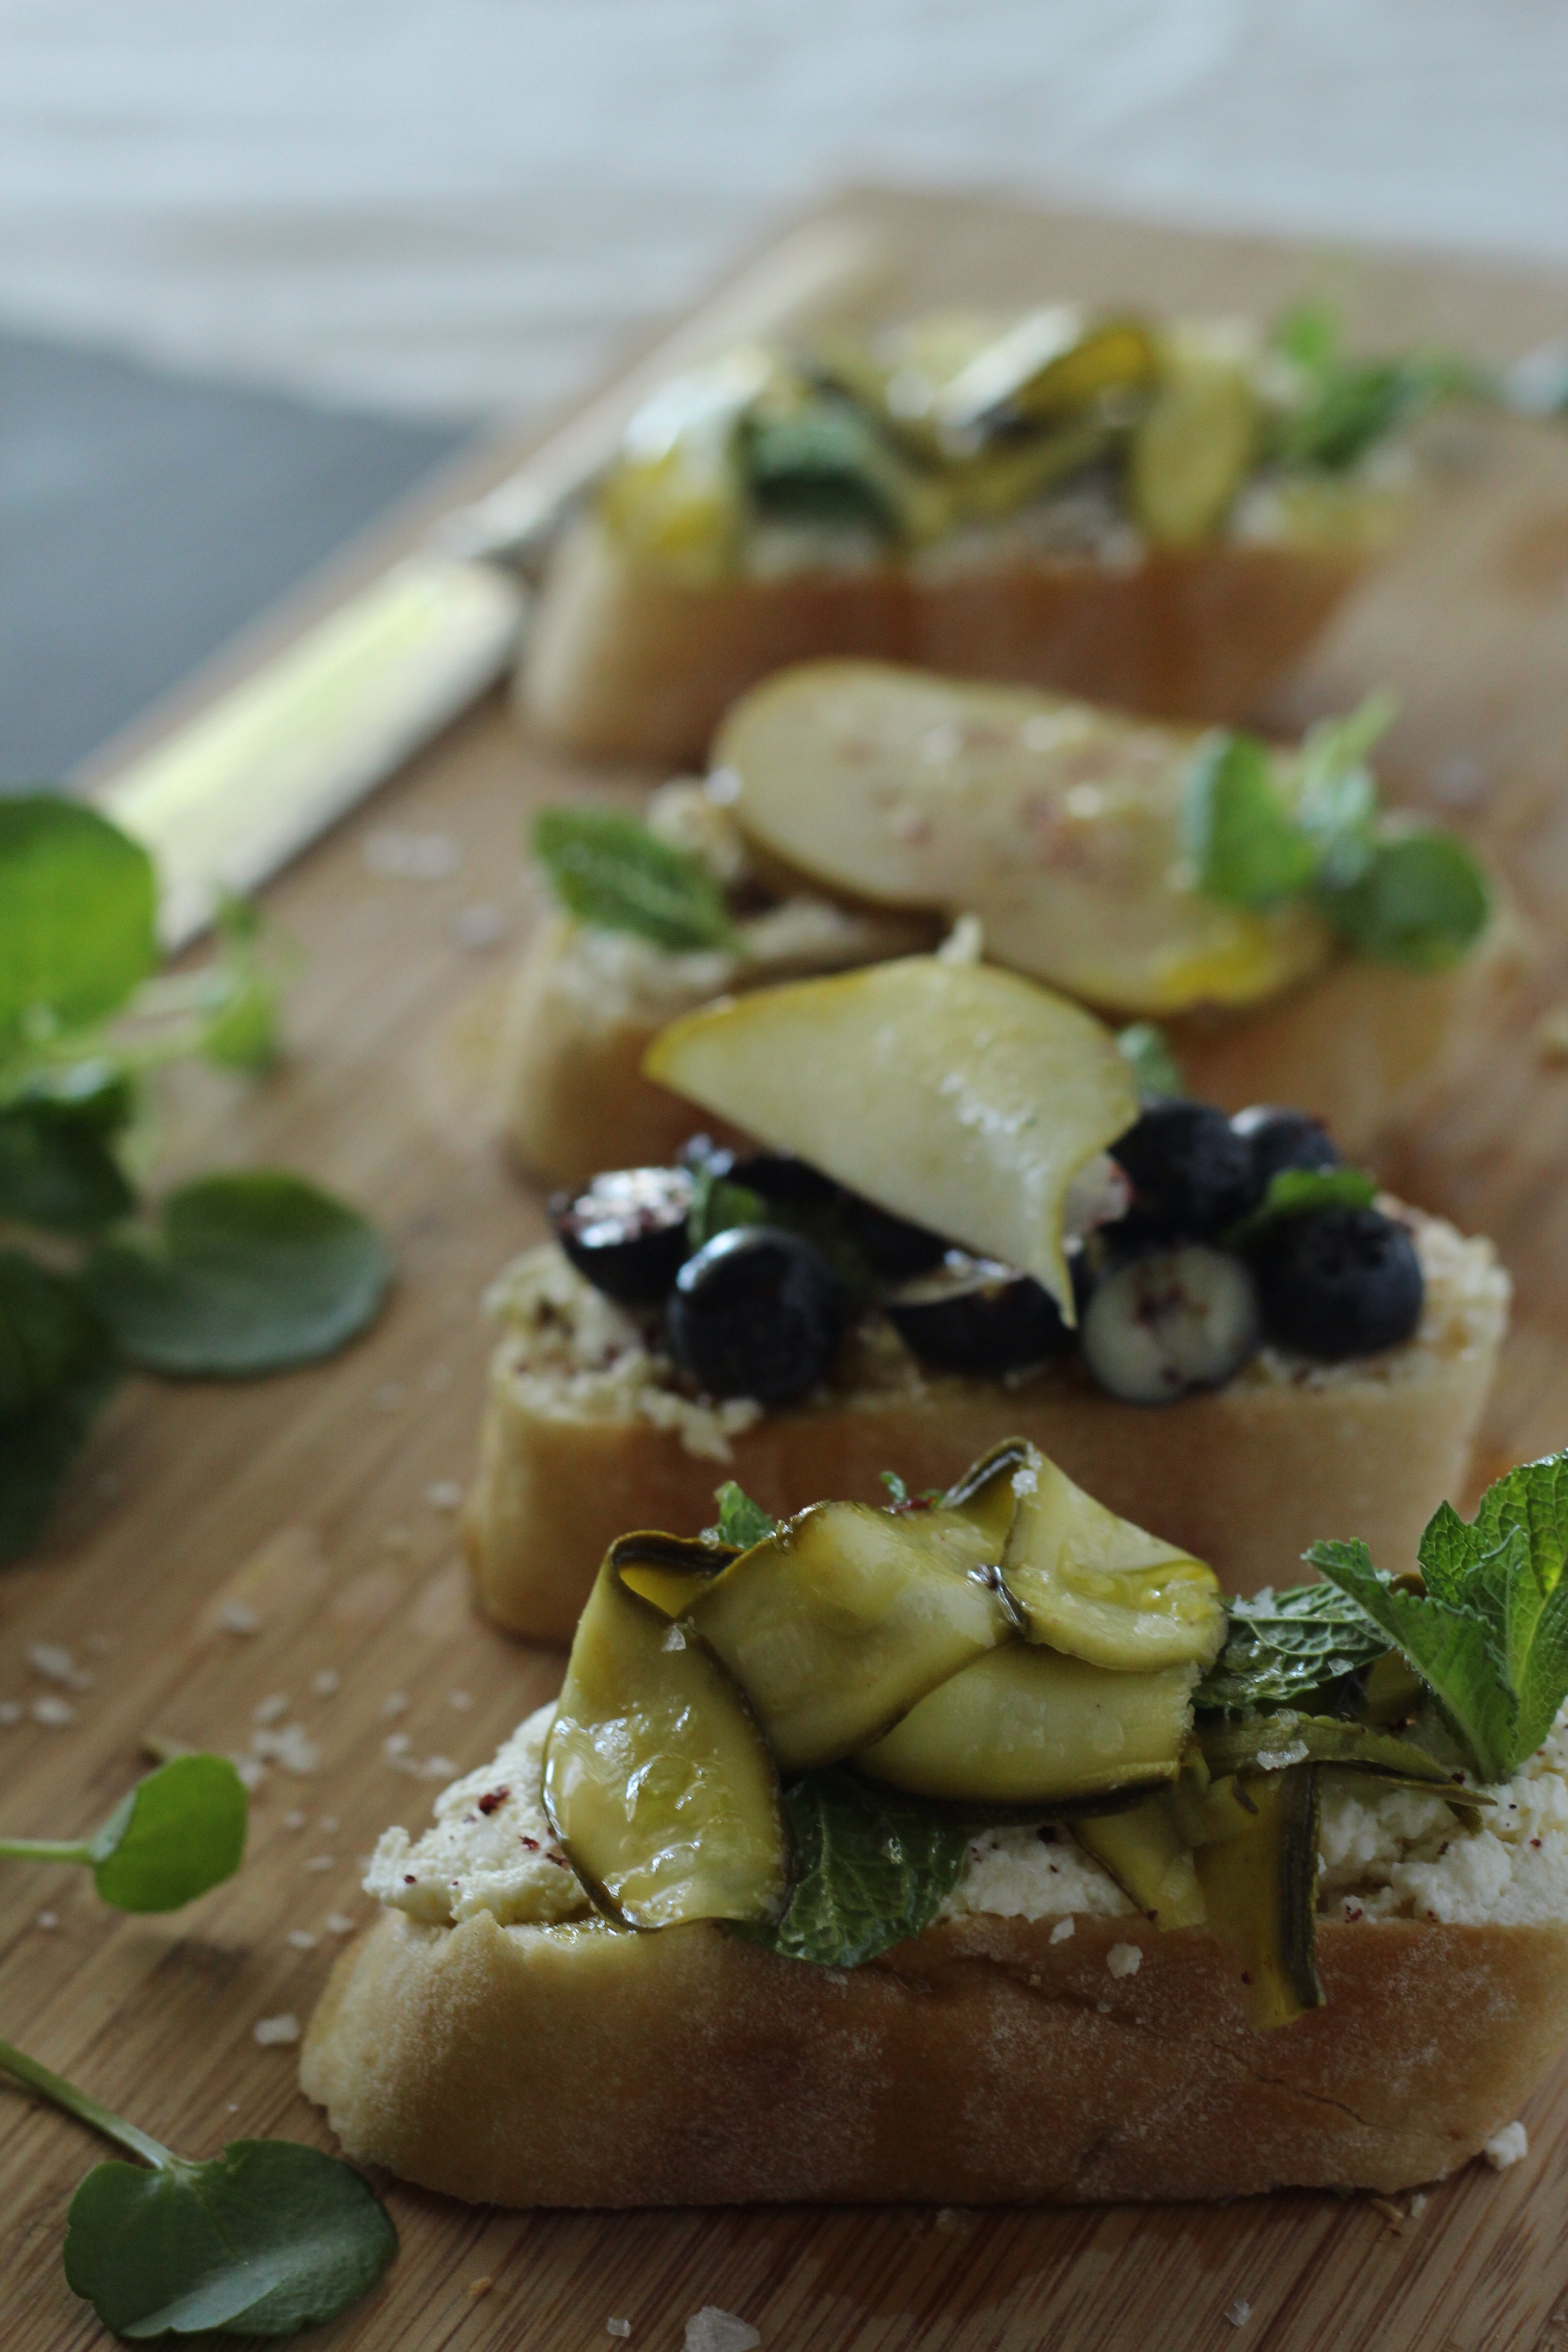
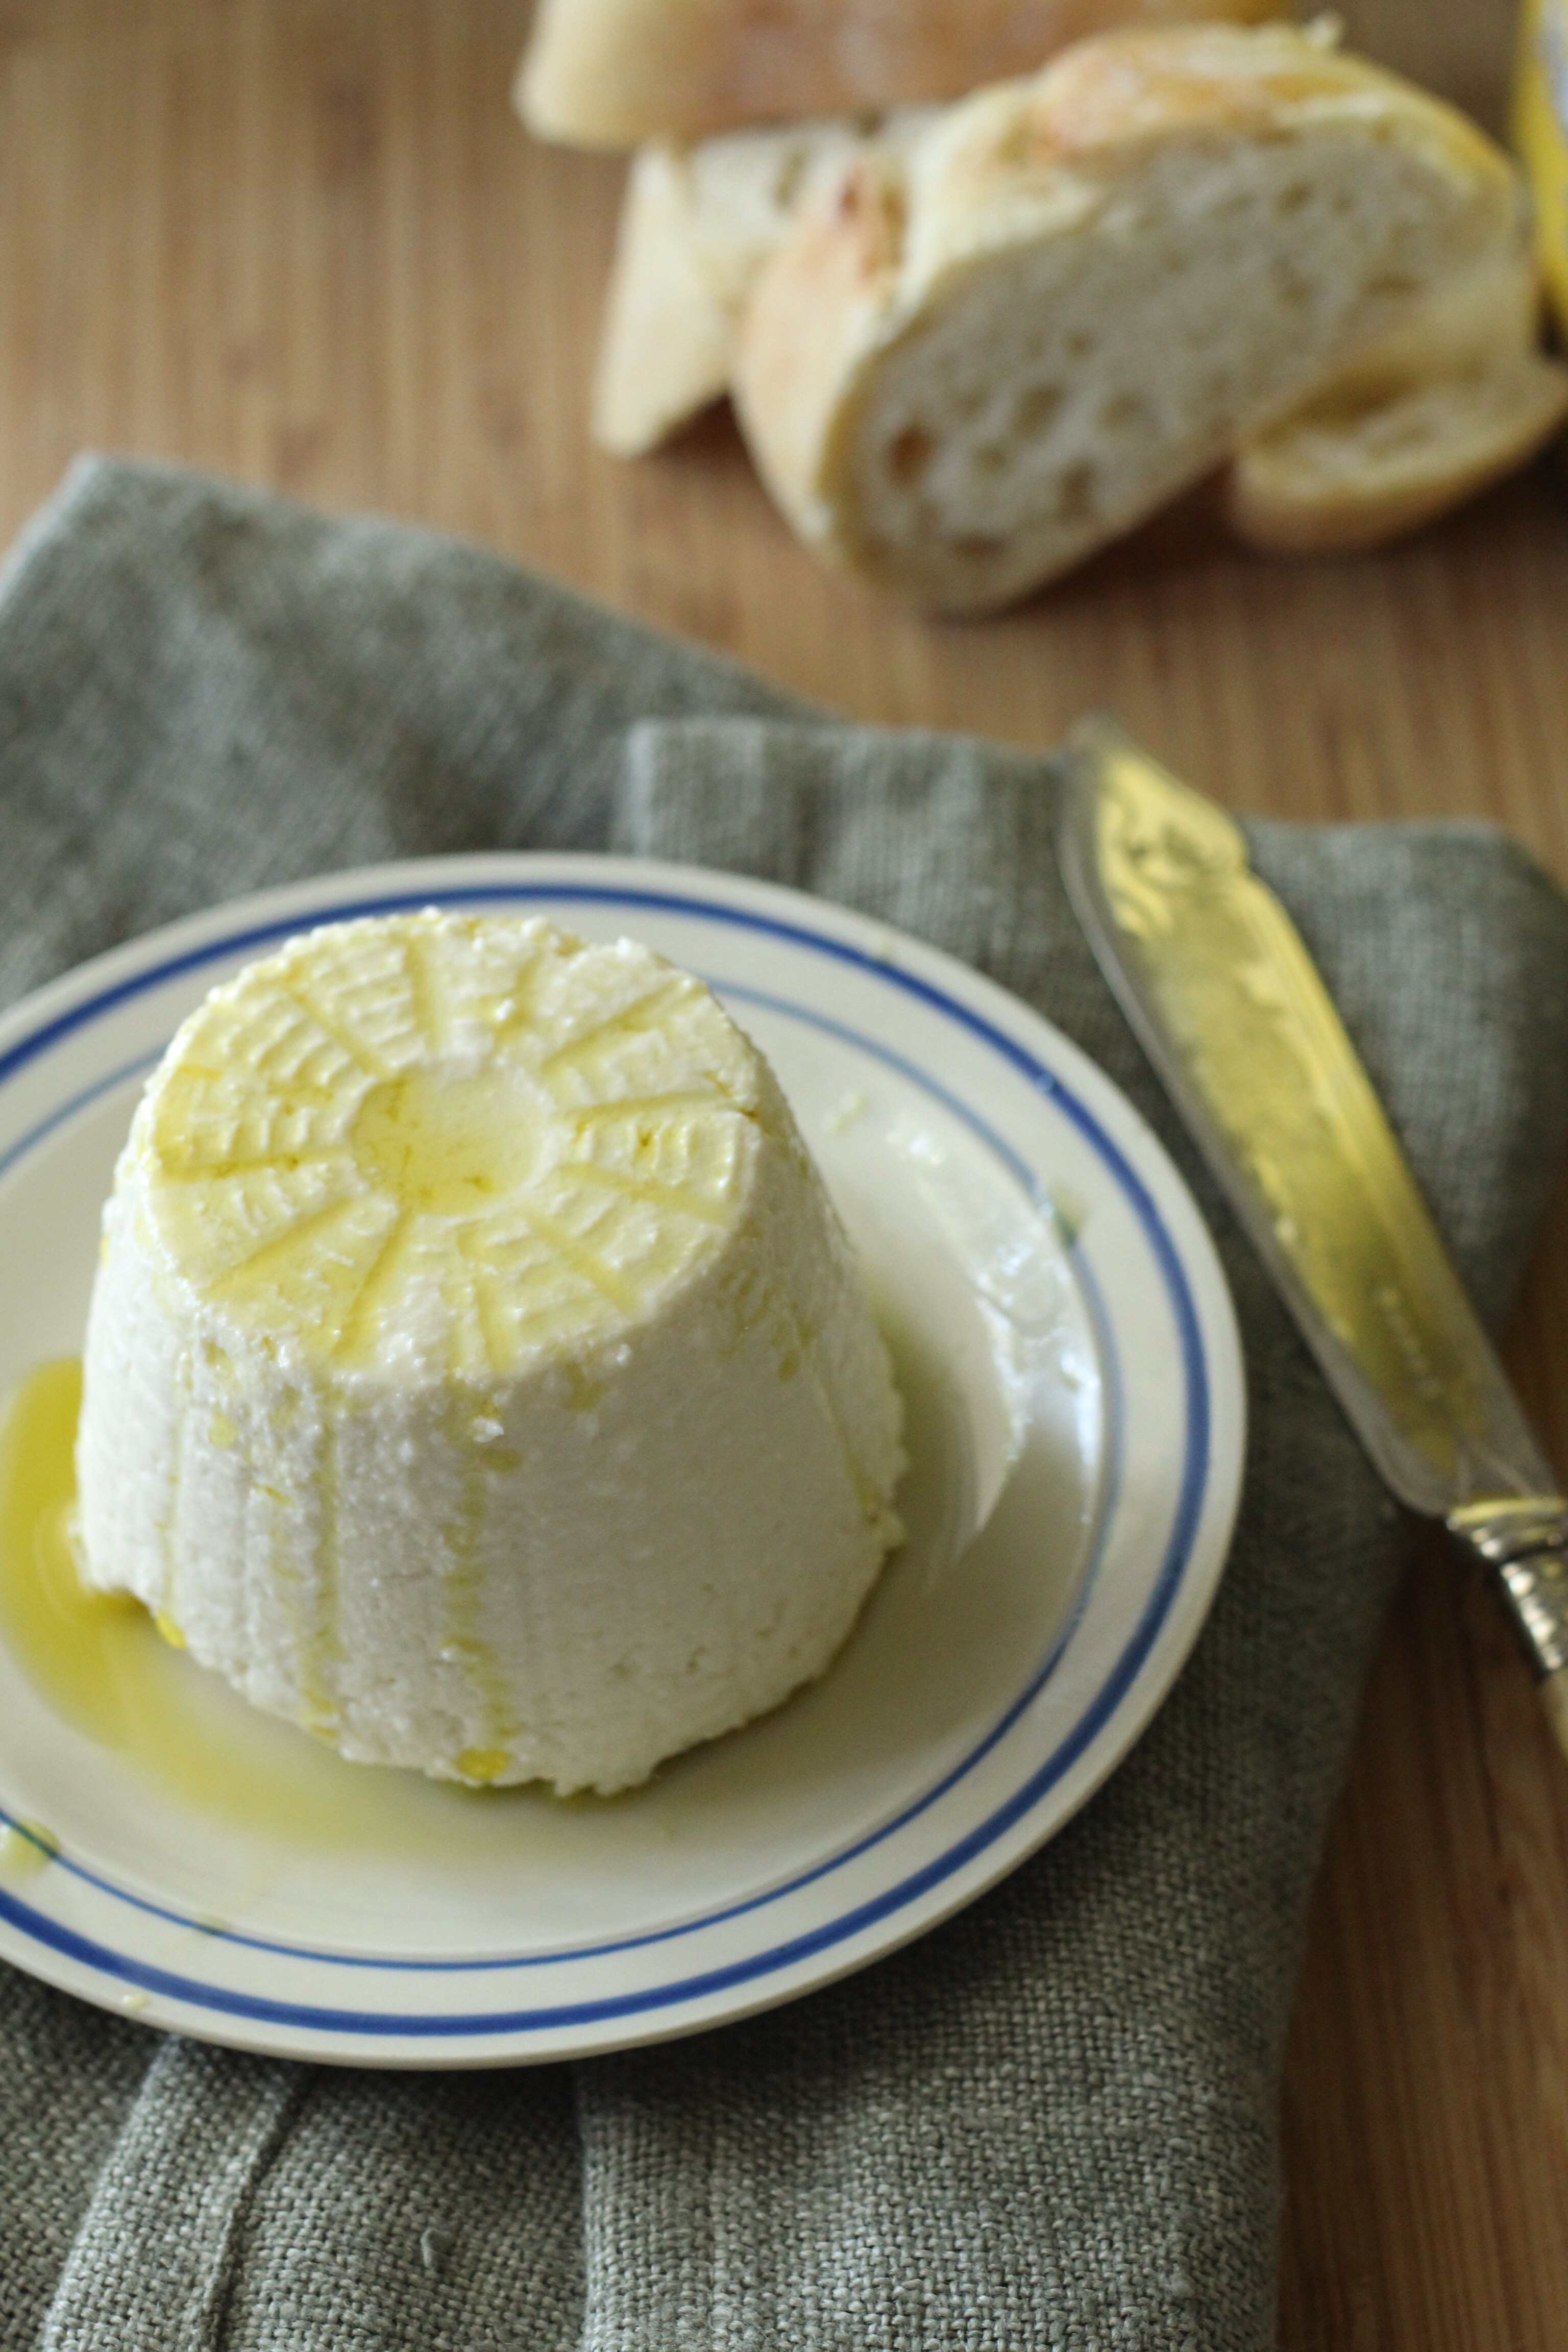
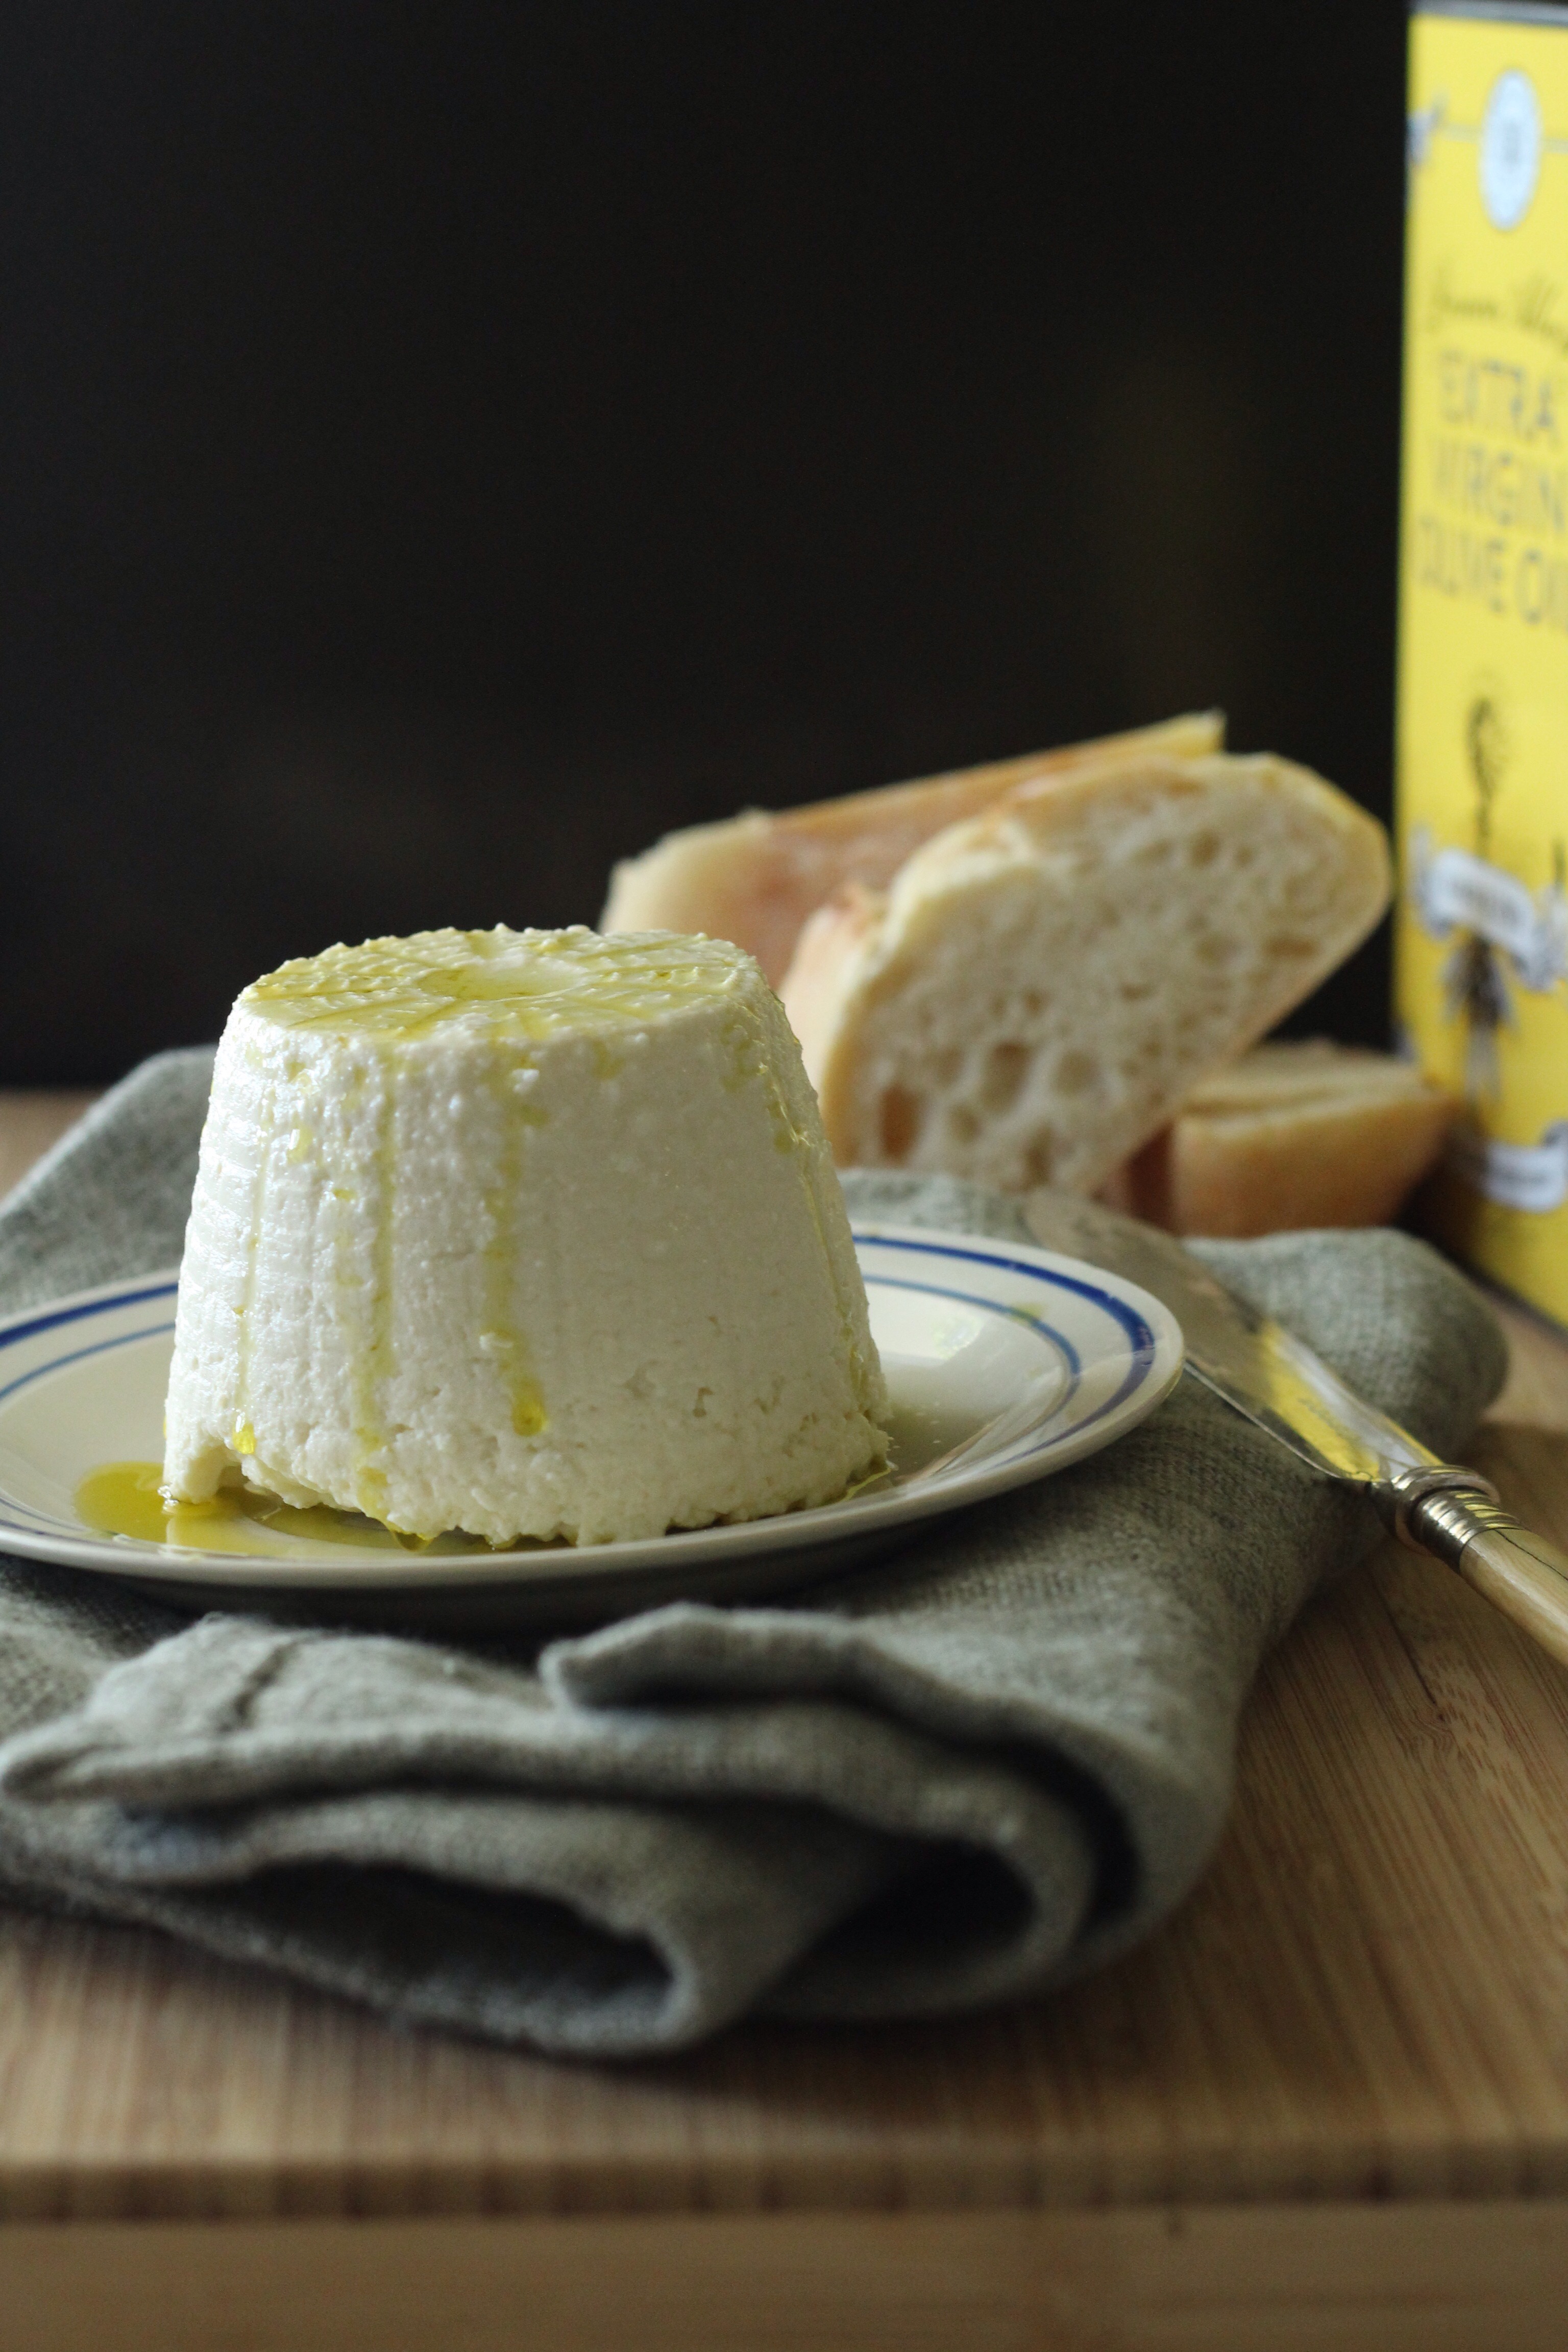
My love of cheese knows no bounds! Feta, cream cheese, cottage cheese, Brie, Camembert, Goat’s cheese or 24 month matured Parmigiano Reggiano, name it and I’ll be there with a bottle of wine to pair it with! Ricotta is so very versatile, I mainly use it as a substitute for cream in my pasta sauces, it makes the texture that more luxurious and velvety smooth. But ricotta is more than just an addition to a great sauce. I usually make my own from scratch which is rather easy and foolproof. I have a healthy obsession (excuse the pun) of knowing exactly what goes into my food same can be said for what goes into my body.
Beside making a really creamy sauce, if there’s any leftover Ricotta, I make blueberry ricotta hotcakes/flapjacks that I smother in lemon curd and bacon, because why not? This time I wanted to do something a bit different and at the same time keep it simple. Simplicity in food sometimes is the key.
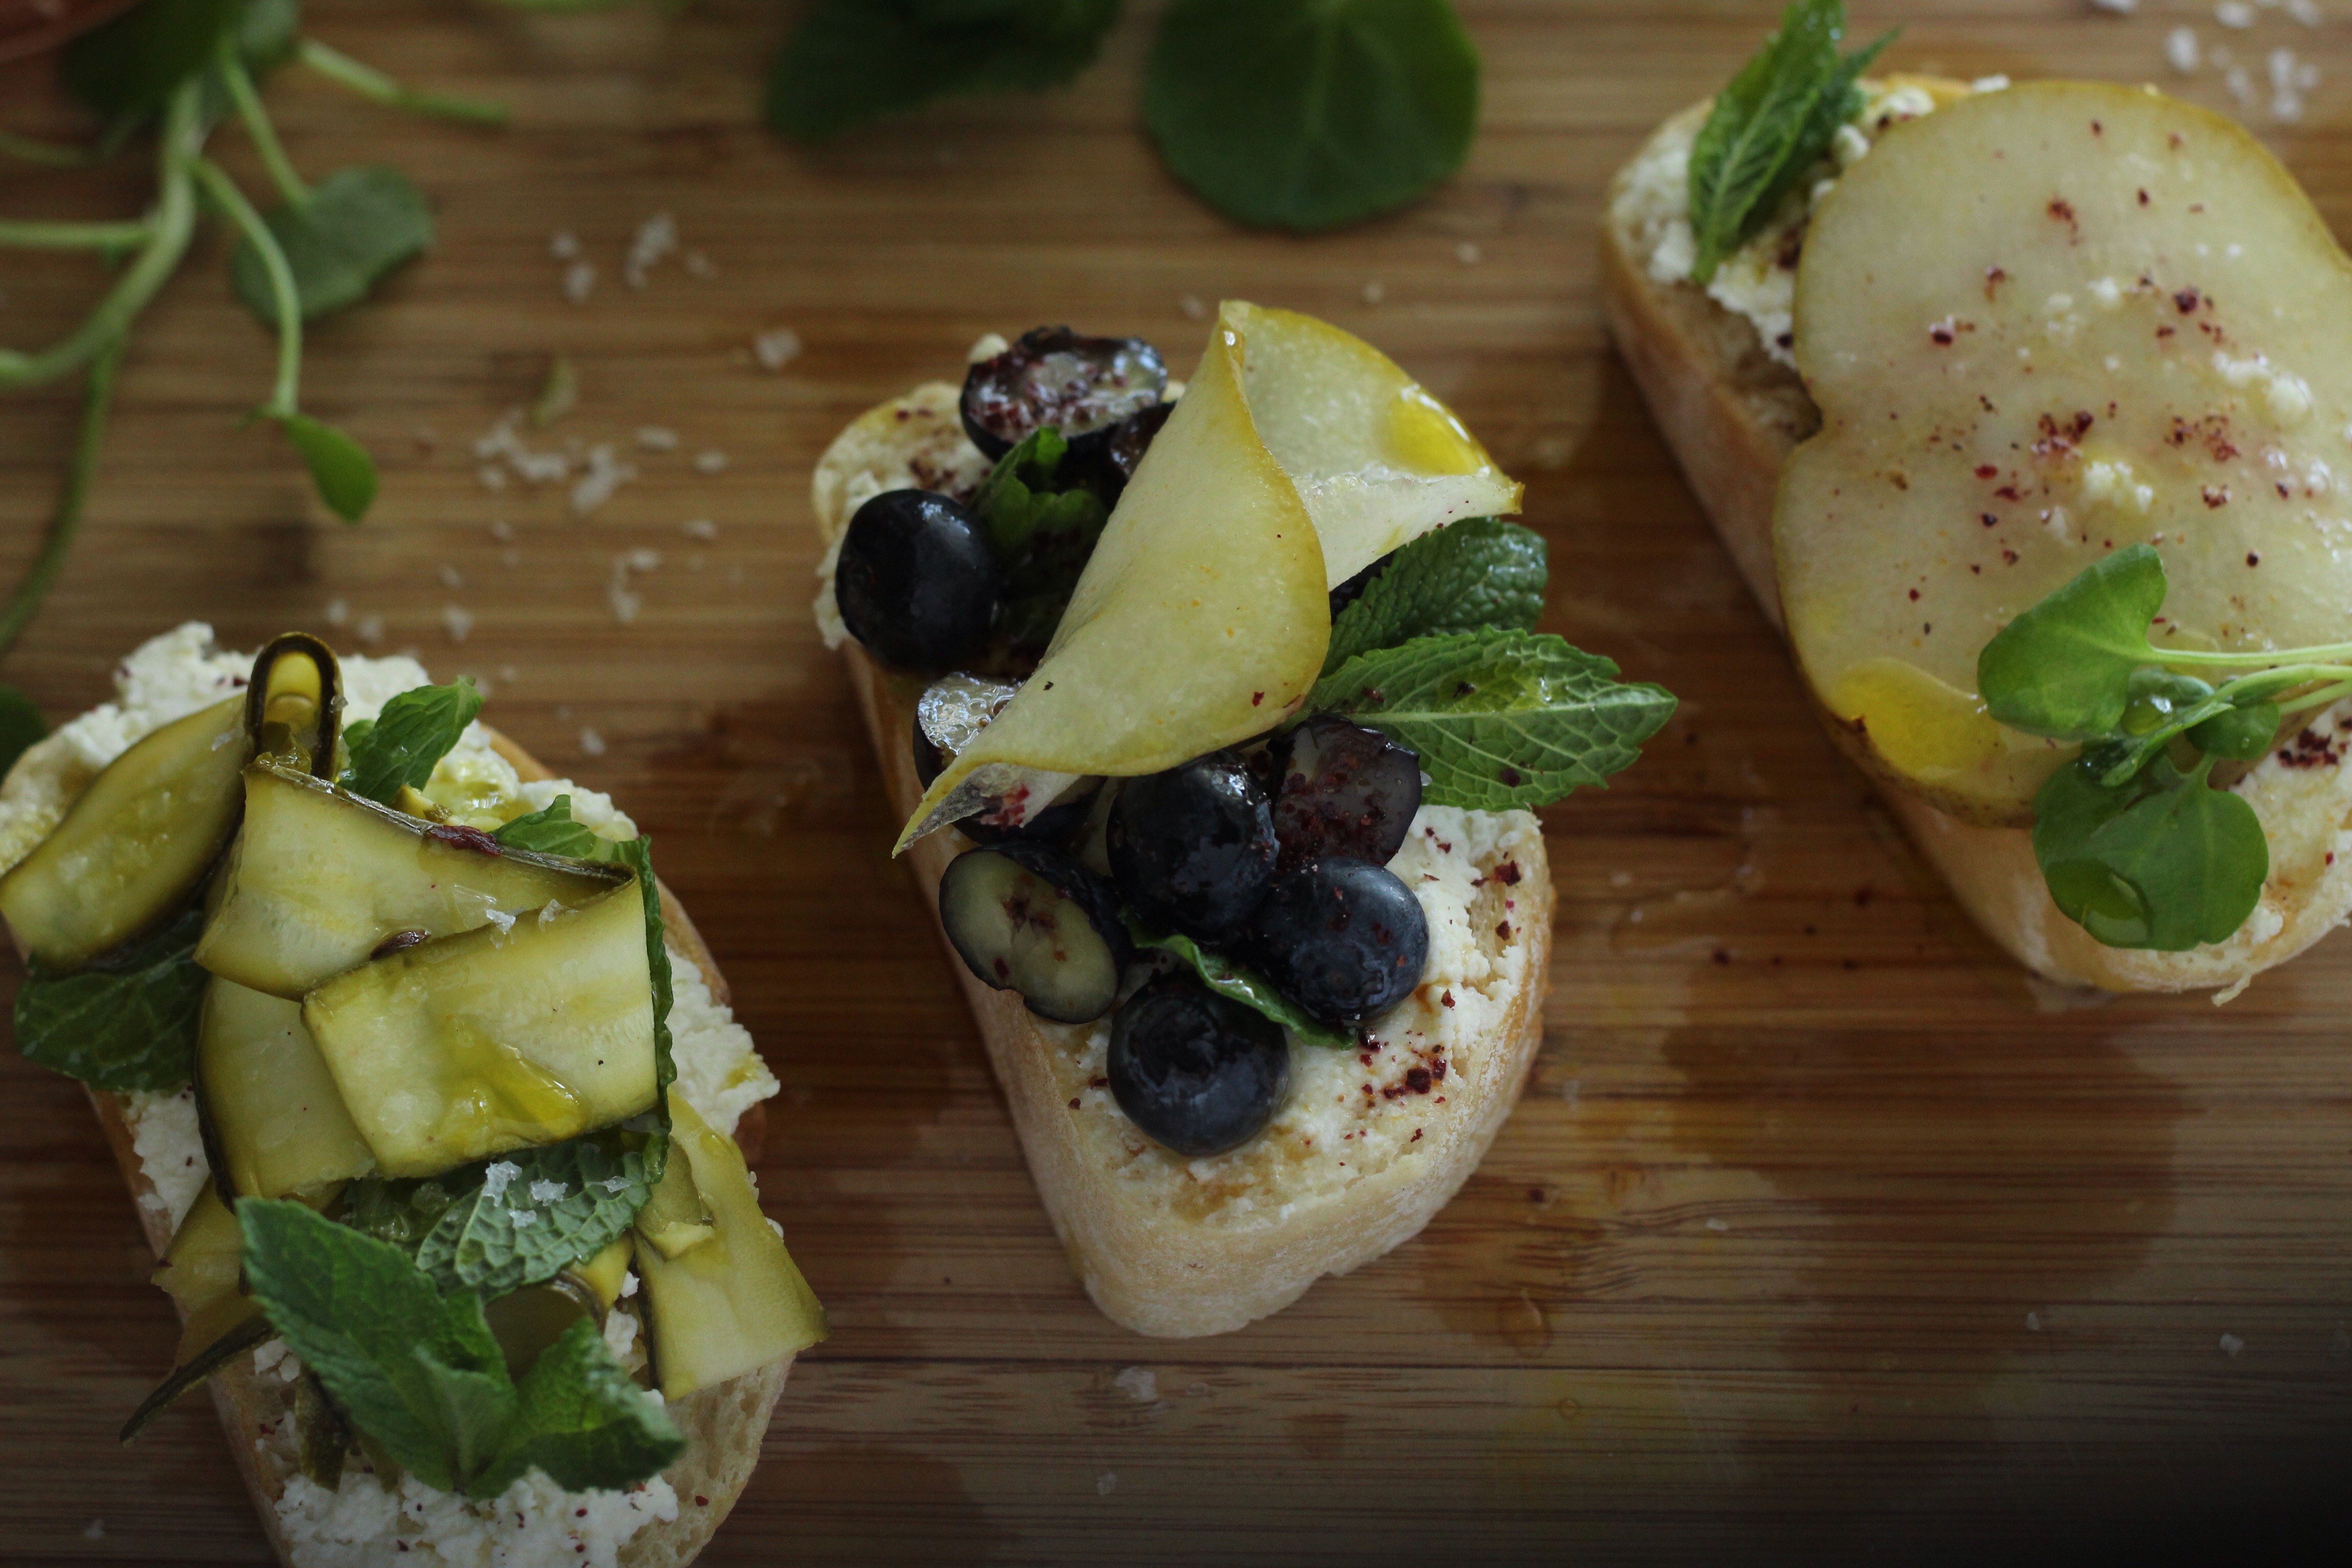
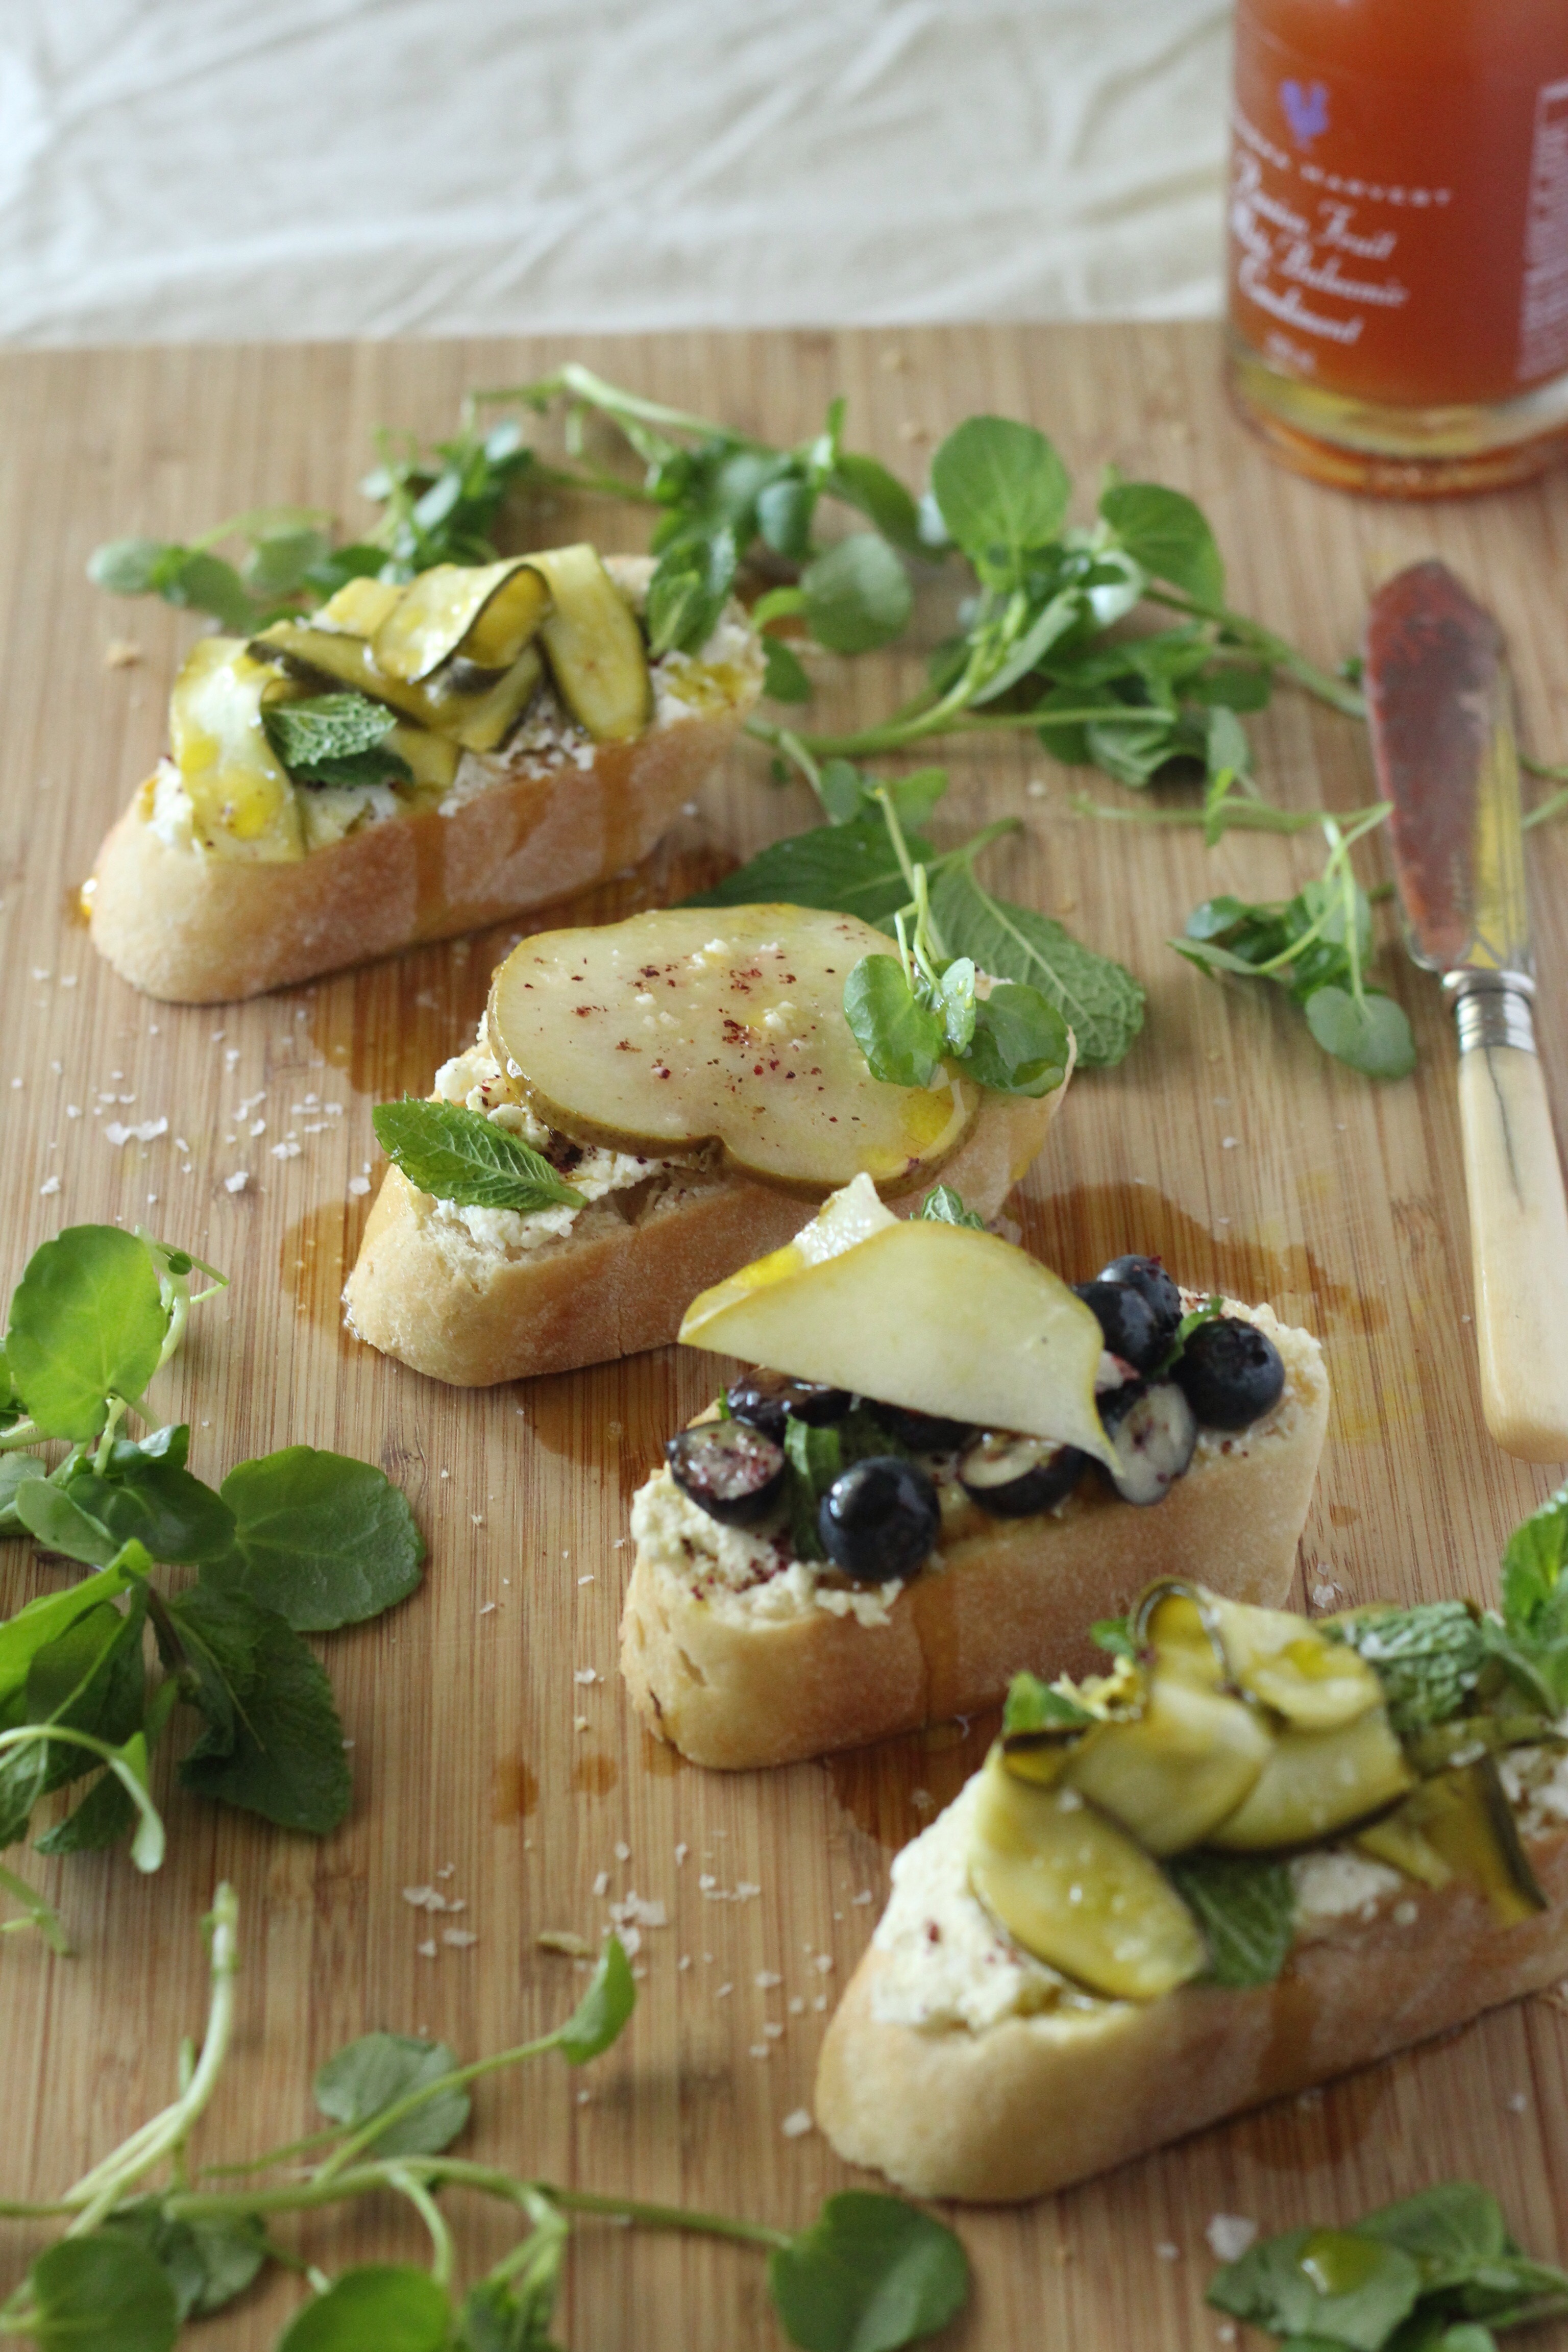
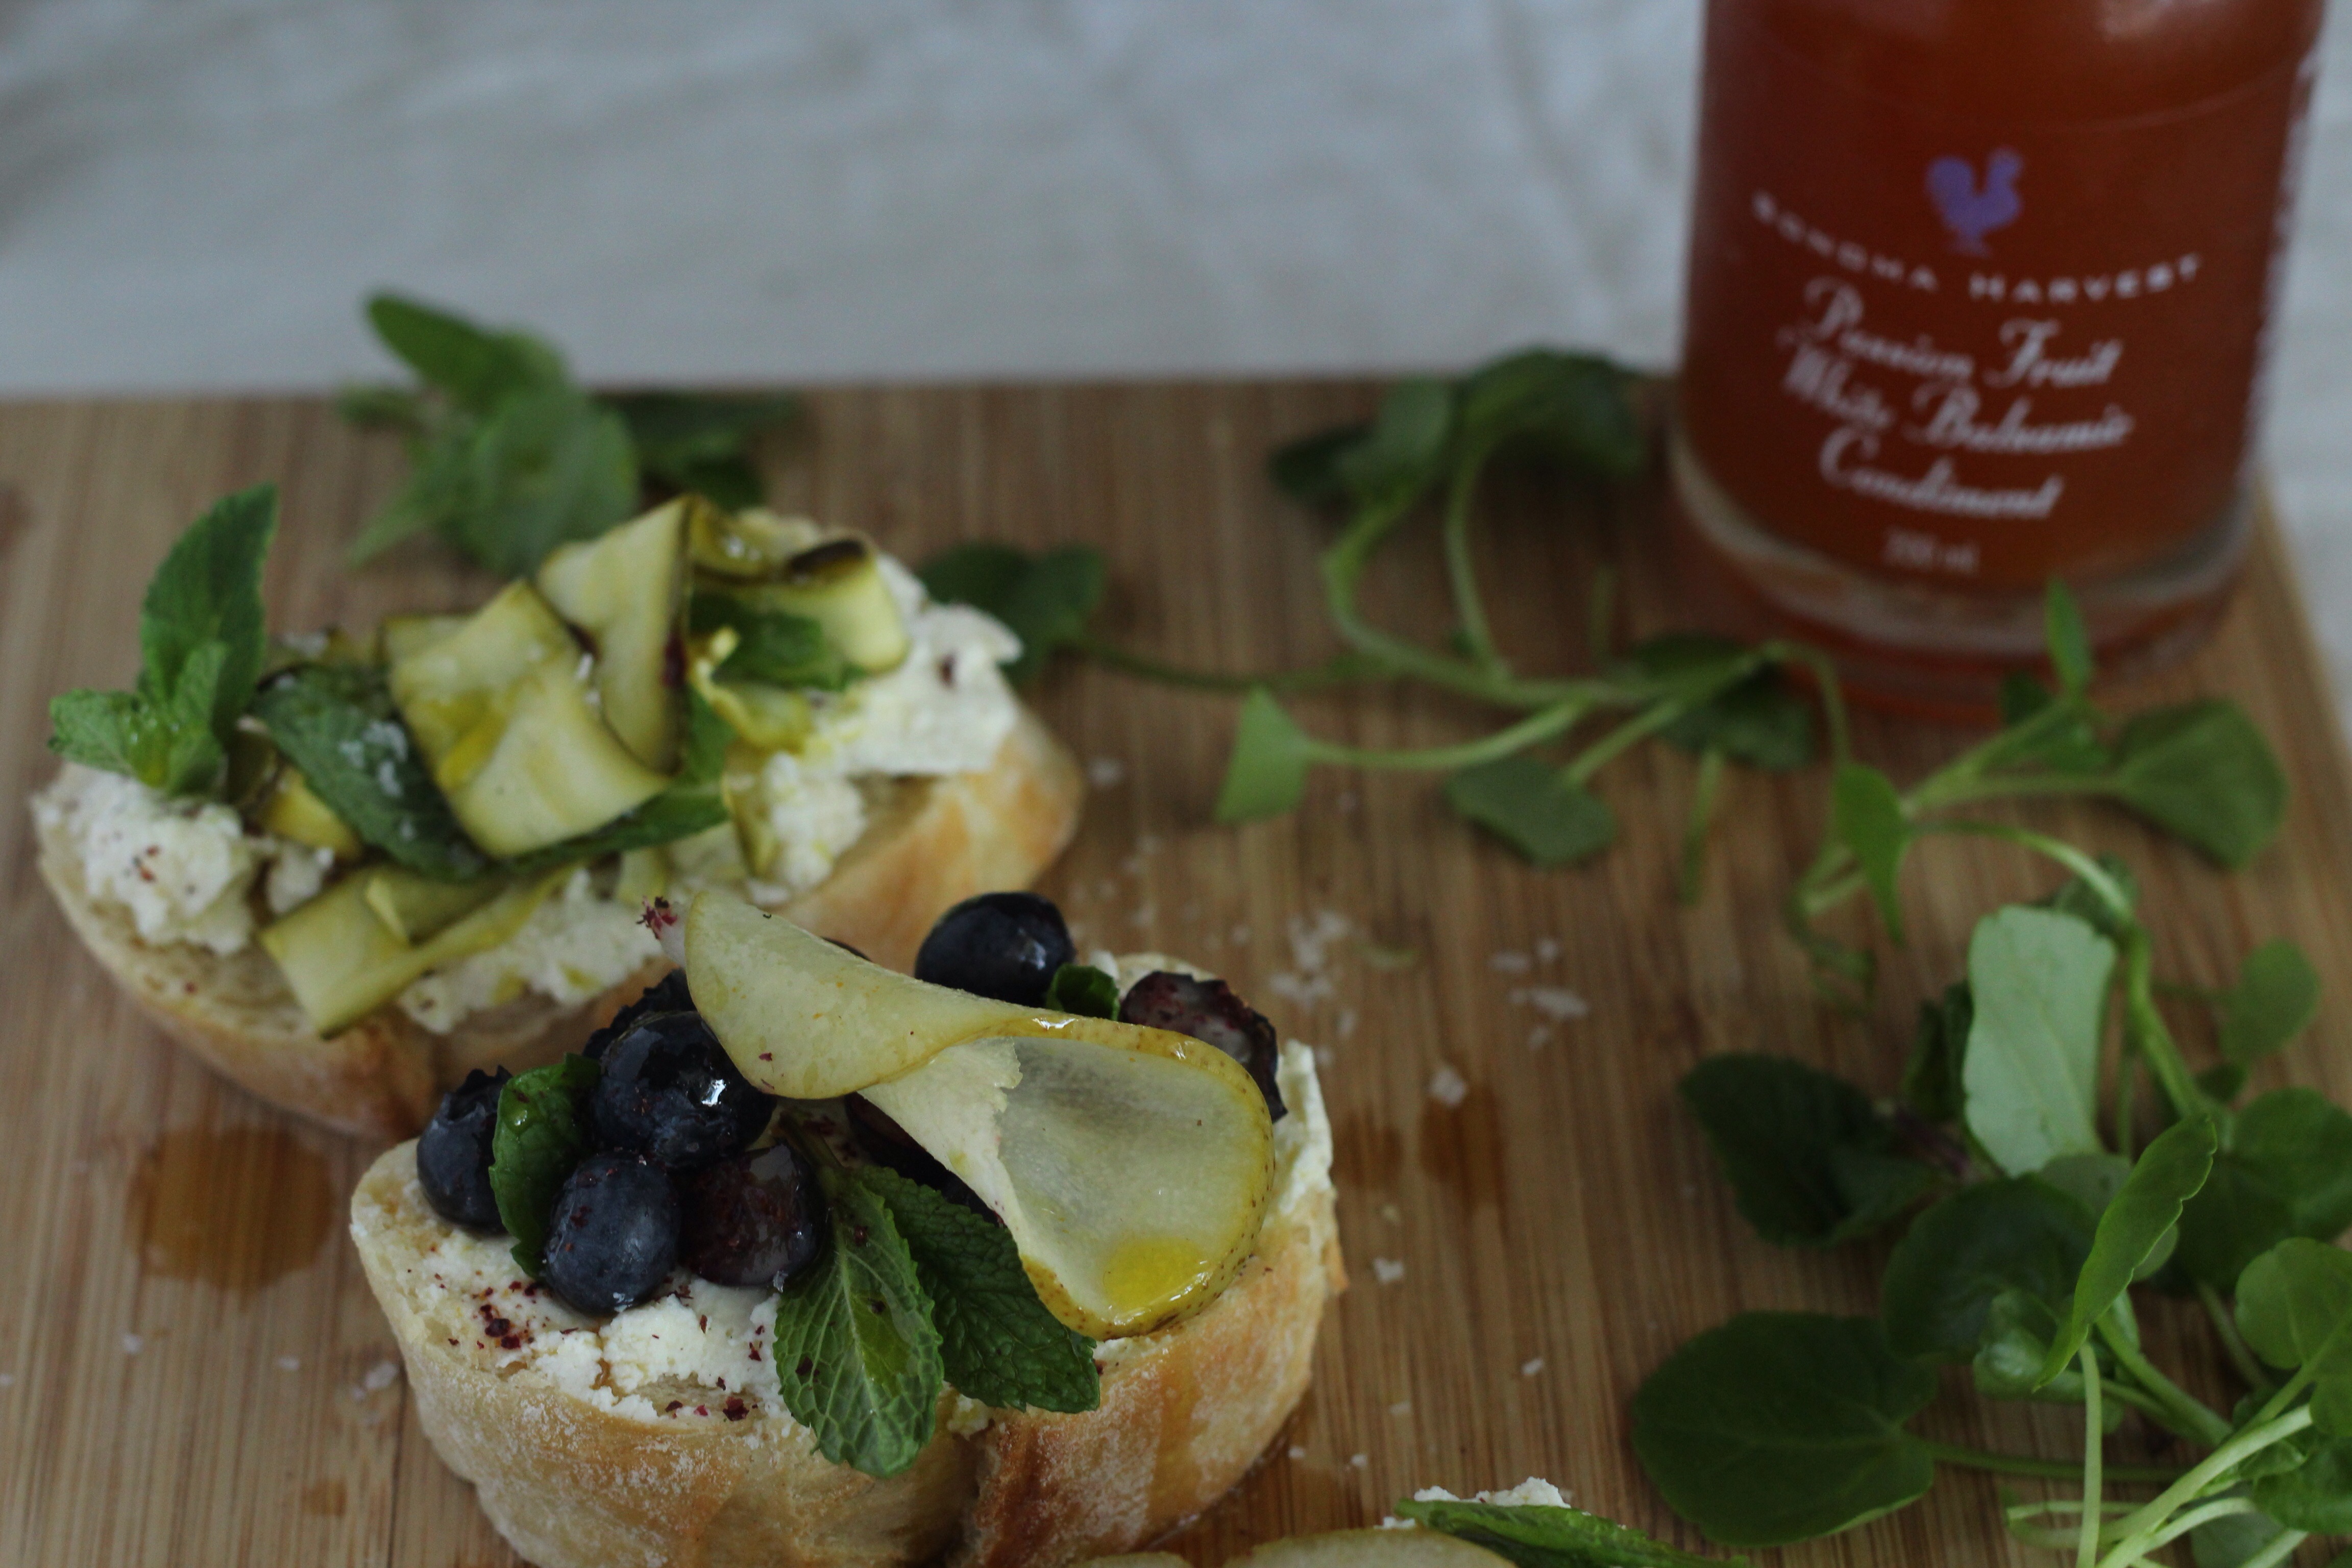
I bought a fresh plain rusticata loaf at my local Woolworths and this time purchased my ricotta, instead of making it, and also spotted some lush green courgettes. I made a quick pickle (I used 1 cup of white wine vinegar to equal amounts of castor sugar) and two cloves, a few cumin seeds and a few drops of this amazing white balsamic vinegar(Sonoma Harvest Passion fruit White Balsamic vinegar) the quick pickle is a tad unconventional, but it’s all in the spirit of experimenting and playing around with flavours.
I added thin slices of Courgette and Pear to the pickle, allow to simmer on a low-medium heat to let the flavours fully permeate and the speedy process of pickling take place. Take off the heat and assemble on thickly spread Ricotta on crusty bread sprinkled with a pinch of sumac and toasted cumin seeds and finish with a sprig or two of mint. I’m so enamoured with the lip puckering taste and crunch of the courgettes, I do like the pickled pear, the variety I used was really sweet, the pickling balanced the flavour of the pear beautifully. I made an extra one with blueberries for another tart flavour combination. There are so many flavour combinations one can experiment with Ricotta.
The photos were taken just after noon. Only once I have looked at them on my computer screen, did I realize how similar in some ways it is to my previous post, The ultimate toastie. I hope this post will inspire and fuel you with ideas for your next get together with friends and family.
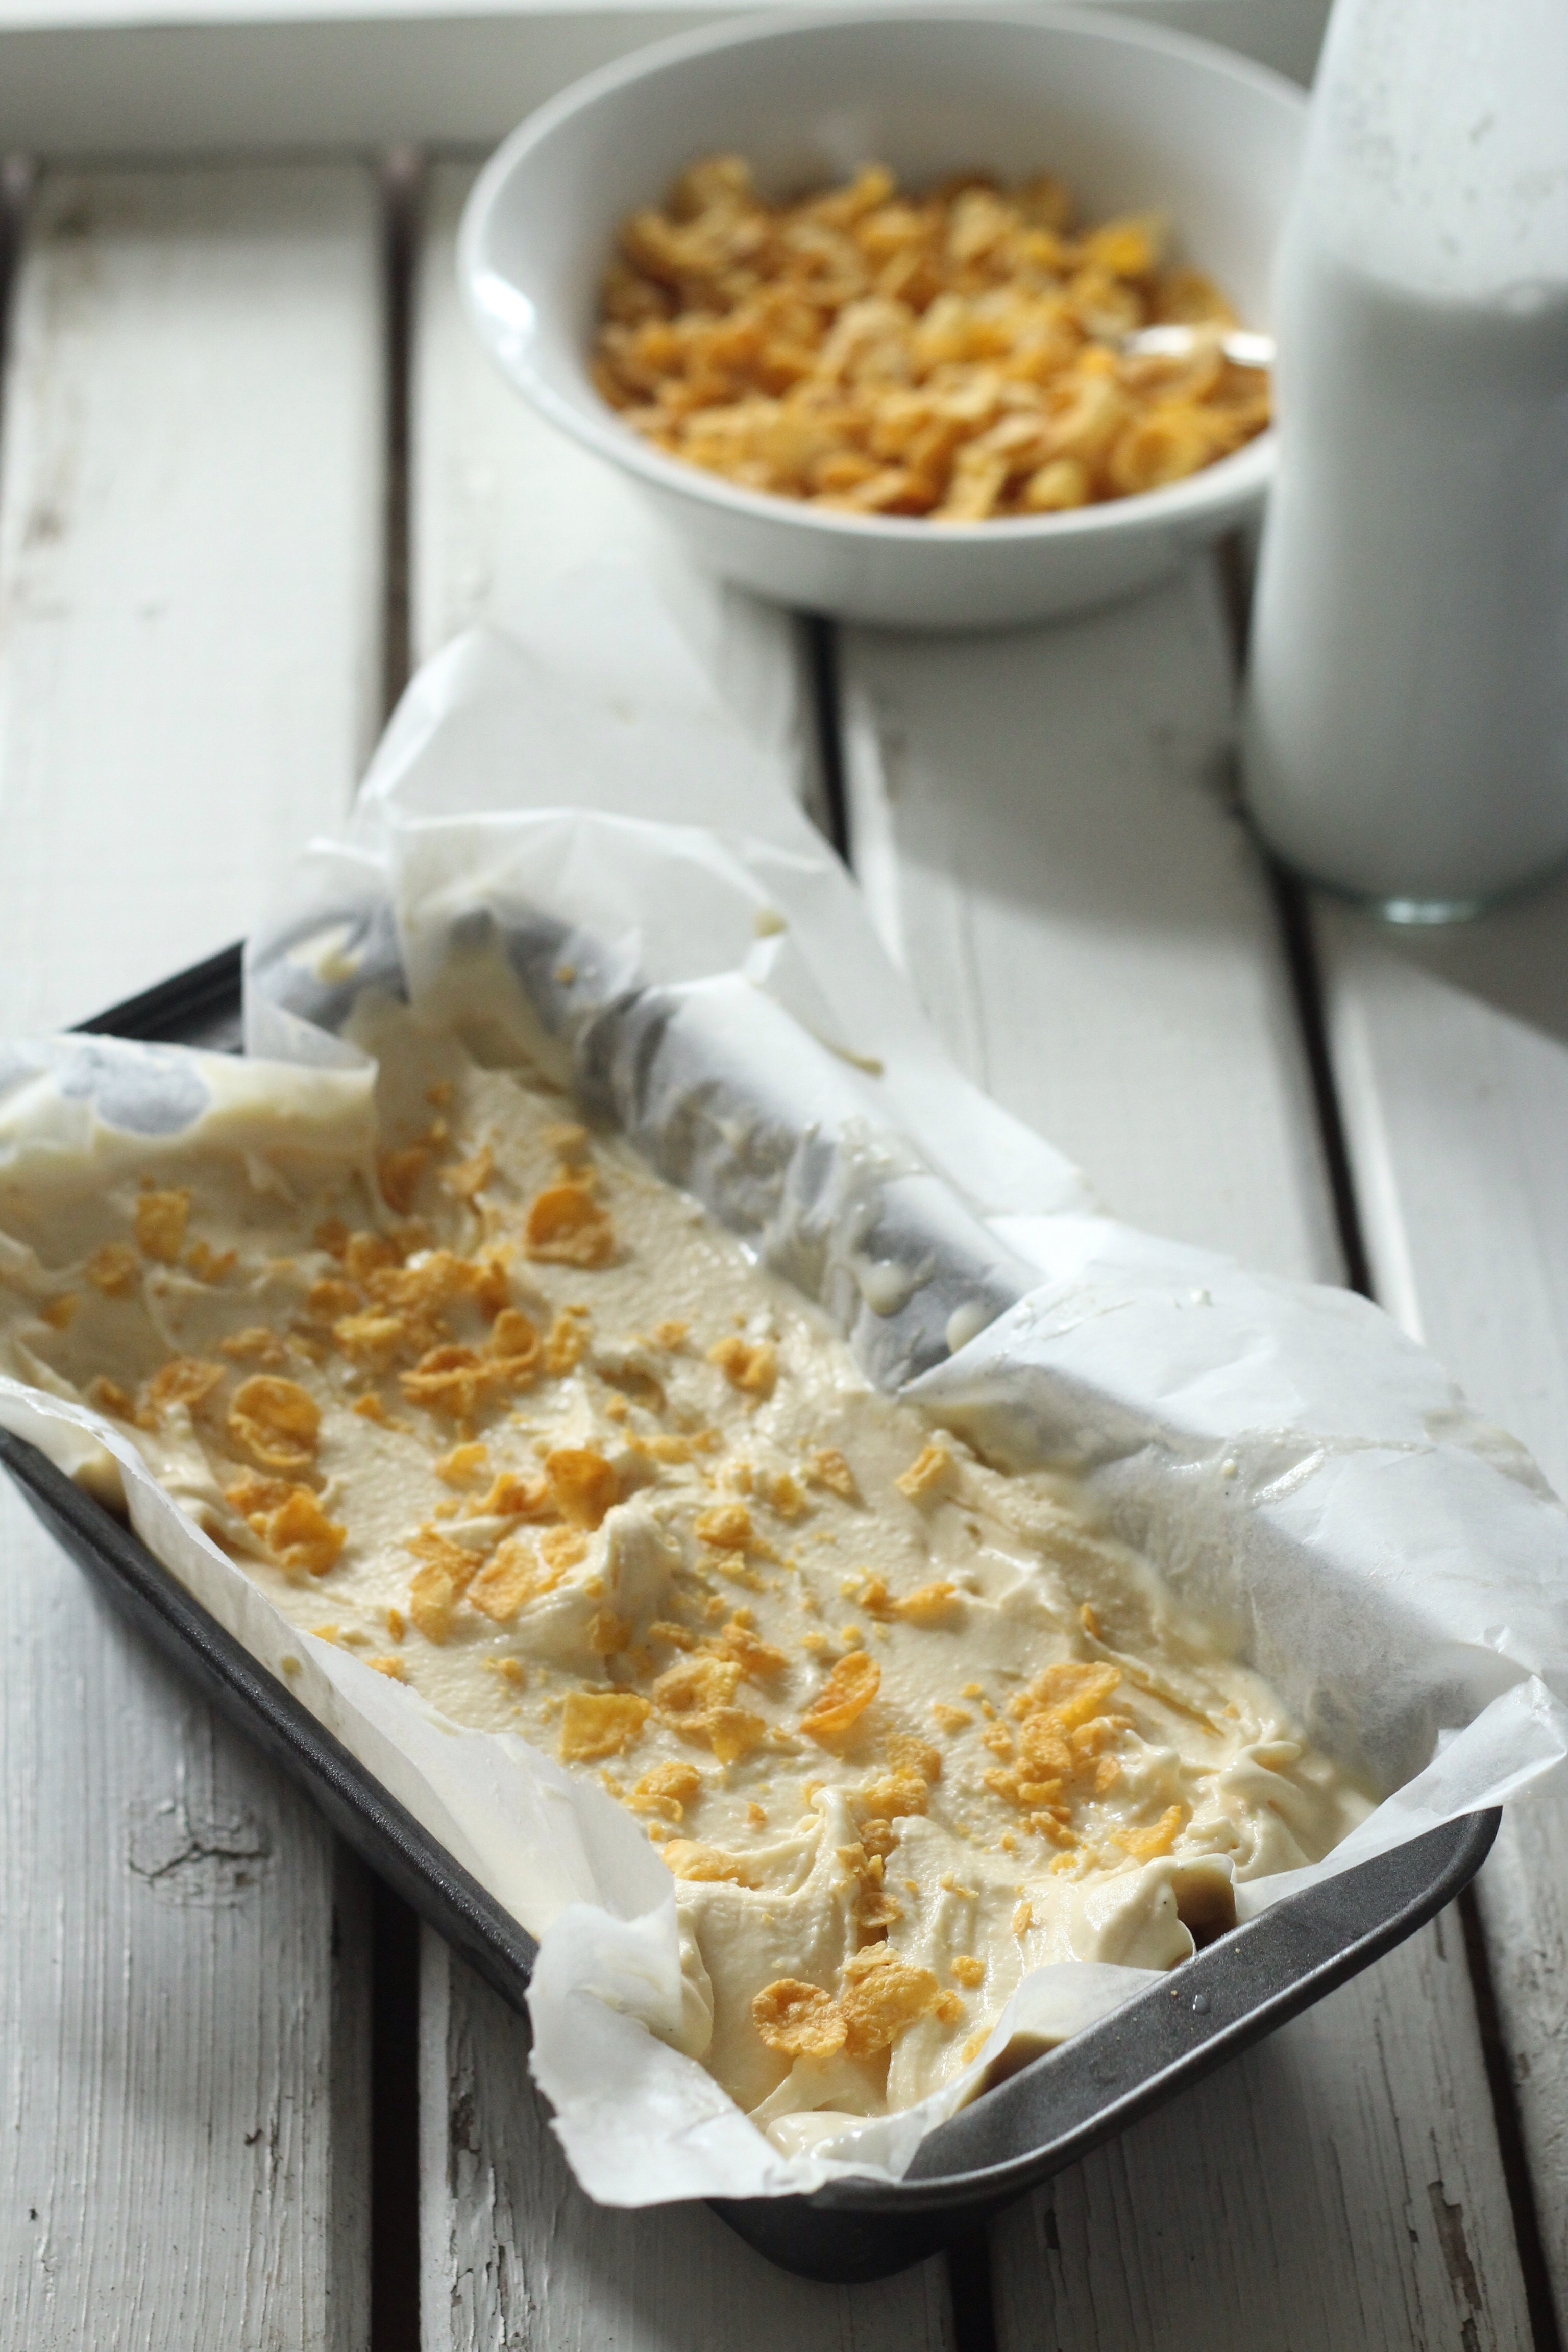
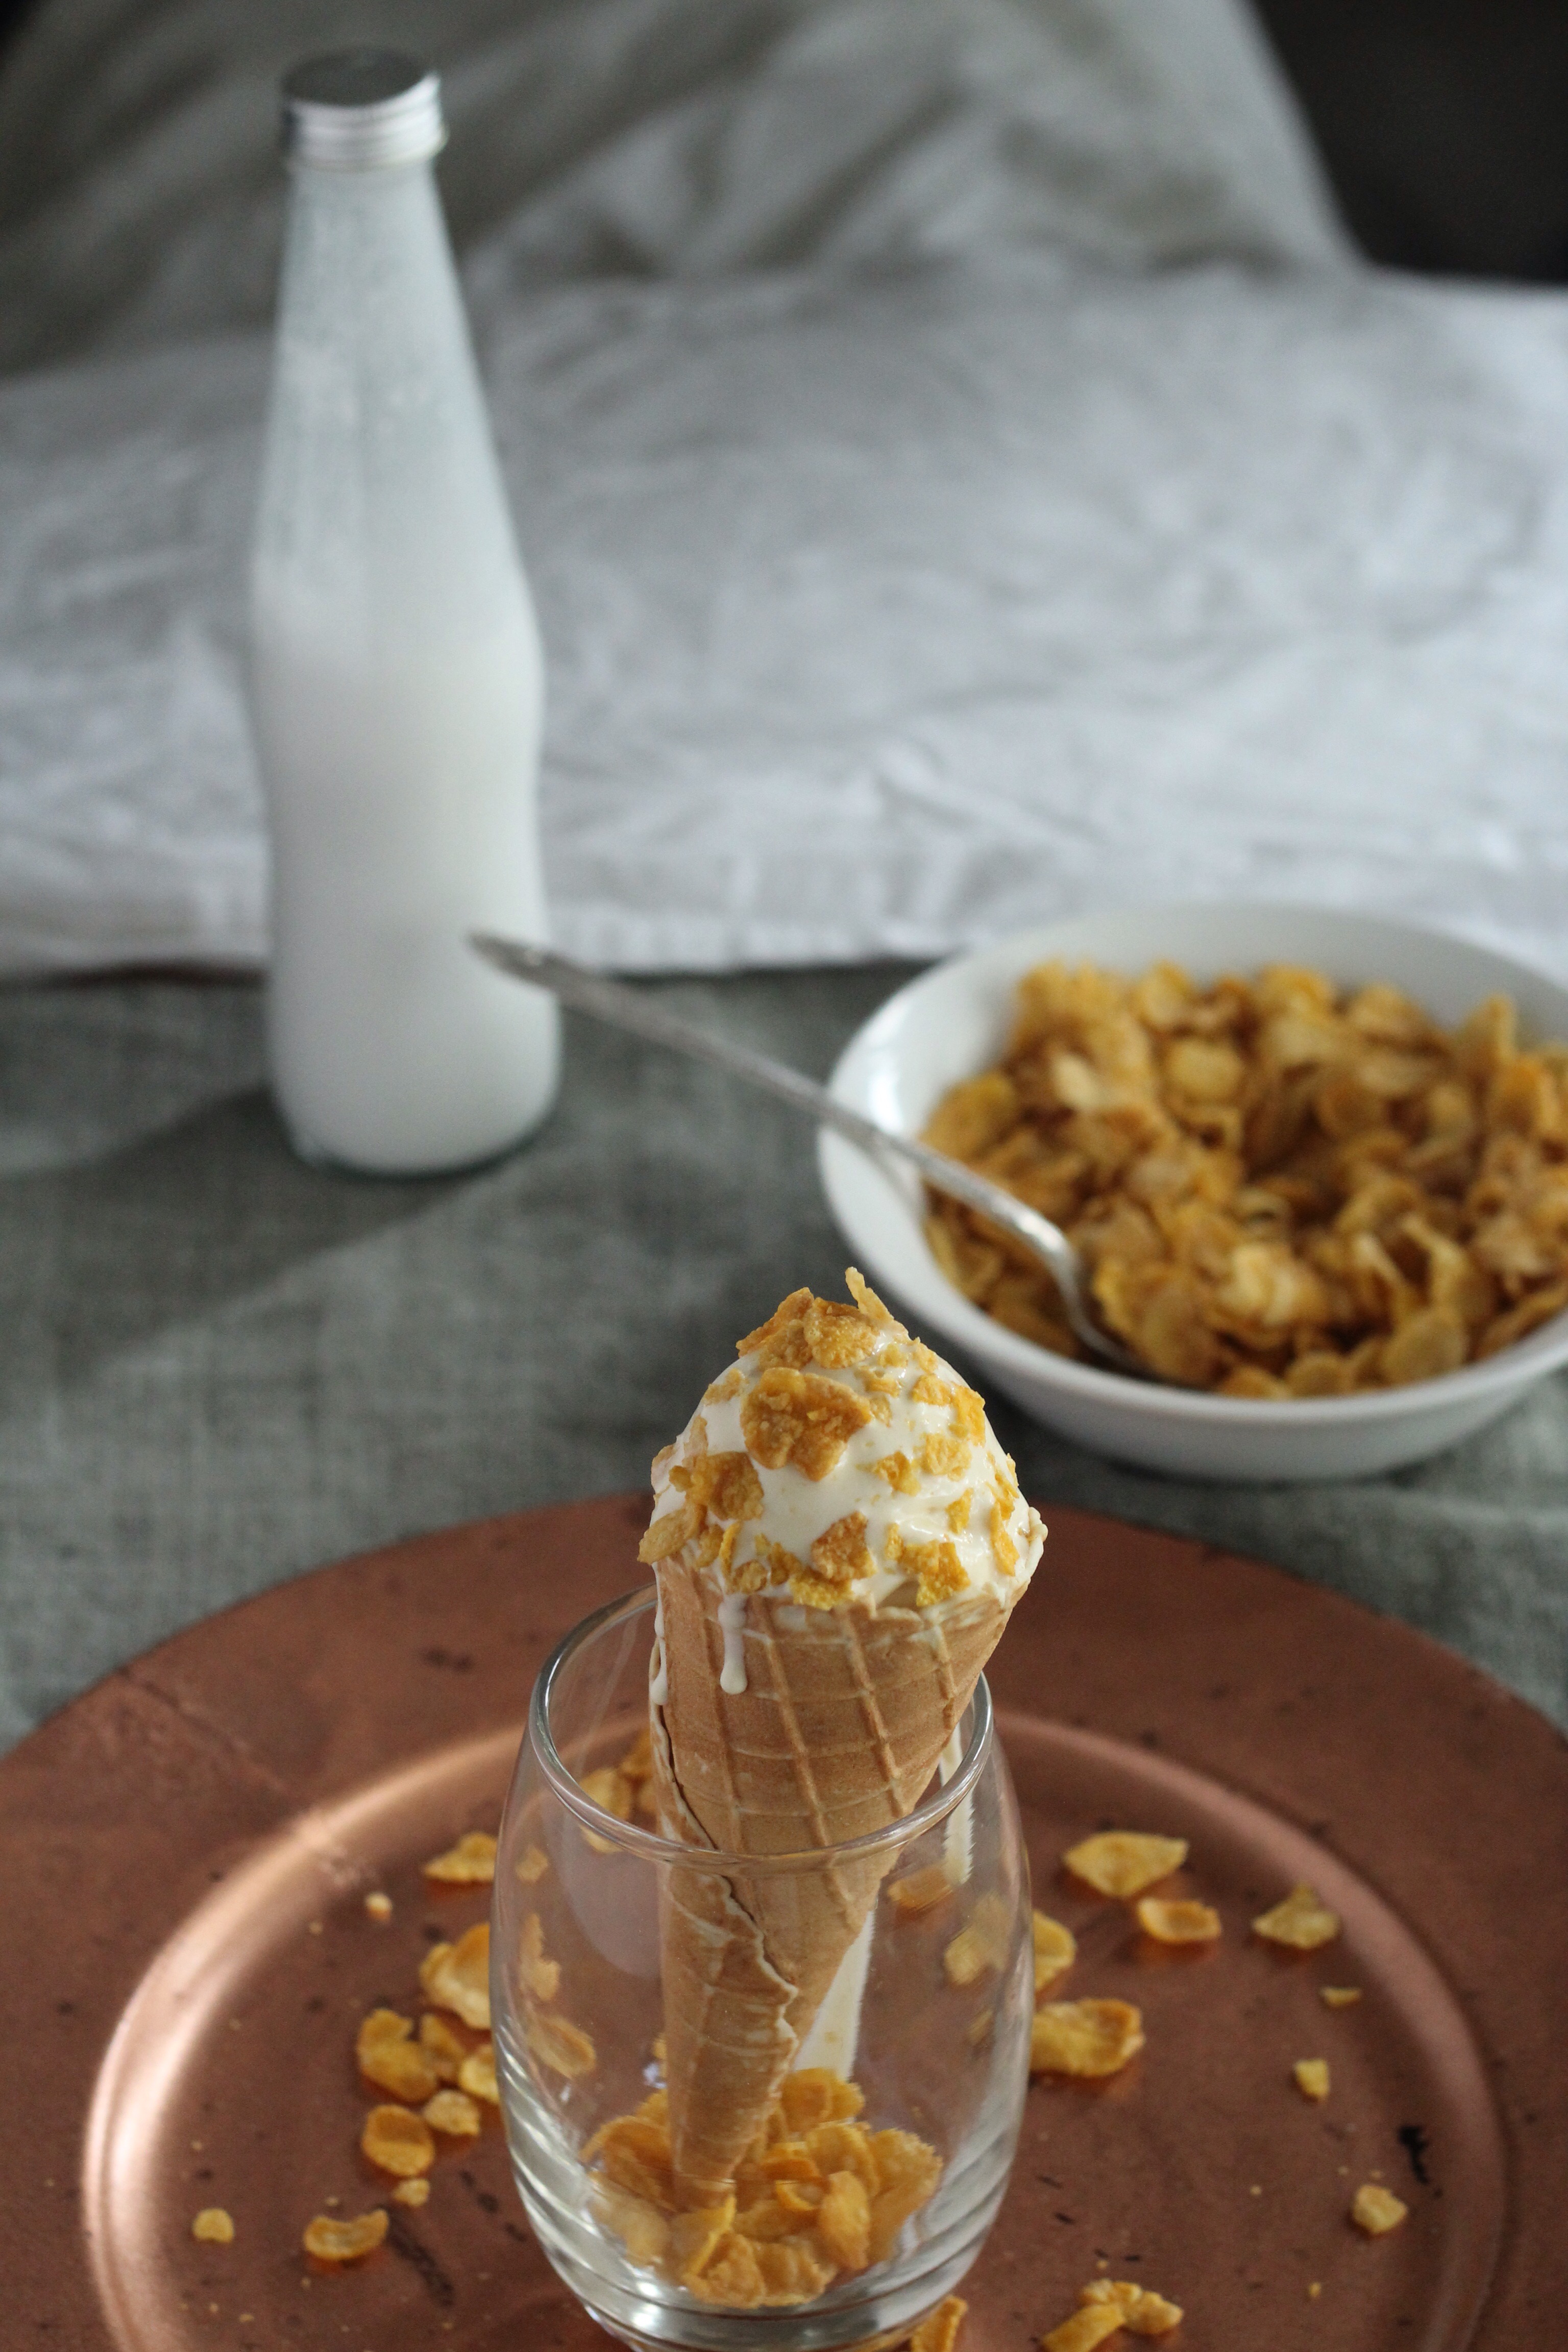
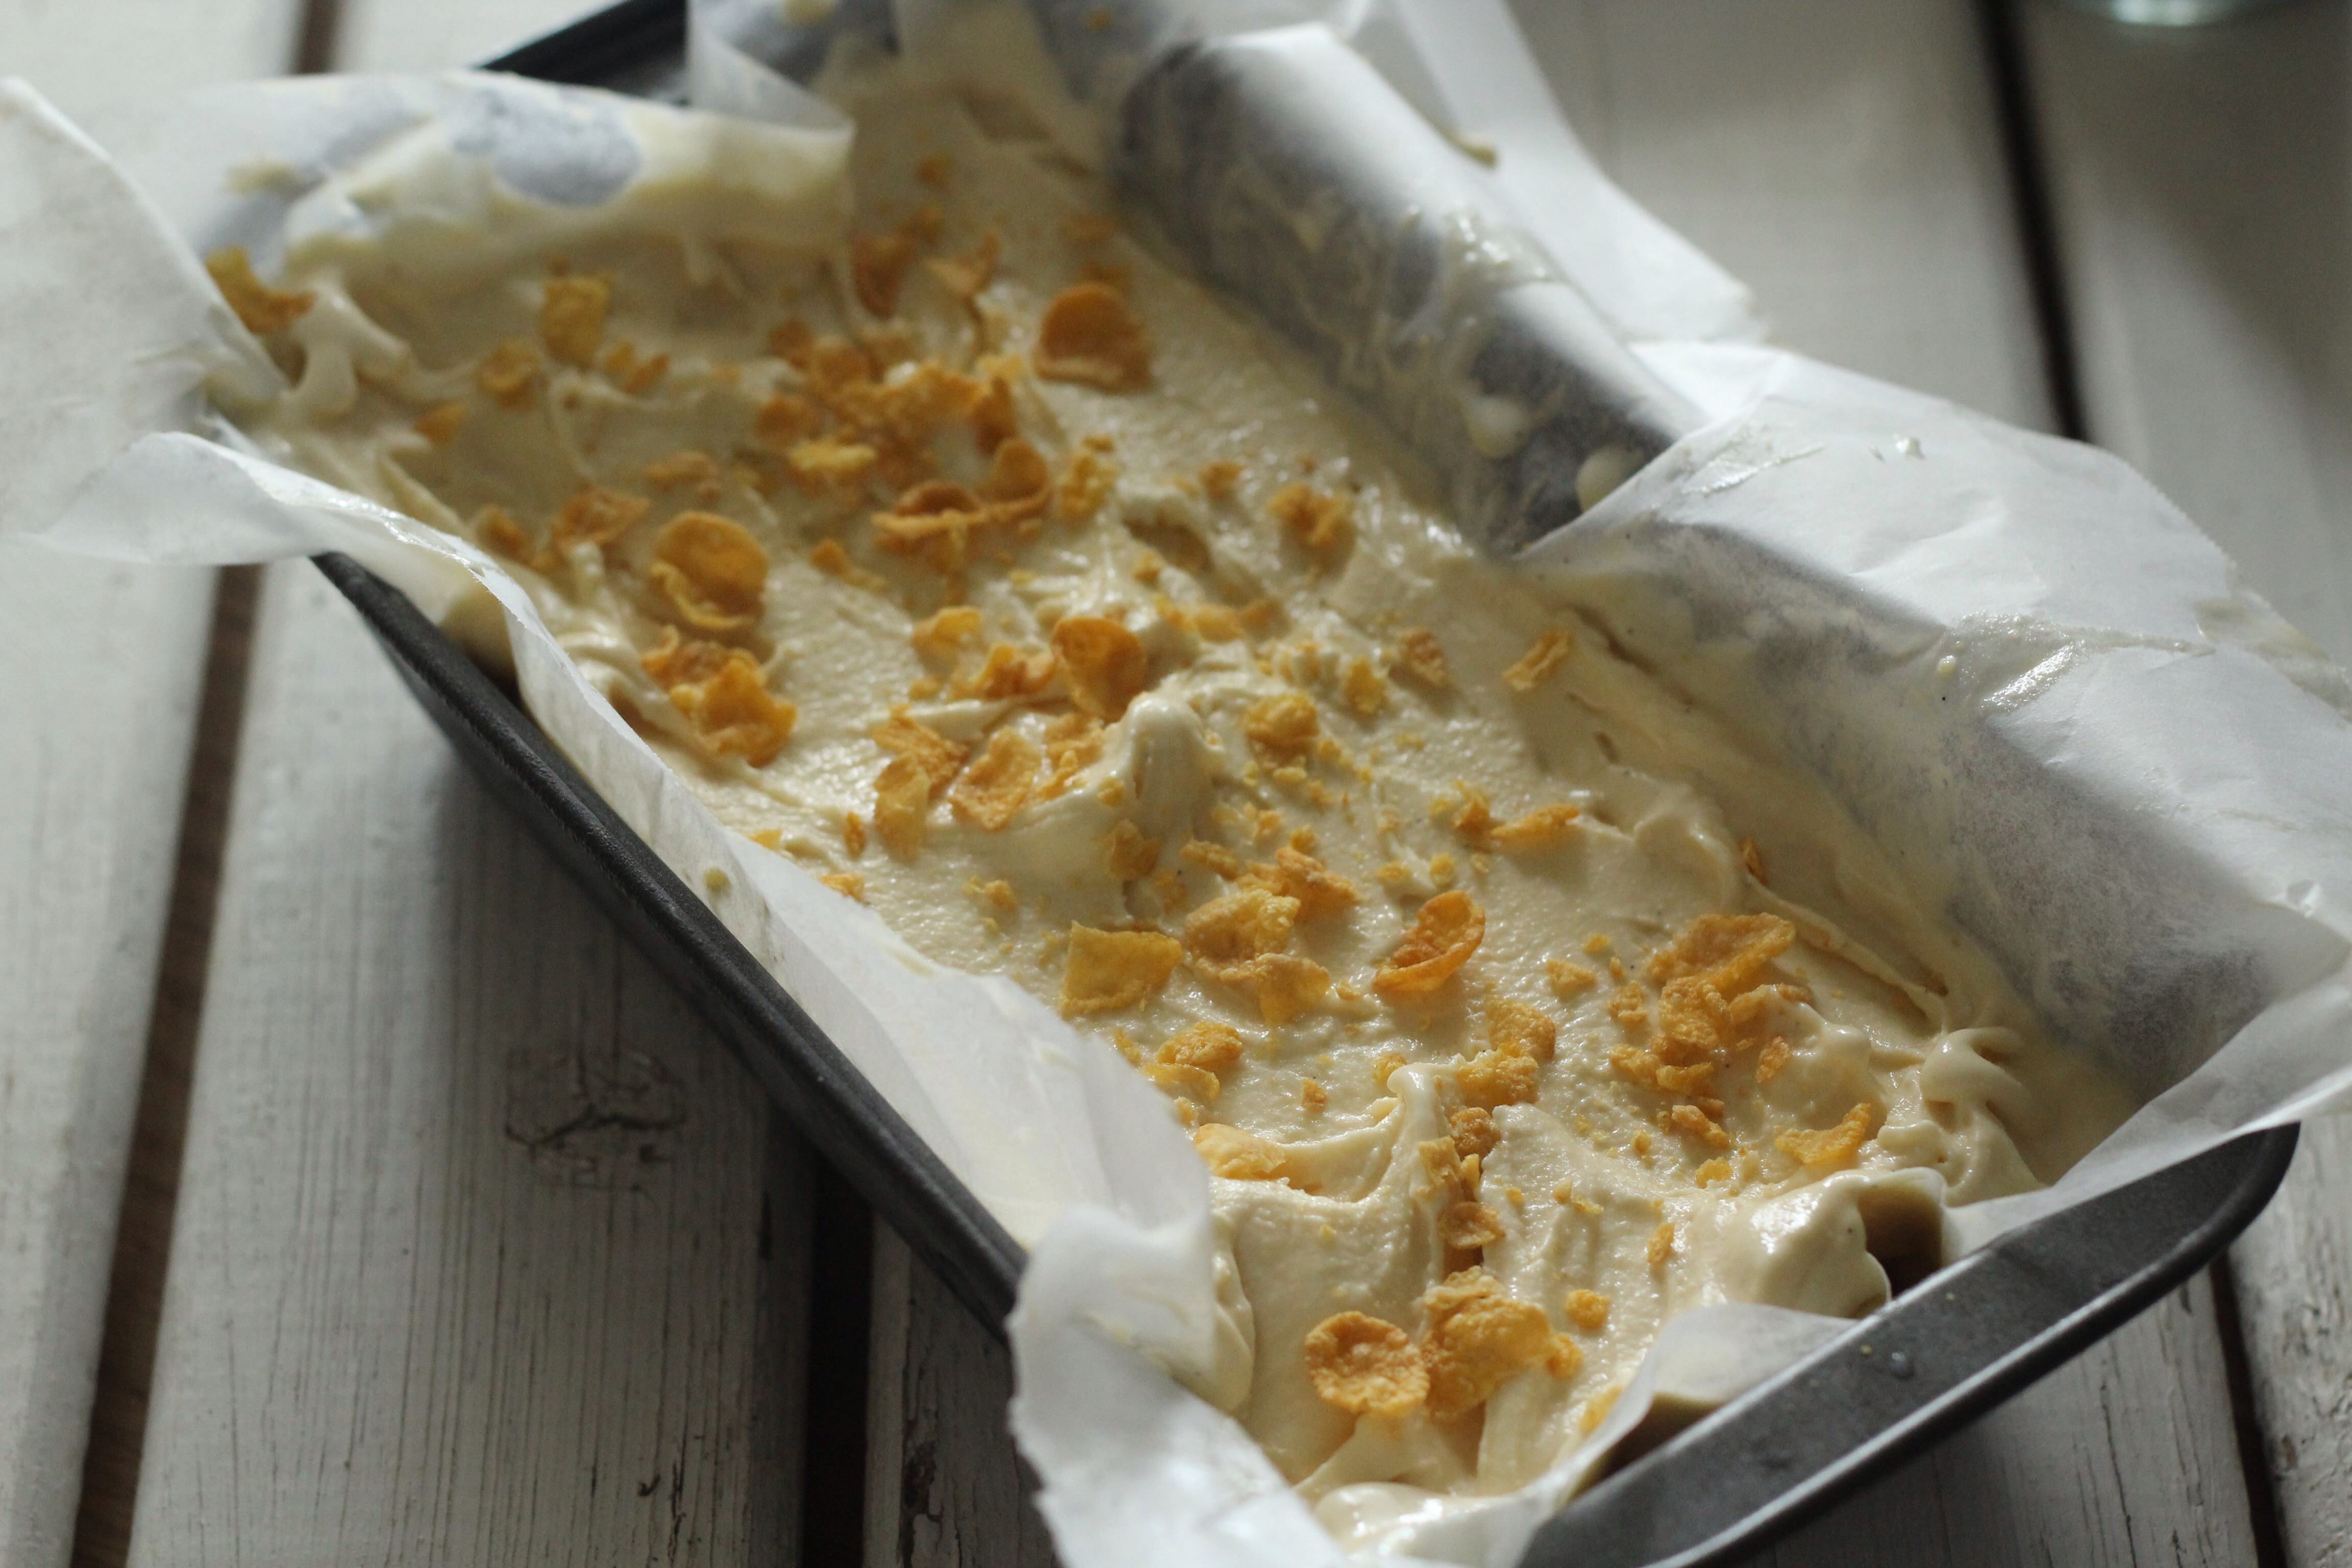
a melting Corn Flakes Cereal milk ice cream
For the first 10 years of my life, being the youngest gave me that prized golden first choice of choosing the cereal for the month when we went grocery shopping. My favourites alternated between, Cocopops, Rice Crispies and Corn flakes, whatever I chose my sister had to suck it up and eat. This all changed when I became the ‘middle child’ and my preferences as the youngest fell away. So as an ode to my glory days when I used to antagonize my older sister and reign supreme as the youngest. So in that spirit I recreated a Christina Tosi dessert with cereal milk being front and centre! Christina Tosi is the chef and founder of Milk Bar, many of you will know her from Dave Chang’s Momofuku as the highly acclaimed and inventive pastry chef.
I saw this ice cream trending not too long ago, many travel to New York City solely to experience this unique and coveted dessert. For me, one of two highlights of eating a bowl of Corn Flakes was the sweet flavoured milk at the end when all of the crunchy flakes are quickly devoured so as to not get soggy. The second is of course the crunch.
I’m something of an ice cream addict. When I do, I love making from scratch, but hate the fickle tempering process with the egg yolks. So i’d much rather visit my favourite ice cream parlours in and around Cape Town for my frequent fix. I spotted the recipe on Food52 and made an exception to make this interesting recipe. With that last batch of ice cream and dignity down the drain from my previous failed attempt at ice cream and fierce bravery(fake or not) as I attempt this batch of ice cream.
I am happy to report that yes, it does indeed taste of ice cream, not exactly soft serve, but it will do. I love how the taste of the cereal milk really shines through although it’s not overpowering. I love the velvety smooth texture. The specks of vanilla from the vanilla paste really does it for me.
The photos were taken just before noon today, the weather is not exactly ideal for the natural light that I needed but again, with the use of reflector boards and white backgrounds I made it work somehow.
Do you have any favourite foolproof ice cream recipes? Share them in the comments section. Sharing is indeed caring 🙂
This post was collated whilst listening to the album X By Ed Sheeran.
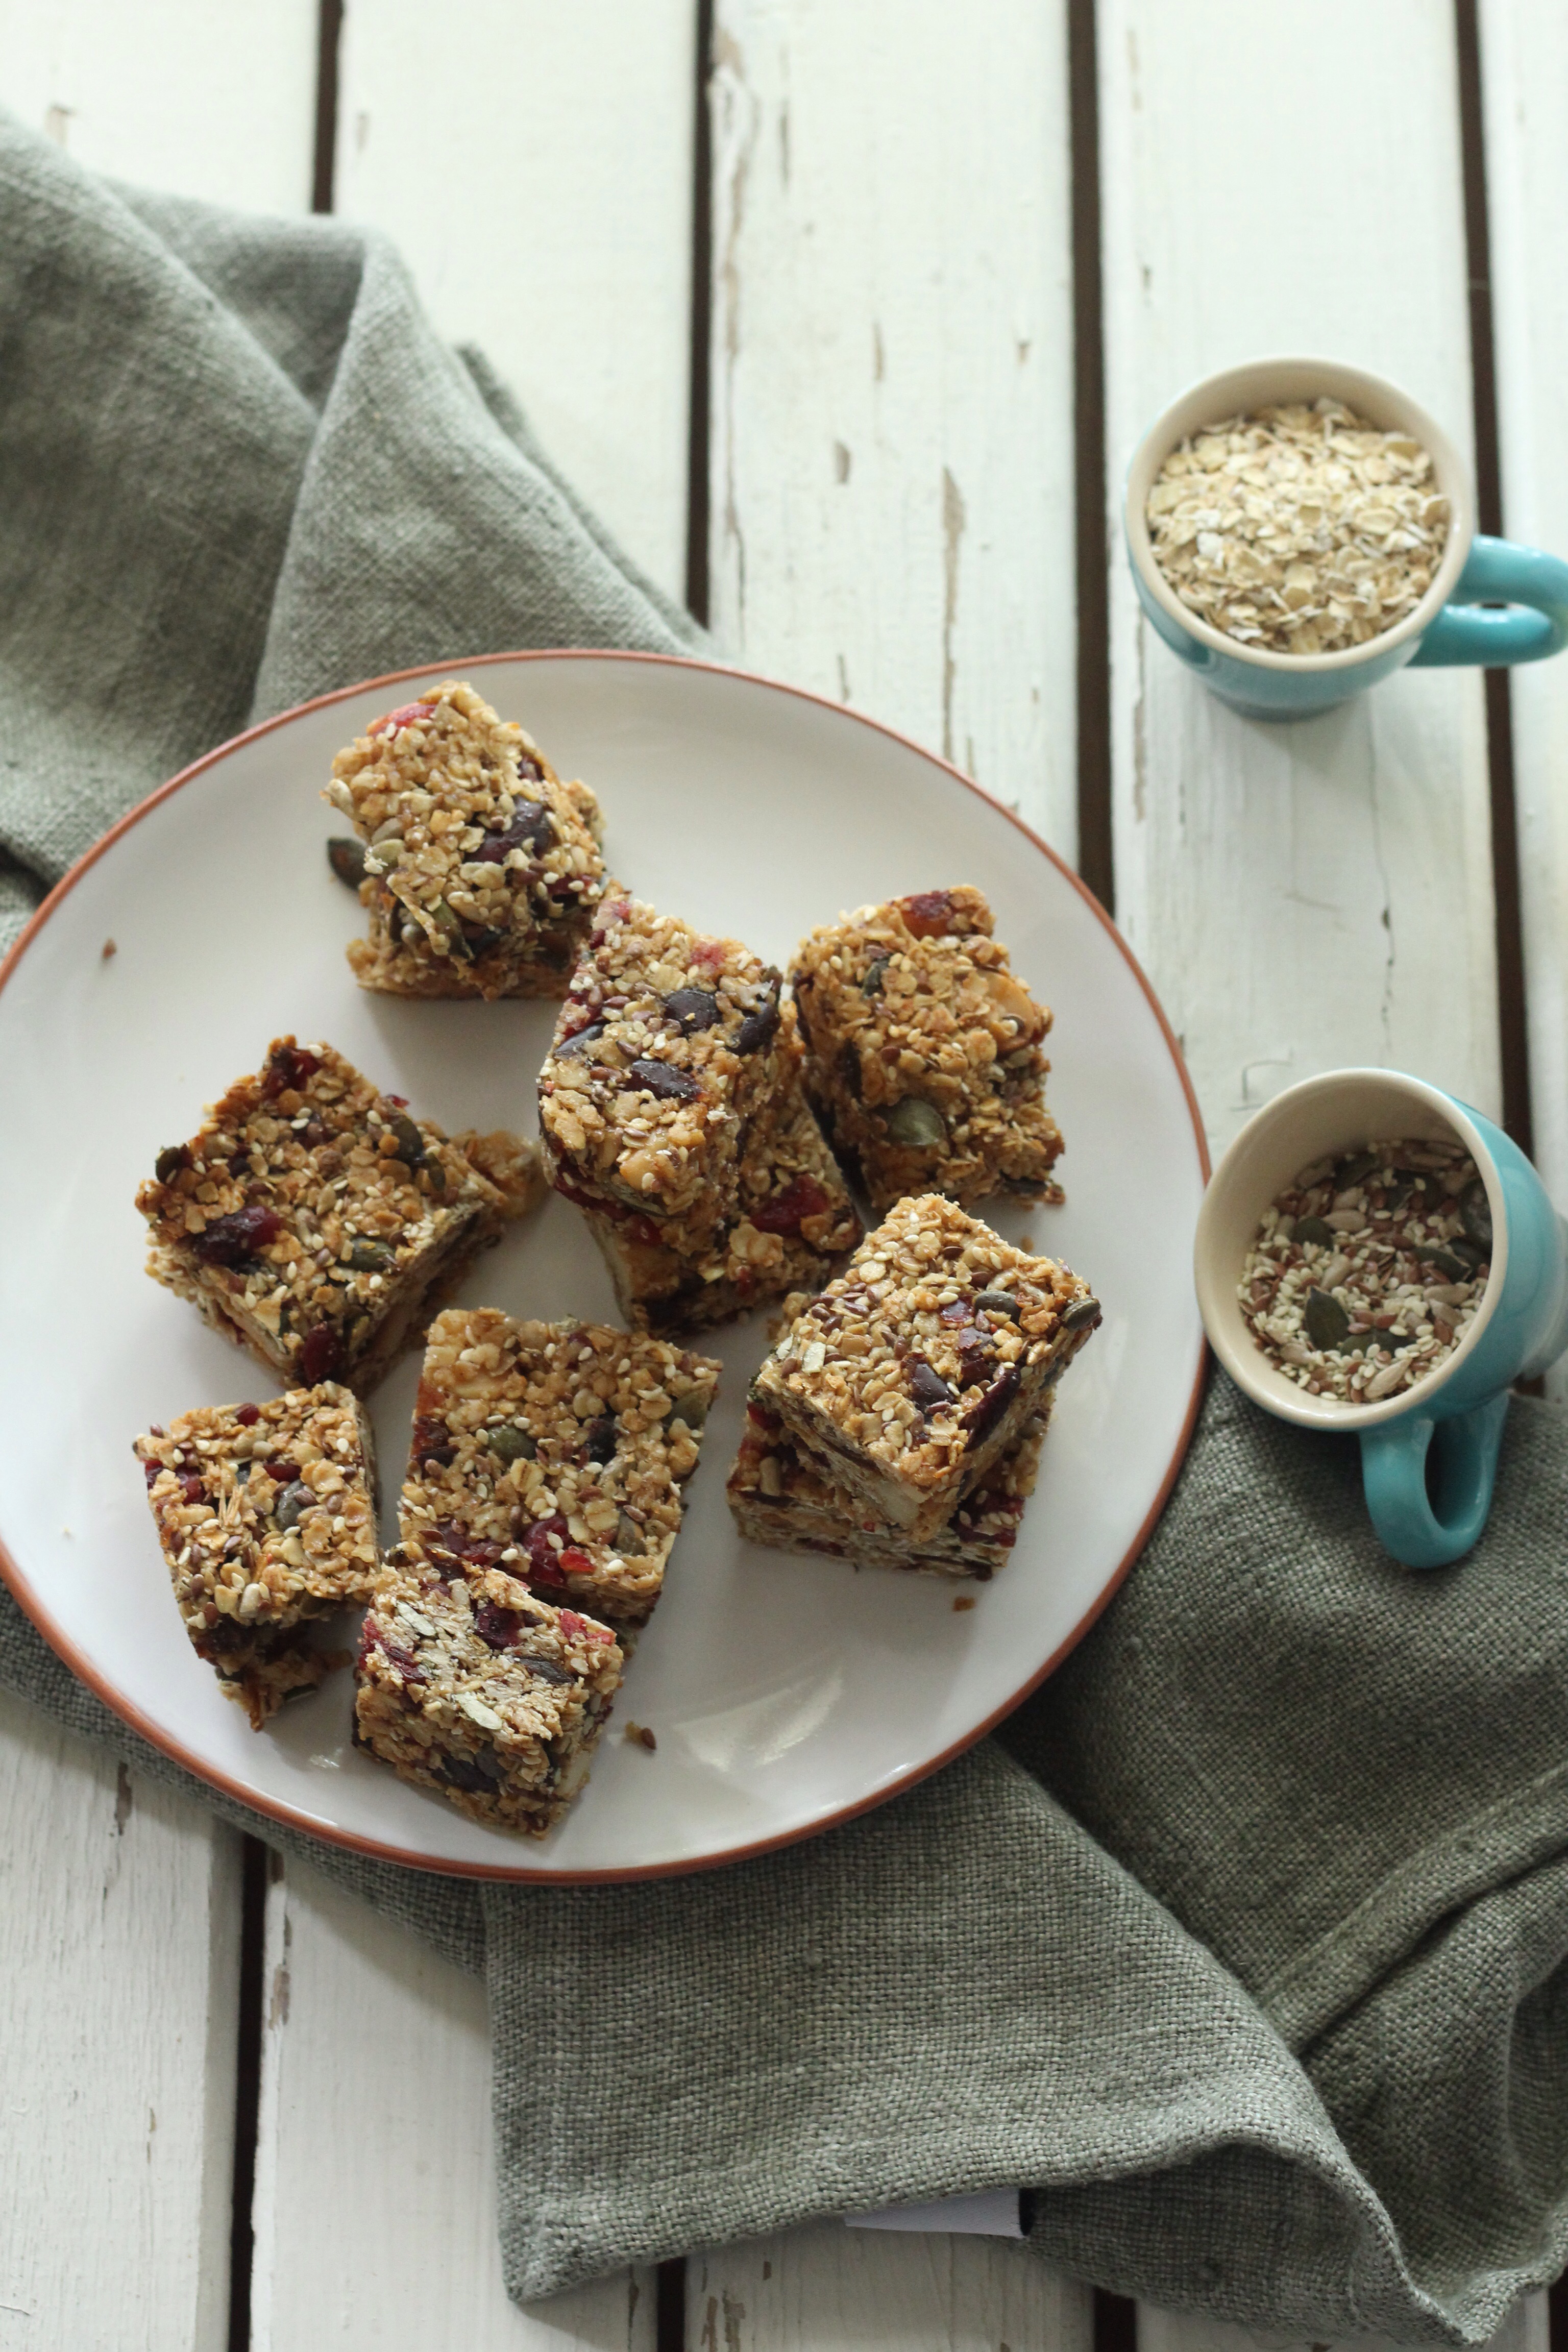
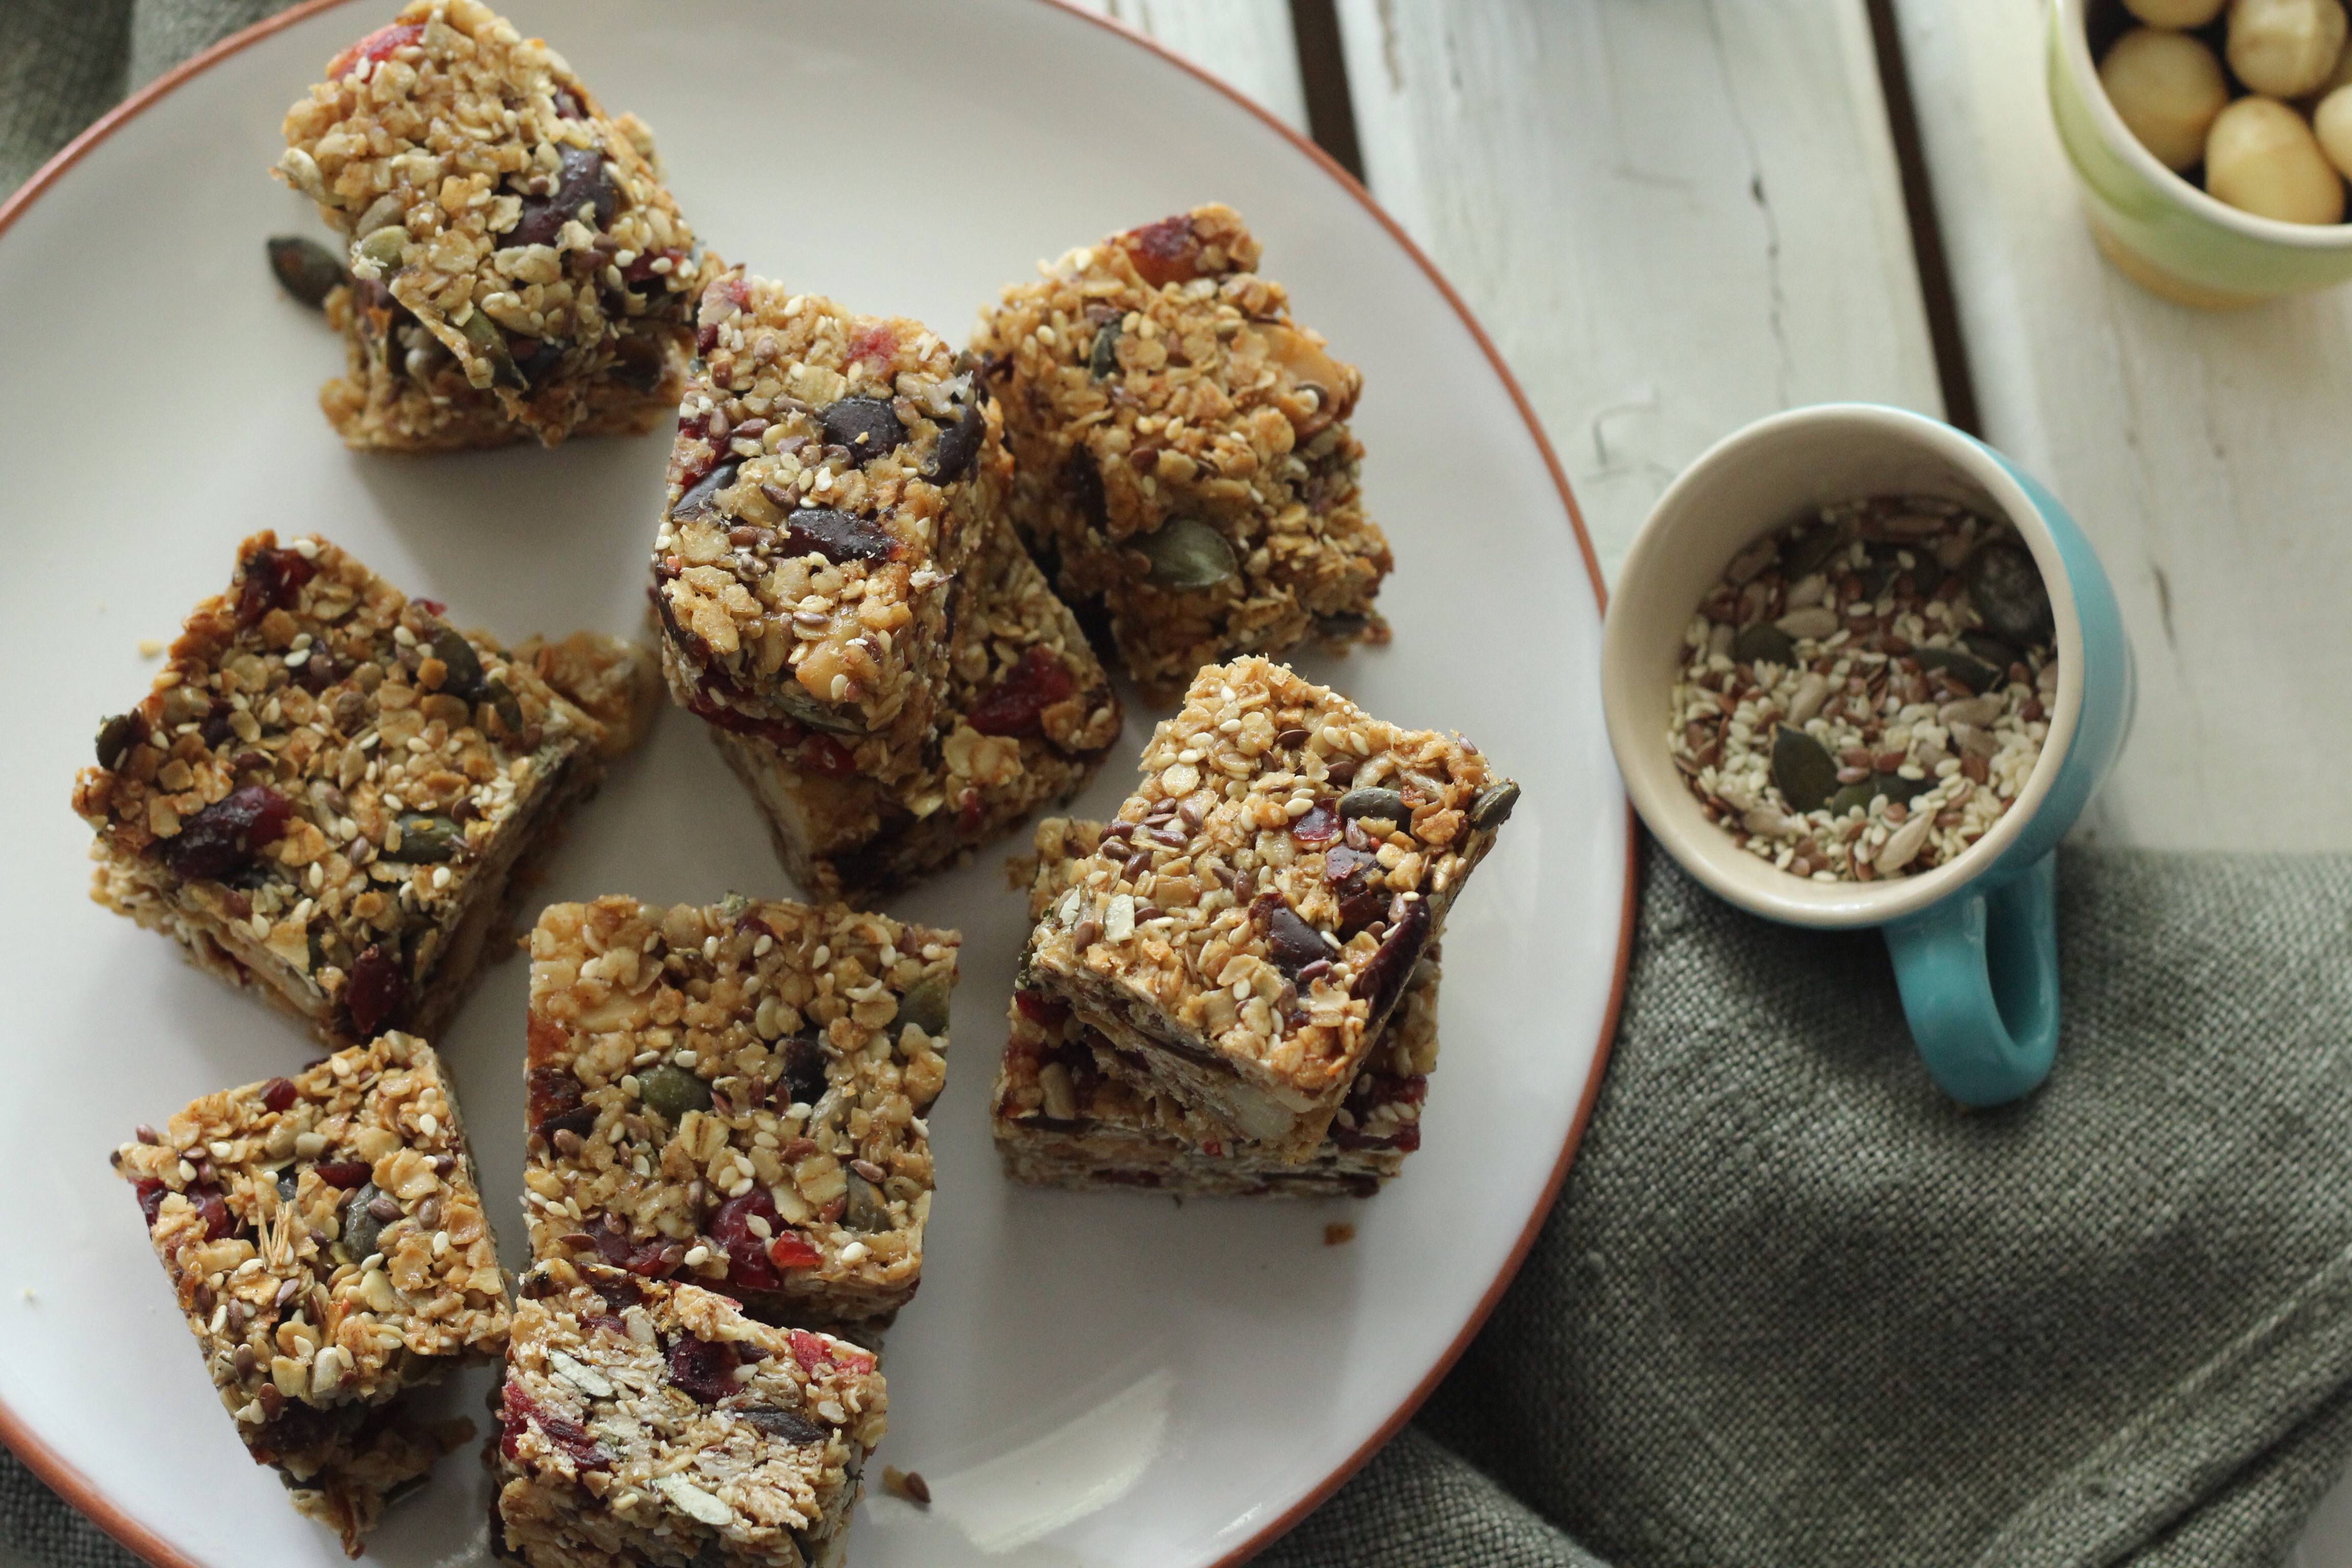
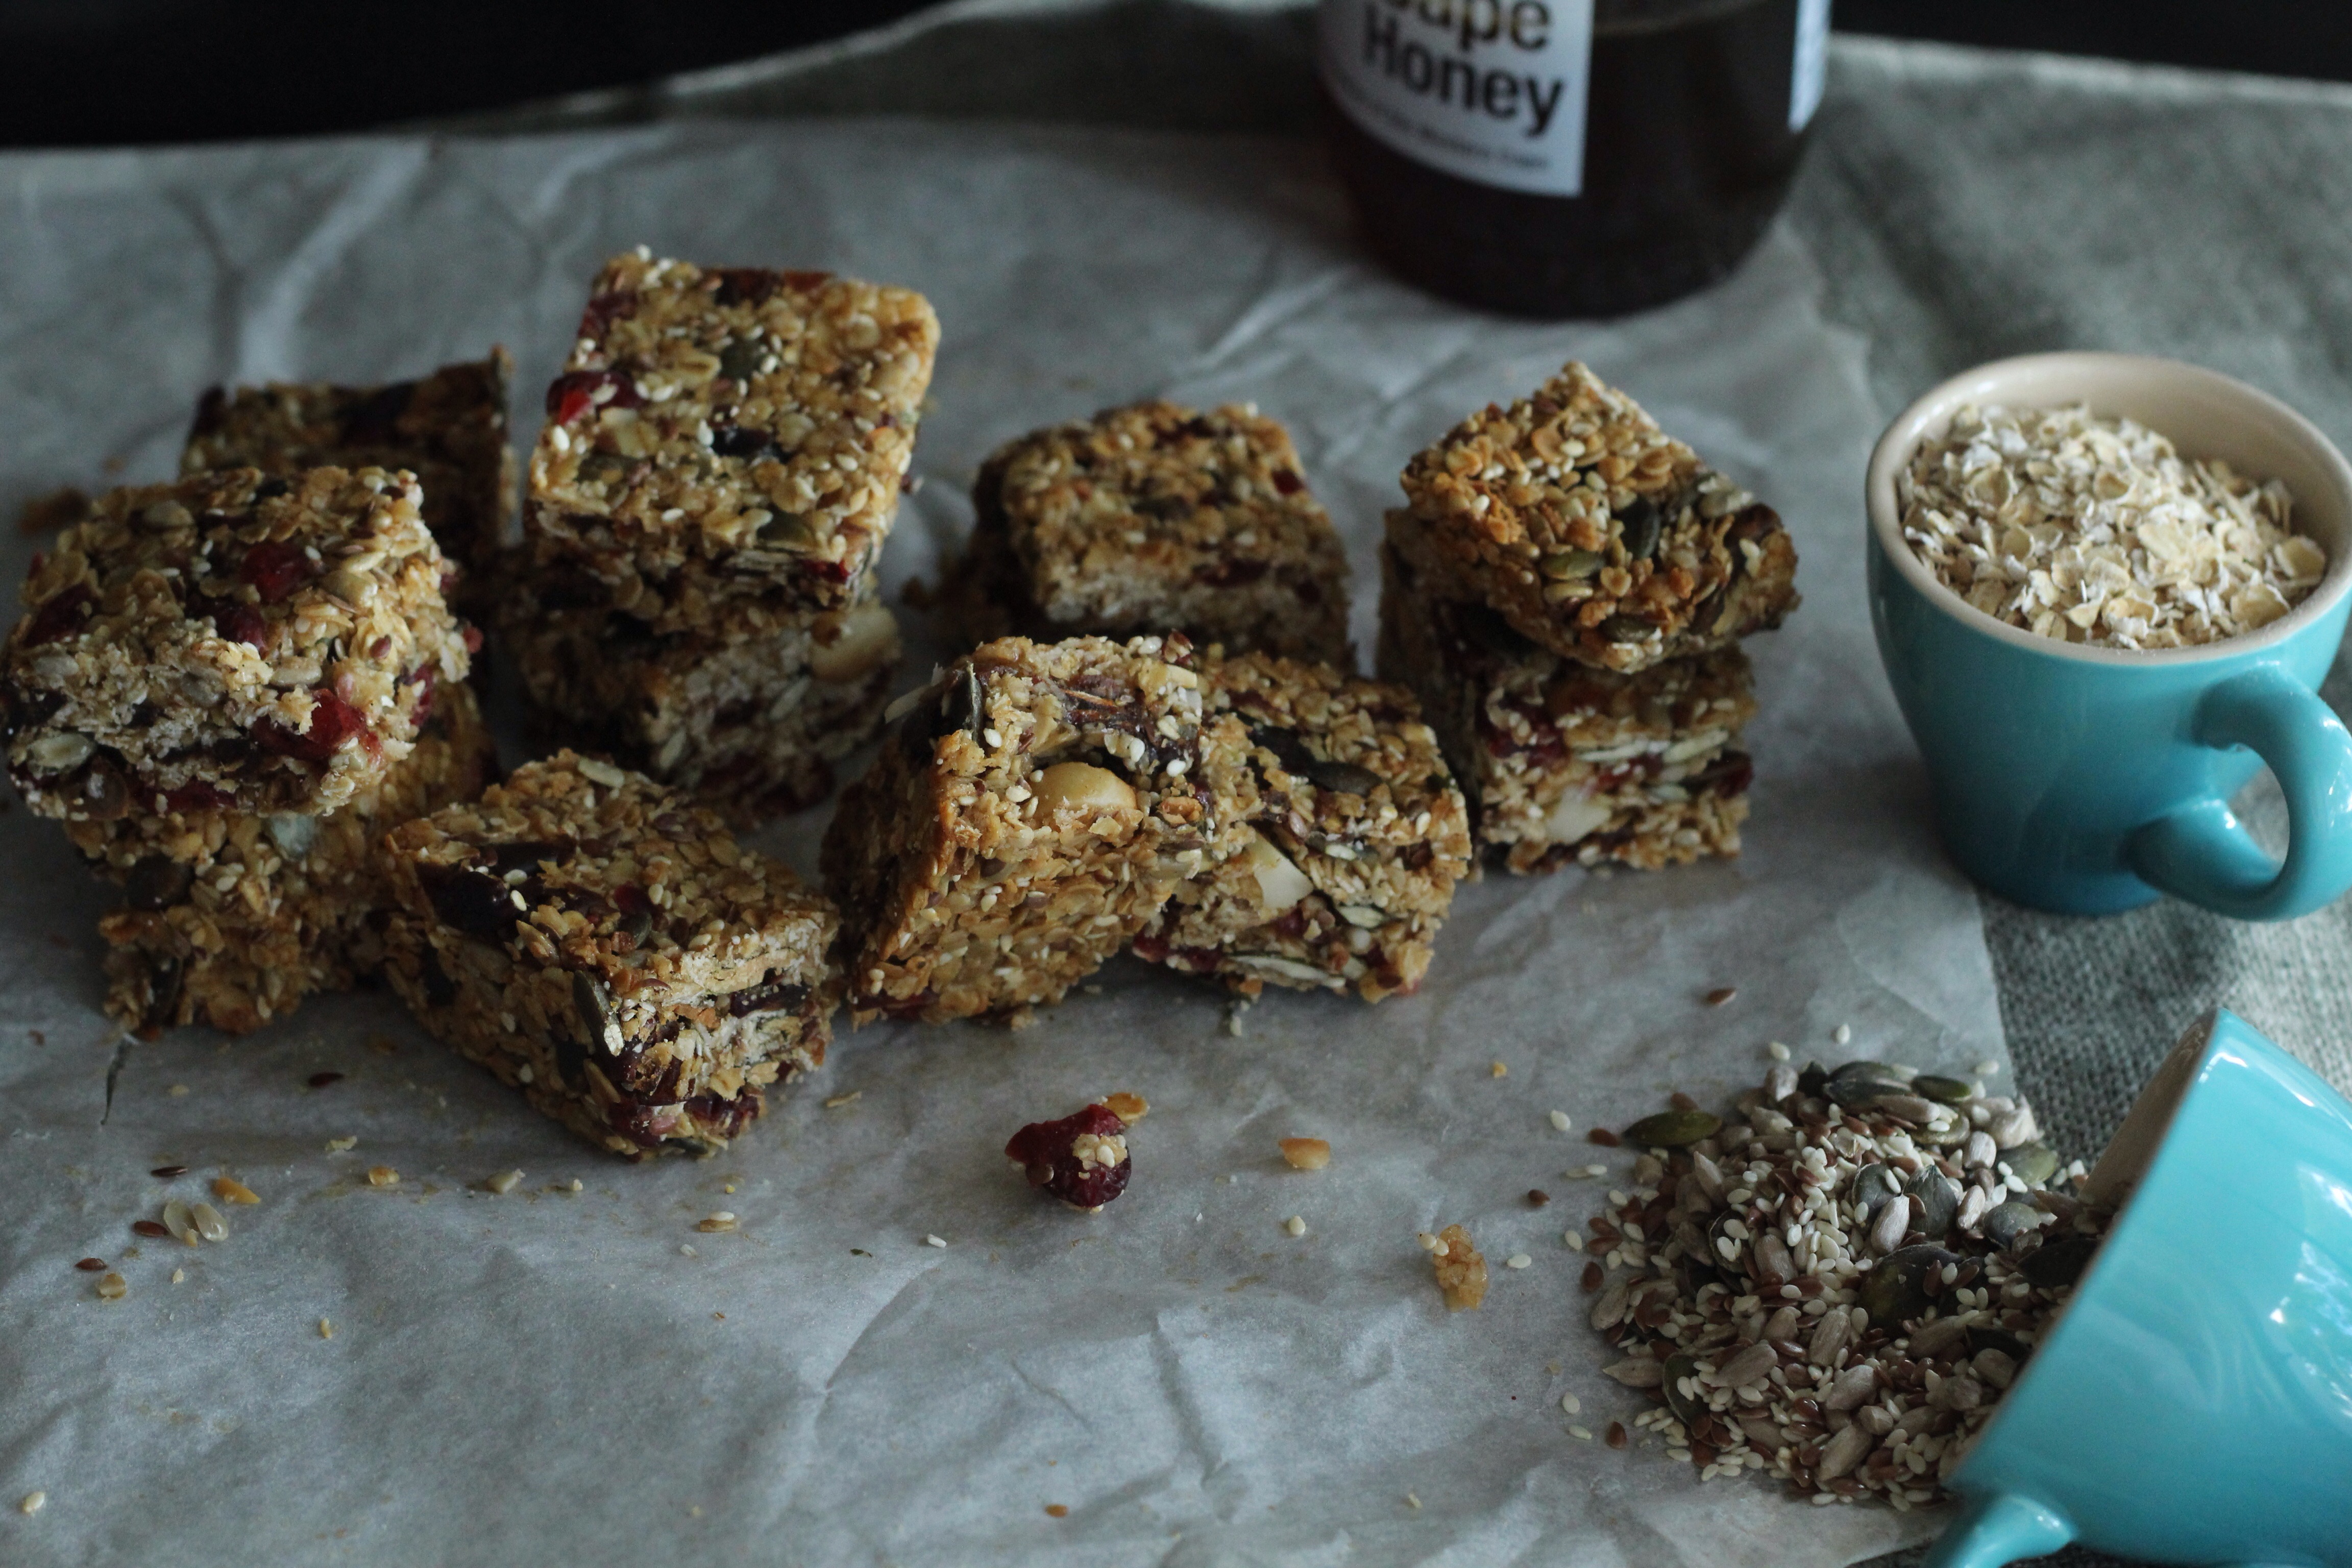
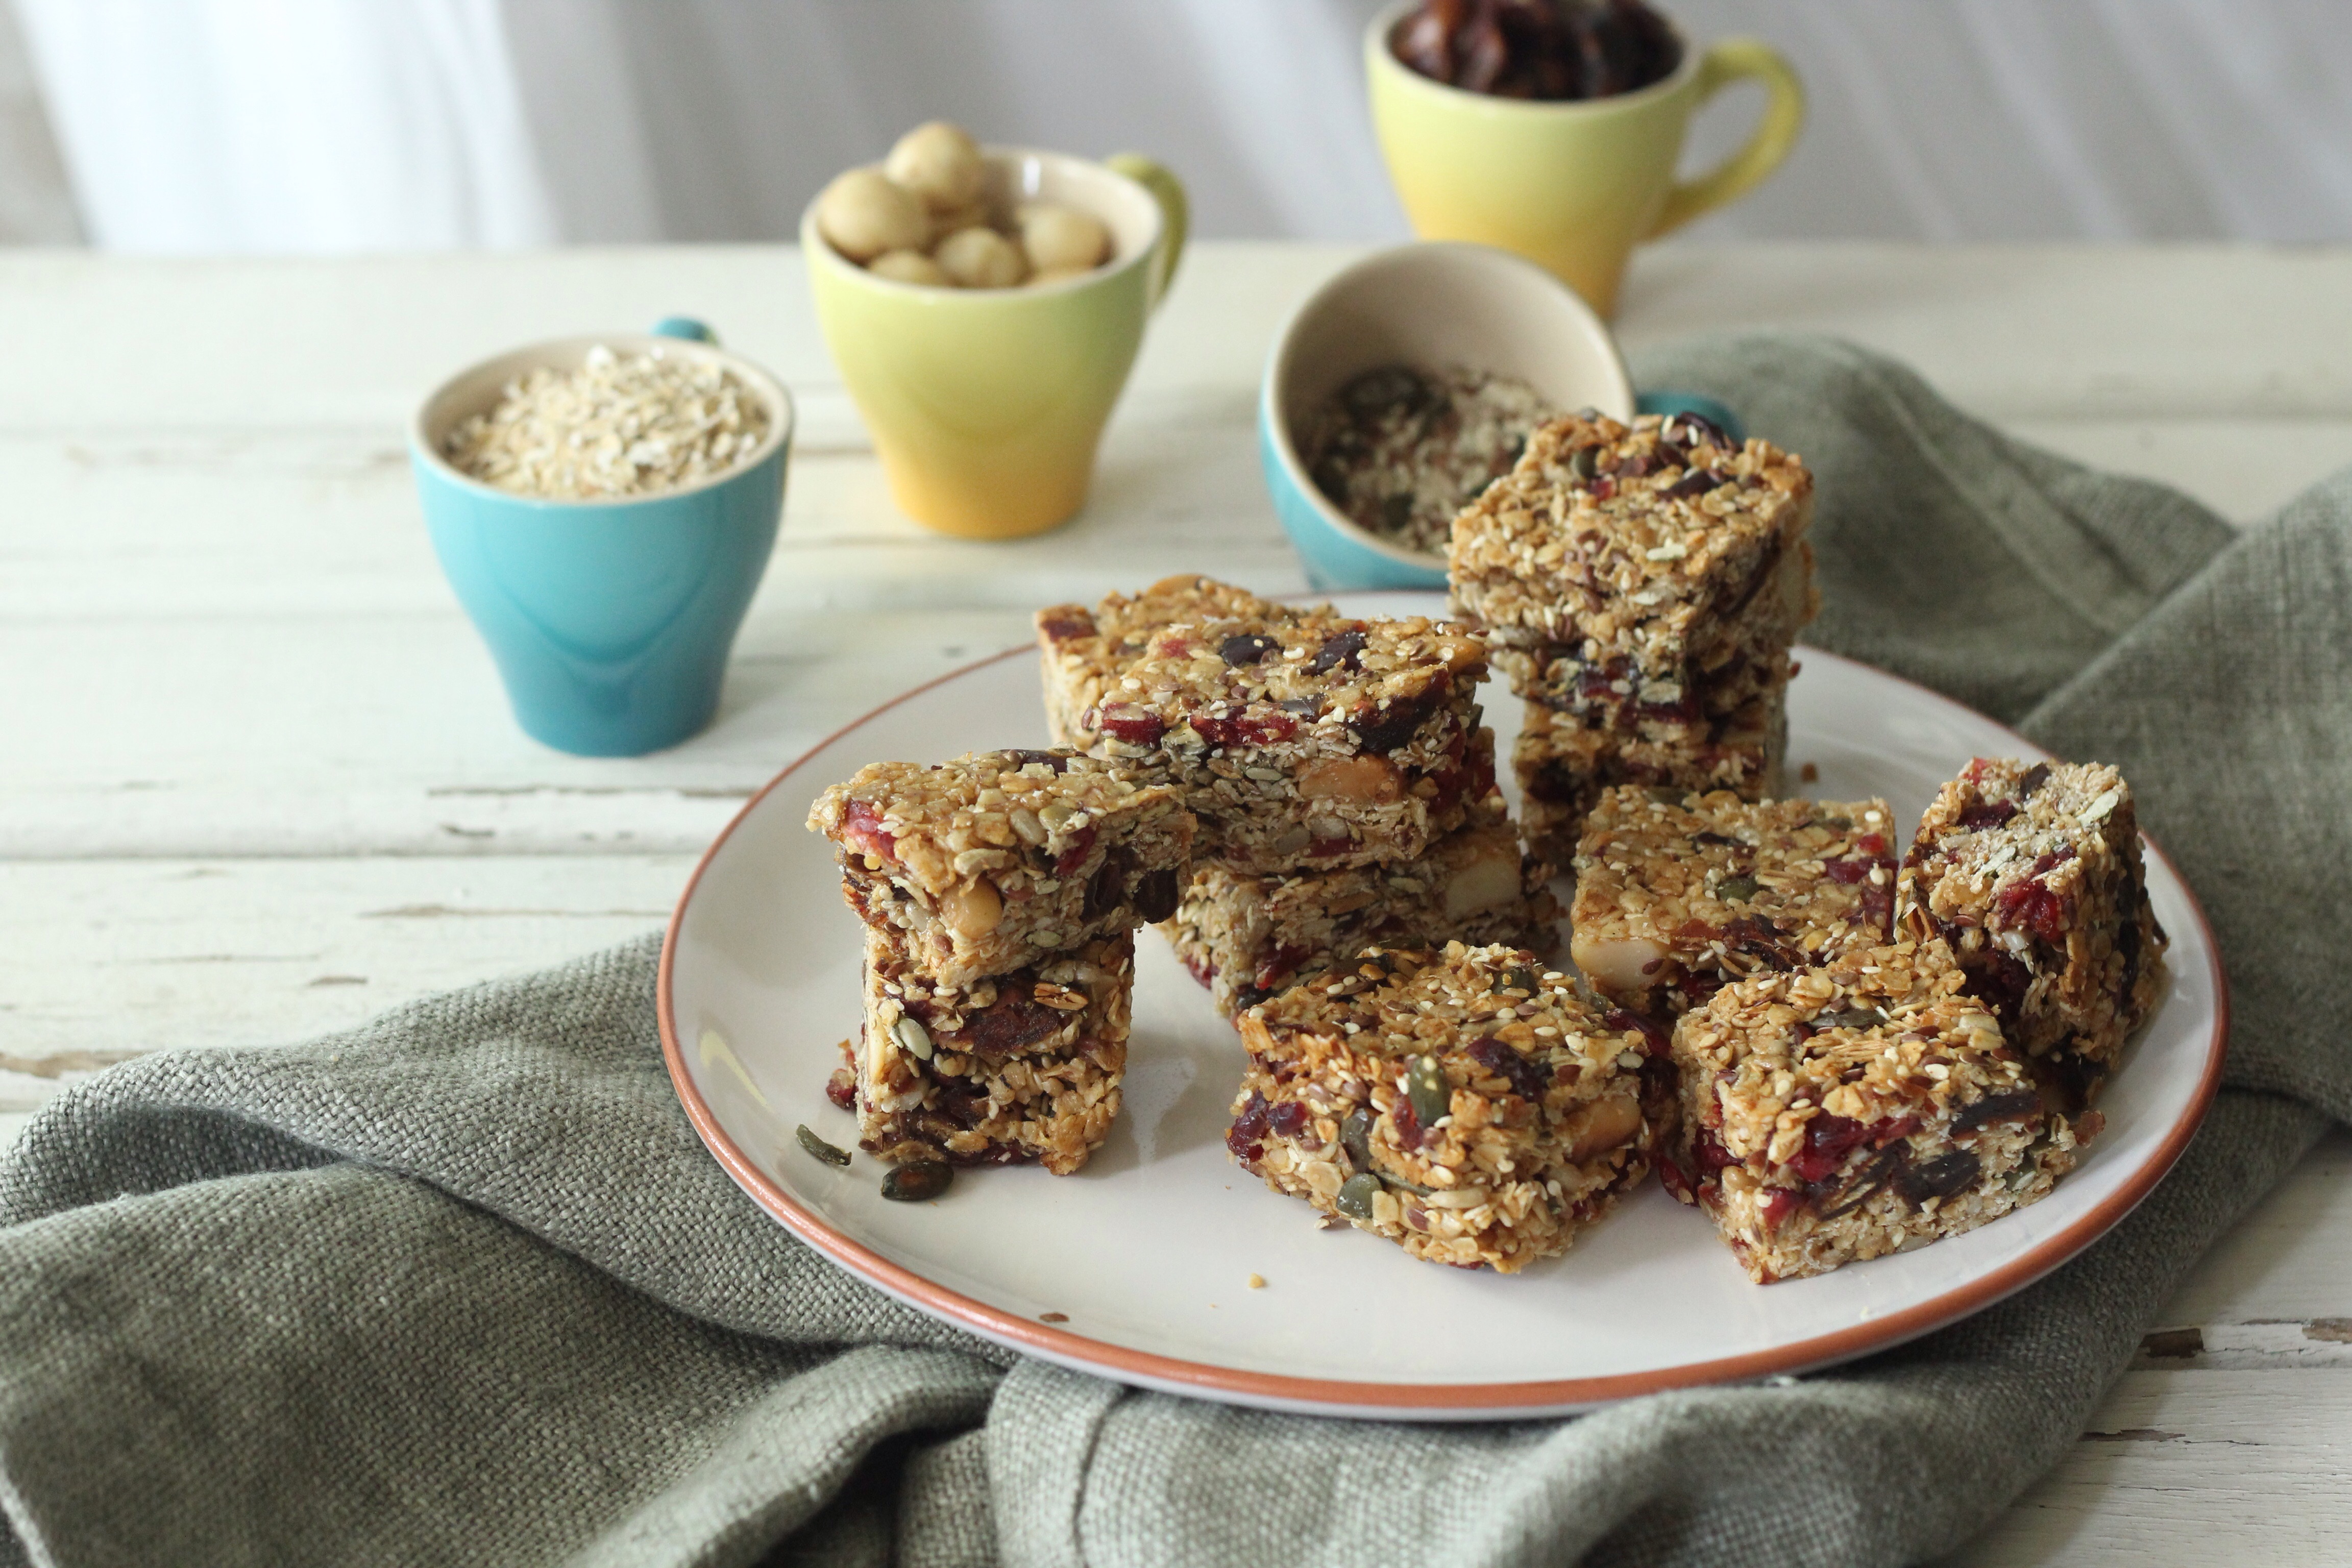
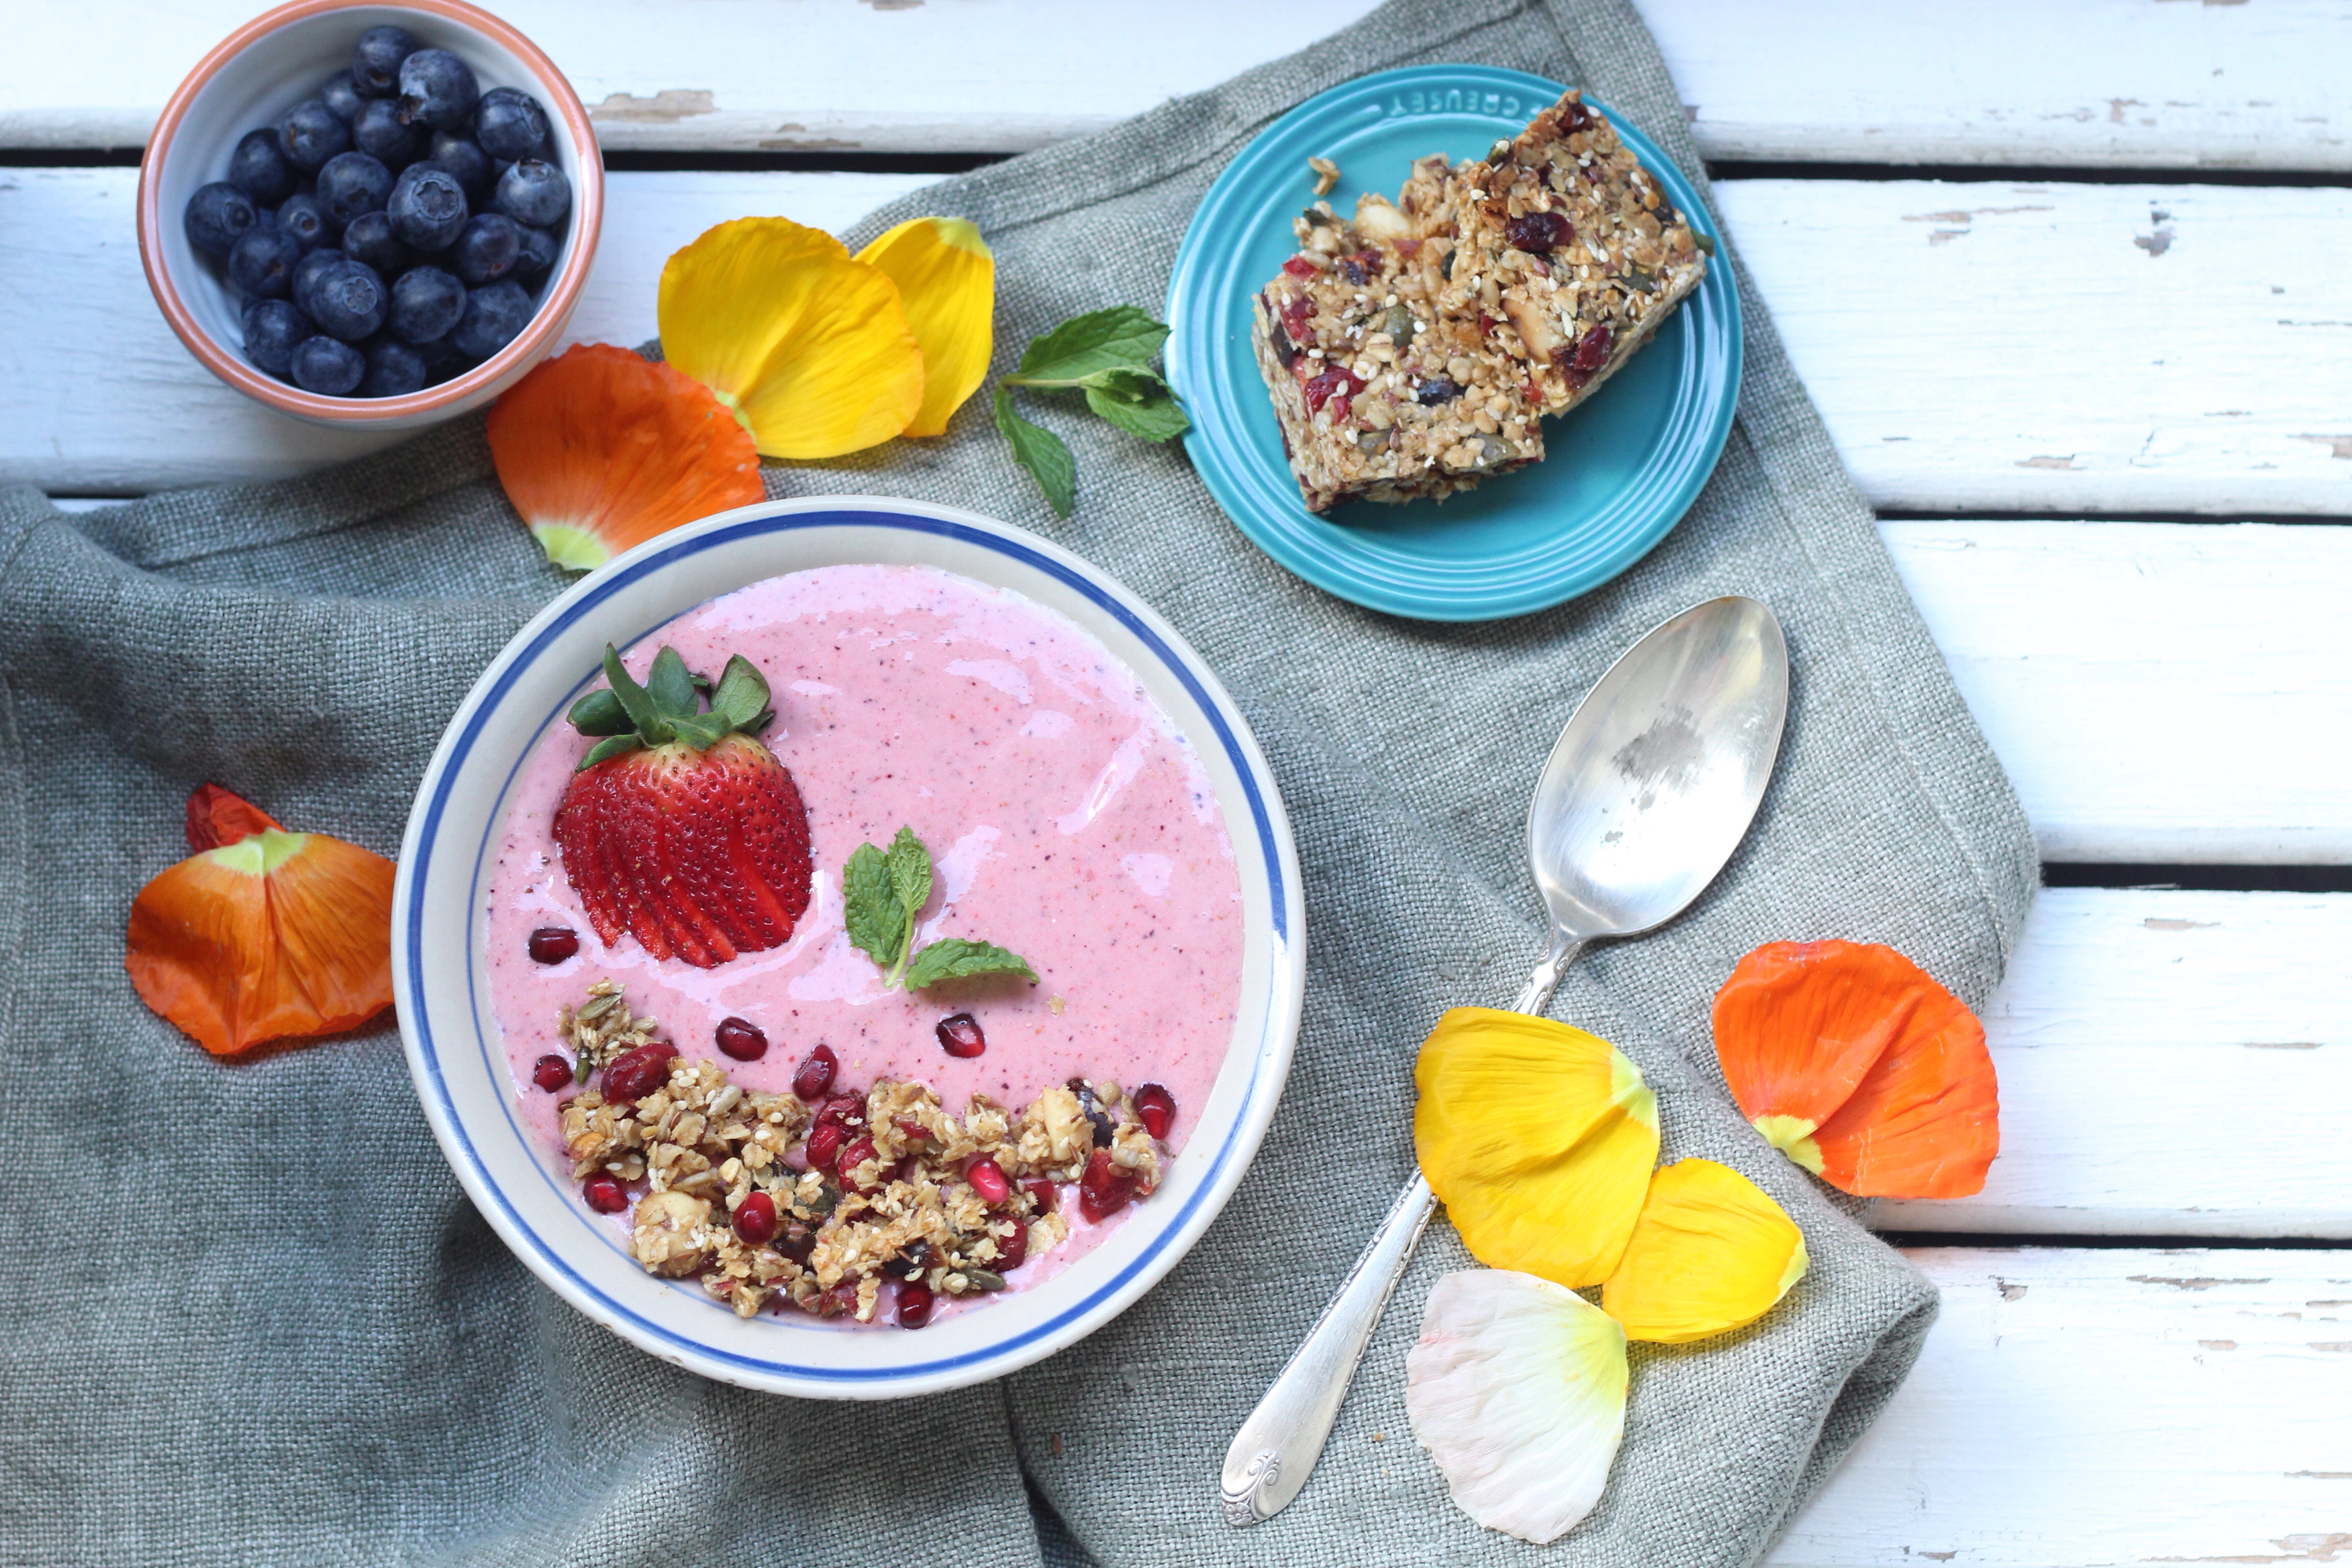
Every week I mix up a batch of granola bars, every week a different recipe, each week a different taste and texture. I’ve never been happy with any recipe I’ve tried until I tried this one. Whilst looking for inspiration for my next post and researching recipes, I had the TV on the food network channel on a really soft yet audible tone. When I noticed Anna Olsen about to make her Granola bar recipe, I stopped searching and adjusted the volume with all eyes on the screen. Her recipe seems very easy and tasty and had me wondering what have I been doing all this time with all these disappointing granola bar recipes! Sunday, I schleped my partner along to a prop and background sourcing haul at the Milnerton Flea market. Feeling quite chuffed with all my treasures I couldn’t wait to play around and shoot something with them. I made the granola bars on less than a few hours sleep and much zeal after my haul. I couldn’t believe how easy and fuss free the recipe was, I toasted the oats and nuts along with a seed mix which consists of pumpkin, linseeds, sunflower and sesame seeds and added to all the ingredients along with the melted coconut oil and warmed honey pressed down firmly in a parchment fitted pan and baked for 15 minutes. Allow to cool completely in the pan before slicing. I cooled in the fridge to set further, to have a more firm and chewey texture you don’t have to do this(I just wanted to be sure that this time when I cut into the bars they won’t fall apart instantly). It was indeed love at first bite, I love the crunch and saltiness of the salted and roasted macadamia nuts and the tartness of the cranberries married with the sweetness of the dates.A match made in heaven. I love how I can control what goes into the bars, as opposed to the mysterious artificial ingredient packed store bought ones. I make these scrummy bars for my partner to take along to work as a midday ‘pick me up’ snack and the bars are great for kids to take along to school for a healthy energy boost. I decided to make a smoothie bowl as a great idea to use the granola bars as part of a full breakfast meal, the quick and easy on the go option might not be for all. I used my trusty NutriBullet to blitz up berries, frozen banana slices, coconut milk and water to thin it down. serve in a bowl or cup with the crushed granola bar pieces.
As I type this blog post, my iPad is covered in sticky finger marks from all the constant munching on these glorious granola bars.
The photos were taken around noon and late afternoon as the sun decided to make a late appearance for the day. I love my new props and background and as you can tell I am still trying to find my own style of shooting and styling. This takes time and patience, I am not the most patient person but I am certainly learning to be…


 Here’s to many more firsts! xo